Setup
How to set up a Dialogflow integration
This guide will walk you through the process of connecting a Dialogflow agent to your Meya app.
Before you begin
This guide assumes you already have a Dialogflow agent. If you haven’t created one yet, please refer to the Dialogflow documentation: Quickstart: Build an agent
This guide also assumes you have your local development environment set up and connected to a Meya app.
Create a service account
A service account is a special type of Google account that allows a non-human user to authenticate and access Google APIs. In this case, your Meya app needs a service account to send user input to Dialogflow.
-
Go to your Dialogflow console and choose the agent your want to connect. Click the gear icon next to the agent’s name to open the agent’s settings.
-
On the General tab, find the Project ID field. Click on the project ID to open the project on the Google Cloud Platform (GCP).
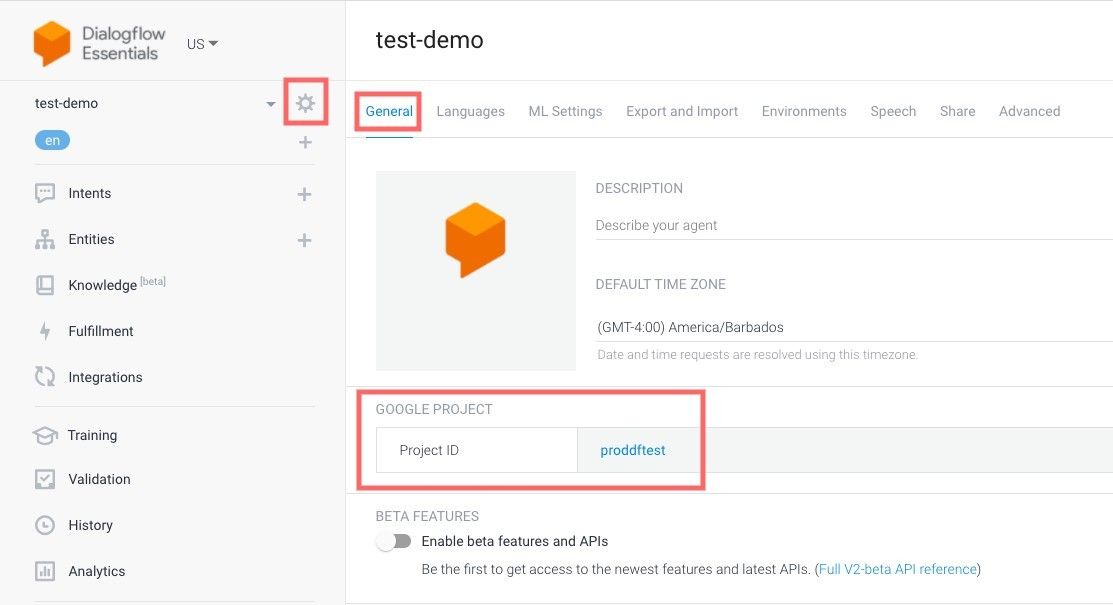
Depending on when the agent was created, you may not be able to click the project ID itself. Instead, click the Google Cloud link next to the project ID (see image below).

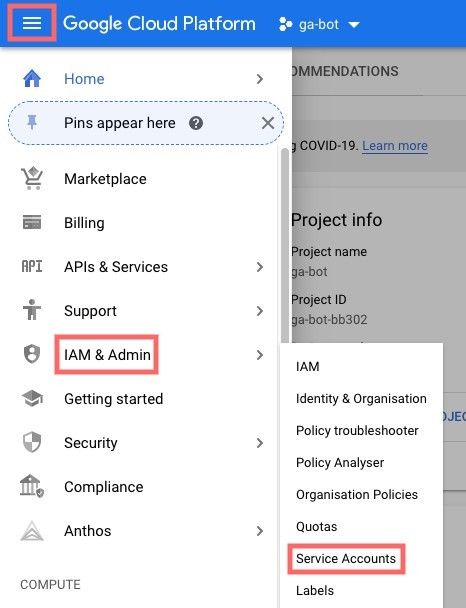
- From the GCP menu, go to IAM & Admin → Service Accounts.
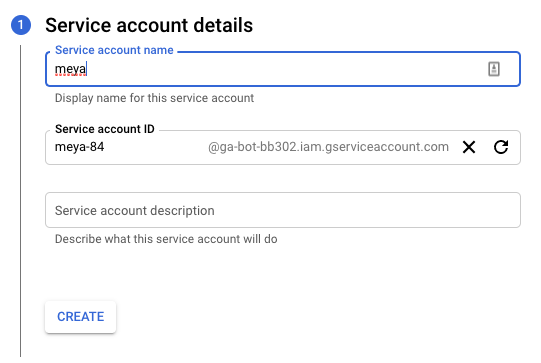
- Click Create Service Account. Give the service account a name (e.g.
meyaorbot). Click Create.
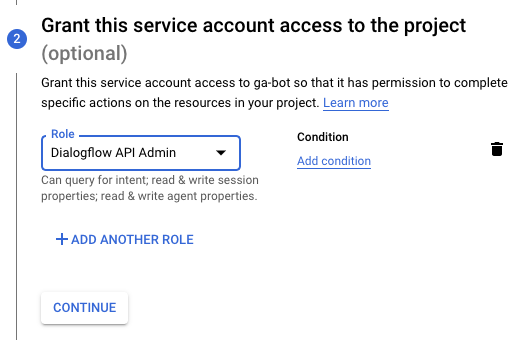
- In the Select a role dropdown, search for Dialogflow API Admin, select it, then click Continue.
- There is no need to fill out the final section. Click Done.
You should now see your new service account listed in the service accounts table.
- Click the three dots in the Actions column of your new service account and select Create key.
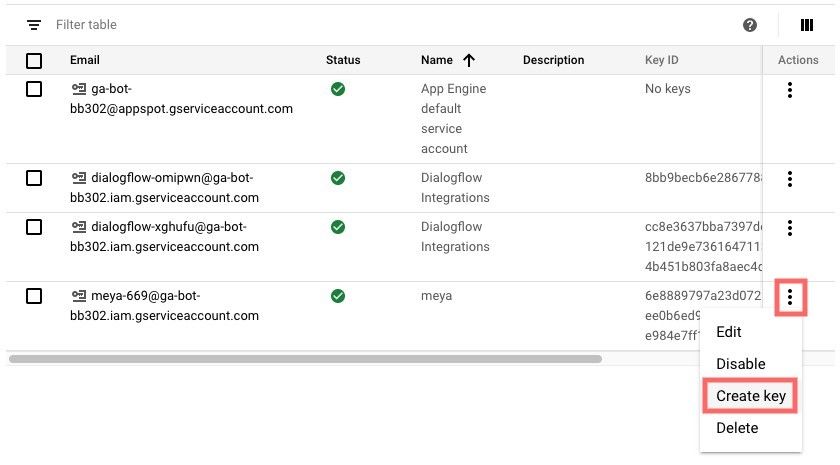
- Make sure Key type is set to JSON, then click Create. A JSON file will be downloaded to your computer.
So far you’ve created a service account with permission to access Dialogflow. You’ve also downloaded a private key so your Meya app can use the service account. In the next section we’ll add this key to your app’s vault.
Setting up the Dialogflow integration on Meya
Make sure you have your Meya app code open in your IDE, along with a terminal. We recommend using PyCharm, which includes it’s own terminal. If you’re using a virtual environment, make sure it’s activated.
Give Meya permission to use your Dialogflow agent
- Open
vault.yamland add a new line for the Dialogflow service account key.
dialogflow.service_account_key: xxxSave the file.
-
Open the JSON key file you downloaded in the previous section. Copy the entire file contents, including the open
{and closing}brackets. -
In your app’s main folder, create a file called
vault.secret.yaml, if it doesn’t already exist.
As the name suggests,vault.secret.yamlcontains secret information that shouldn’t be committed to version control. In fact, we’ve already created an entry for it in your app’s.gitignorefile.
Open vault.secret.yaml and create a new entry for the Dialogflow service account key. Paste in the contents of the key file that you copied in the previous step. It should look something like this:
dialogflow.service_account_key: {
  "type": "service_account",
  "project_id": "<PROJECT_ID>",
  "private_key_id": "<PRIVATE_KEY_ID>",
  "private_key": "-----BEGIN PRIVATE KEY-----\nSECRET_STUFF\n-----END PRIVATE KEY-----\n",
  "client_email": "<CLIENT_EMAIL>",
  "client_id": "<CLIENT_ID>",
  "auth_uri": "https://accounts.google.com/o/oauth2/auth",
  "token_uri": "https://oauth2.googleapis.com/token",
  "auth_provider_x509_cert_url": "https://www.googleapis.com/oauth2/v1/certs",
  "client_x509_cert_url": "https://www.googleapis.com/robot/v1/metadata/x509/<CLIENT_EMAIL>"
}
Save the file.
- Upload the updated vault secrets.
meya vault upload --file vault.secret.yamlAdd the Dialogflow integration to your Meya app
- In your app’s main folder, create a folder called
integration, if it doesn’t already exist. Inside theintegrationfolder, create a file calleddialogflow.yaml. Open the file and put this code in it:
type: meya.google.dialogflow.integration
service_account_key: (@ vault.dialogflow.service_account_key )
Check out the example integration in the demo-app
Notice that instead of pasting the service account key directly into our code, we’re using a reference to the key we saved in the vault. This is the most secure way to use API keys, tokens, and other information that should remain private.
- Create a new flow and enter this code:
triggers:
  - integration: integration.dialogflow
    expect: dialogflow

steps:
  - say: Here's the response from Dialogflow...
  - say: Details (@ flow.get("dialogflow_response") )
Save your work, then run these commands in the terminal:
meya format
meya push
In your browser, navigate to your app’s chat simulator. Try entering text you know will match an intent in Dialogflow. The flow you just created should launch and display the payload returned to the app by Dialogflow.
Troubleshooting
If you’re not getting a response, check the following:
- Make sure the name of the Dialogflow secret in your
vault.secret.yamlfile matches the name you used in theintegration/dialogflow.yamlfile. - Make sure you uploaded the new secret to your remote vault using the
meya vault upload --file vault.secret.yamlcommand. - Make sure the text you entering actually matches an intent in Dialogflow. You can test this using the chat simulator built into Dialogflow.
- Check your terminal for errors that may have occurred while running the
meya checkcommand. - Check your app logs for a Dialogflow response entry. In the search field, enter
type:meya.http.entry.response url:*dialogflow*.
You’ve connected your app to Dialogflow!
Next steps
The Dialogflow trigger and component support more advanced intent and language filtering. Check out our documentation for the complete list of options:
Reference
Dialogflow trigger
Dialogflow ask component
Dialogflow ask form component
Dialogflow detect component
Be sure and check out our demo app for full code examples.
Updated 6 months ago
