
Setup
How to set up a Zendesk Support integration
Learn how to set up a Zendesk Support integration, then increase agent productivity using the strategies in the Advanced Usage section.
Before you begin
You’ll need to have the Administrator role in Zendesk Support to complete some of the steps.
Adding the Zendesk Support integration
Create a bot agent
You’ll need to create a user in Zendesk Support that will represent your Meya app. Let’s do that now.
It’s important that you create a new user account specifically for the app. Sharing this user account with a human agent will result in unexpected behaviour.
- Log in to Zendesk Support. Click the gear icon to access the settings menu. Under Manage, select People. Click the Add user button.

- Give the user a name such as
MeyaorBot. Enter an email address for the user.
If you don’t have an email account specifically for the bot user, you can use this method:YOUR_EMAIL+bot@YOUR_DOMAIN.com
For example, if your regular email address is
[email protected], you can set your bot’s email address to[email protected]. Email address to this address will go to your regular inbox.
Click Add to finish creating the bot user.
- Log out of Zendesk and login using the bot agent account before continuing the setup instructions.
Create an API token
- Click the gear icon to access the settings menu. Under Channels, select API. Enable token access, then click the Add API Token button.

- Give your token a useful description, such as the name of your Meya app.
Copy the token somewhere before saving. You’ll need the token later and it won’t be possible to view it after saving the token.
Click Save.
Create the integration in Meya
Using the Meya Console
- Open the Meya Console.
- Select your app from the app list.
- Go to the Integrations page.
- Find the Zendesk Support integration and click Add.
- Past the following configuration into the editor
type: meya.zendesk.support.integration
subdomain: (@ vault.zendesk.support.subdomain )
bot_agent_email: (@ vault.zendesk.support.bot_agent_email )
bot_agent_api_token: (@ vault.zendesk.support.bot_agent_api_token )
target_password: (@ vault.zendesk.support.target_password )- Click the Save button.
Using the Meya CLI
In your app’s root folder, create a folder called integration, if it doesn’t already exist. Inside, create a subfolder called zendesk. Inside the subfolder, create a file called support.yaml and enter this code:
type: meya.zendesk.support.integration
subdomain: (@ vault.zendesk.support.subdomain )
bot_agent_email: (@ vault.zendesk.support.bot_agent_email )
bot_agent_api_token: (@ vault.zendesk.support.bot_agent_api_token )
target_password: (@ vault.zendesk.support.target_password )
Save the file. You will setup the correct vault values in the next sections.
Add secrets to the vault
The vault is used to store secret information that shouldn't be committed to version control.
You need to set the following keys in your app vault:
zendesk.support.subdomain: your Zendesk Support instance's custom subdomain.zendesk.support.bot_agent_email: the email of the Zendesk Support agent that the bot will use to manage tickets and users. We always recommend that you create a specific bot user in your instance so that all the bot tickets and messages are correctly attributed. See thezendesk.support.bot_agent_api_token: the API token for the bot user, this will allow the Meya app to make API calls to your Zendesk Support instance.zendesk.support.target_password: Create a password using numbers, characters and symbols. You will add this password to the Zendesk Support webhook so that the Meya app can authenticate the incoming webhooks.
Add it using the Meya Console
- Open the Meya Console.
- Select your app from the app list.
- Go to the Vault page.
- Add the above keys and set the values.

Add it using the Meya CLI
Open vault.secret.yaml and add the same code:
zendesk.support.subdomain: ZENDESK_SUPPORT_INSTANCE_SUBDOMAIN
zendesk.support.bot_agent_email: BOT_AGENT_EMAIL
zendesk.support.bot_agent_api_token: BOT_AGENT_API_TOKEN
zendesk.support.target_password: CREATED_PASSWORD
Save the file and upload the new secrets to your vault:
meya vault upload --file vault.secret.yamlGet your app's Zendesk integration webhook
To receive messages from Zendesk Support in your Meya app, you'll need to get your app's webhook URL and add it to Zendesk.
Get your webhook from the Meya Console
- Open the Meya Console.
- Select your app from the app list.
- Go to the Integrations page.
- Find the Zendesk Support integration and click Edit.
- Click the Webhook button.
- Copy the webhook URL.
Get your webhook from the Meya CLI
- Run this command in your terminal:
meya webhooksMake a note of the Zendesk Support webhook. It’ll look something like this:

Create a webhook in Zendesk Support
When migrating from target to webhook make sure to delete old targets before continuing with the configuration
Next, you’ll add your app’s Zendesk Support webhook to your Zendesk instance so Zendesk can send your app events. Later, we’ll create flows that respond to these ticket lifecycle events.
- Go to Zendesk Admin Center.

- Under Apps and Integrations select Webhooks.
- Click Actions.
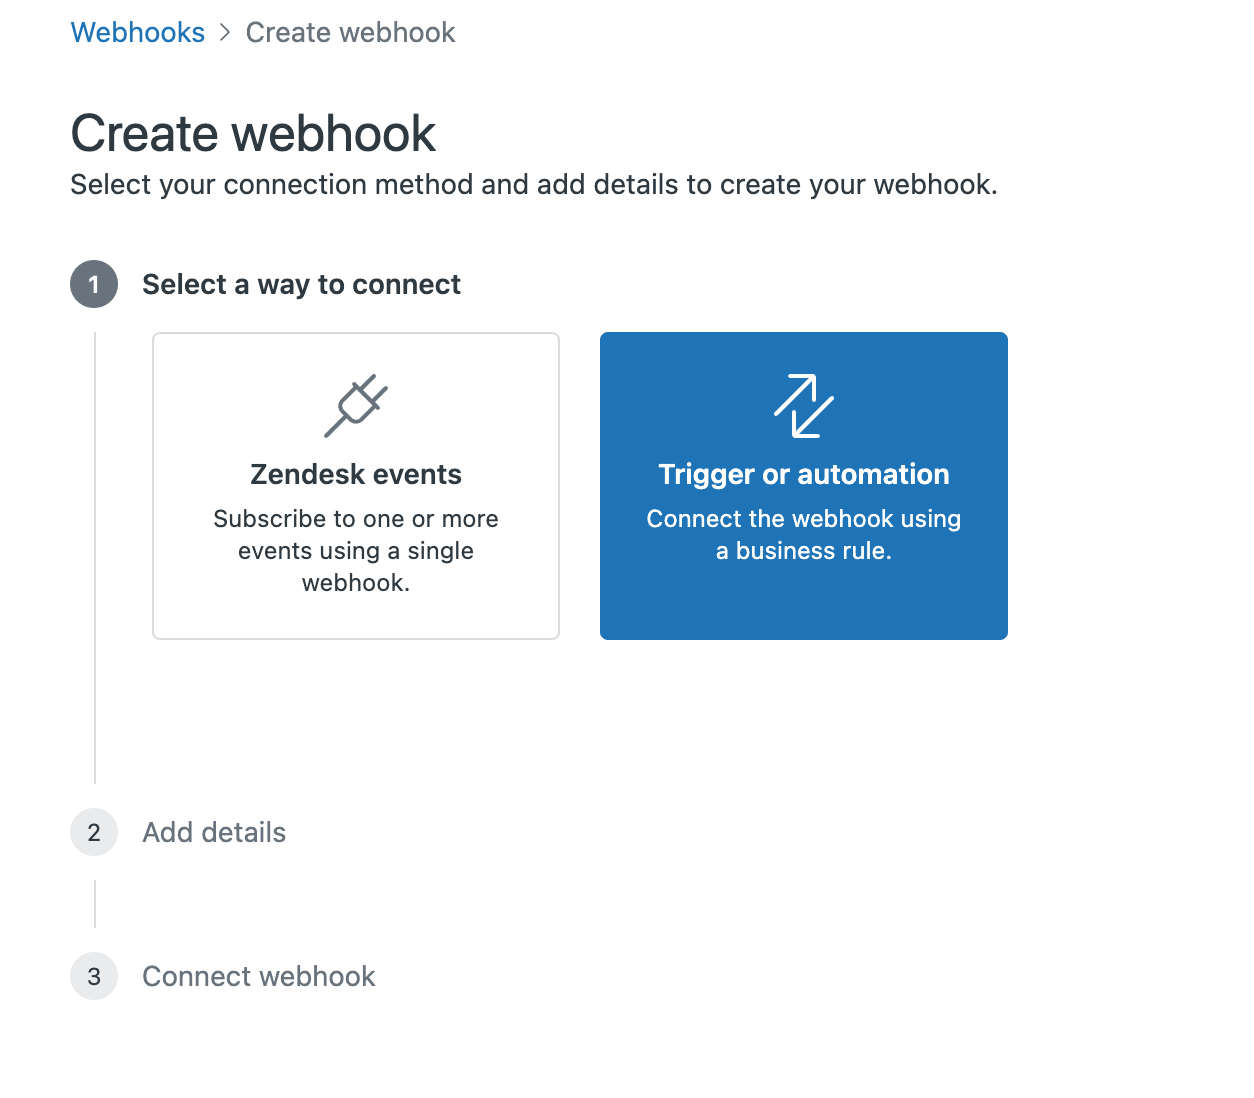
- Click Create Webhook.
- Select Trigger or automation and click Next
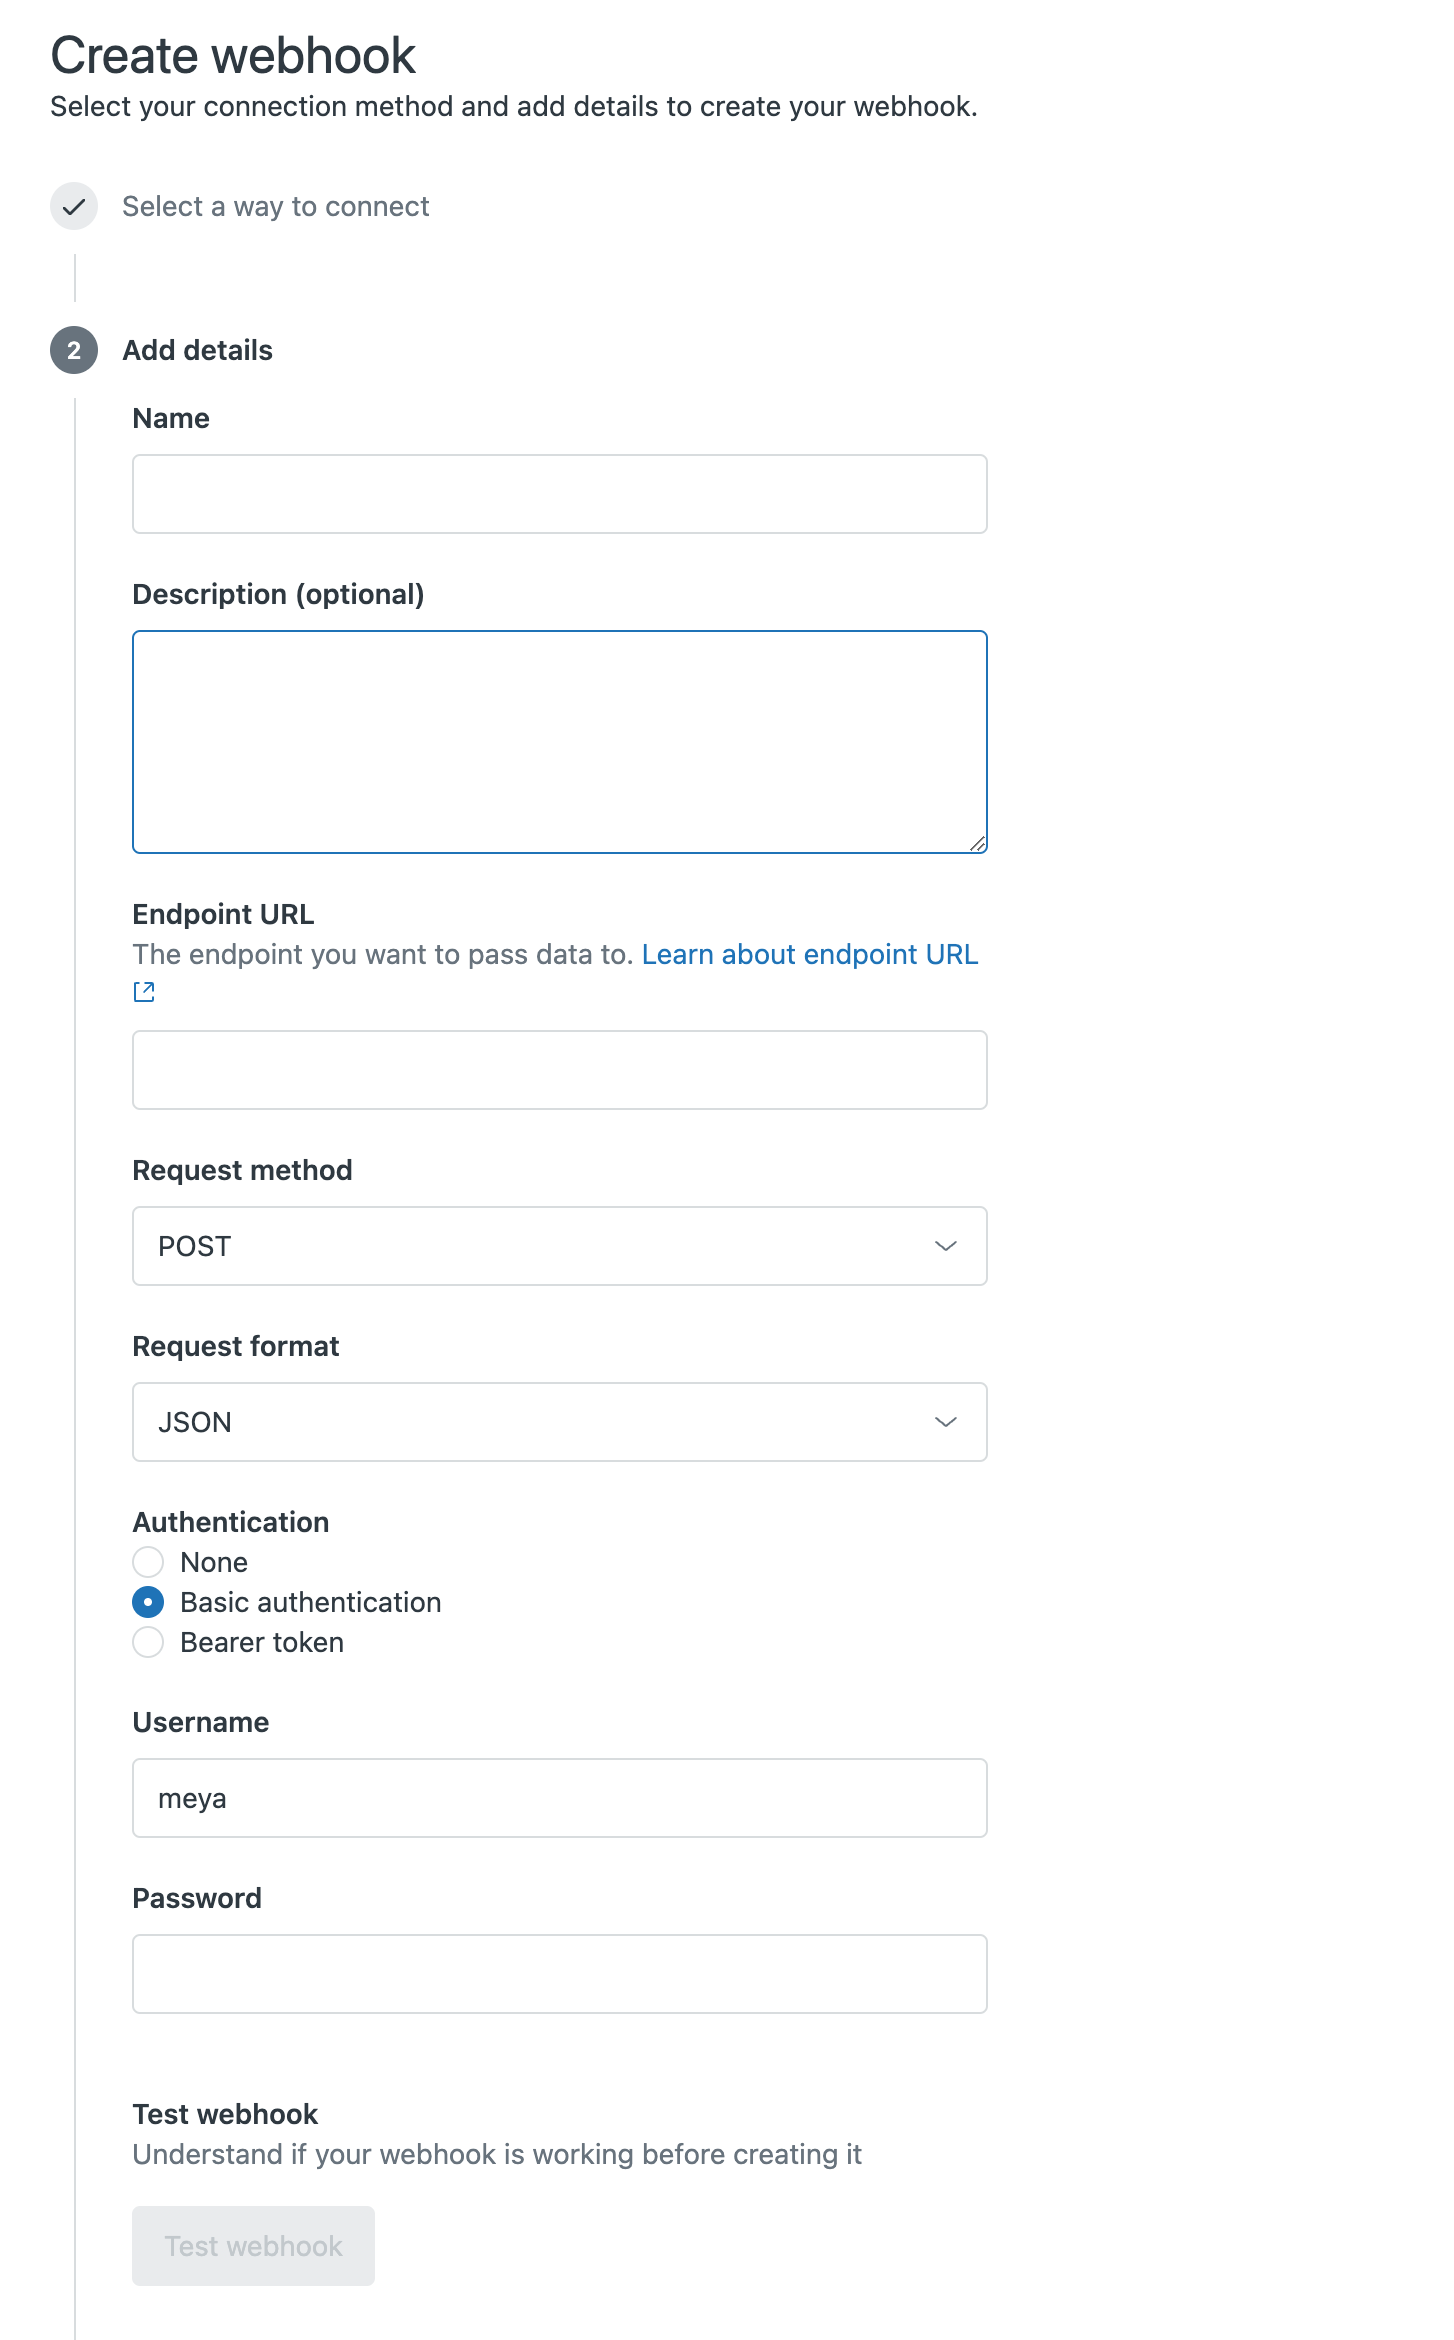
- Fill the webhook data:
- Endpoint URL: Paste the webhook URL you copied from the previous sections.
- Request method: POST
- Request format: JSON
- Authentication: Basic Authentication
- Username:
meya - Password: Paste the password you created for the
zendesk.support.target_passwordvault key.
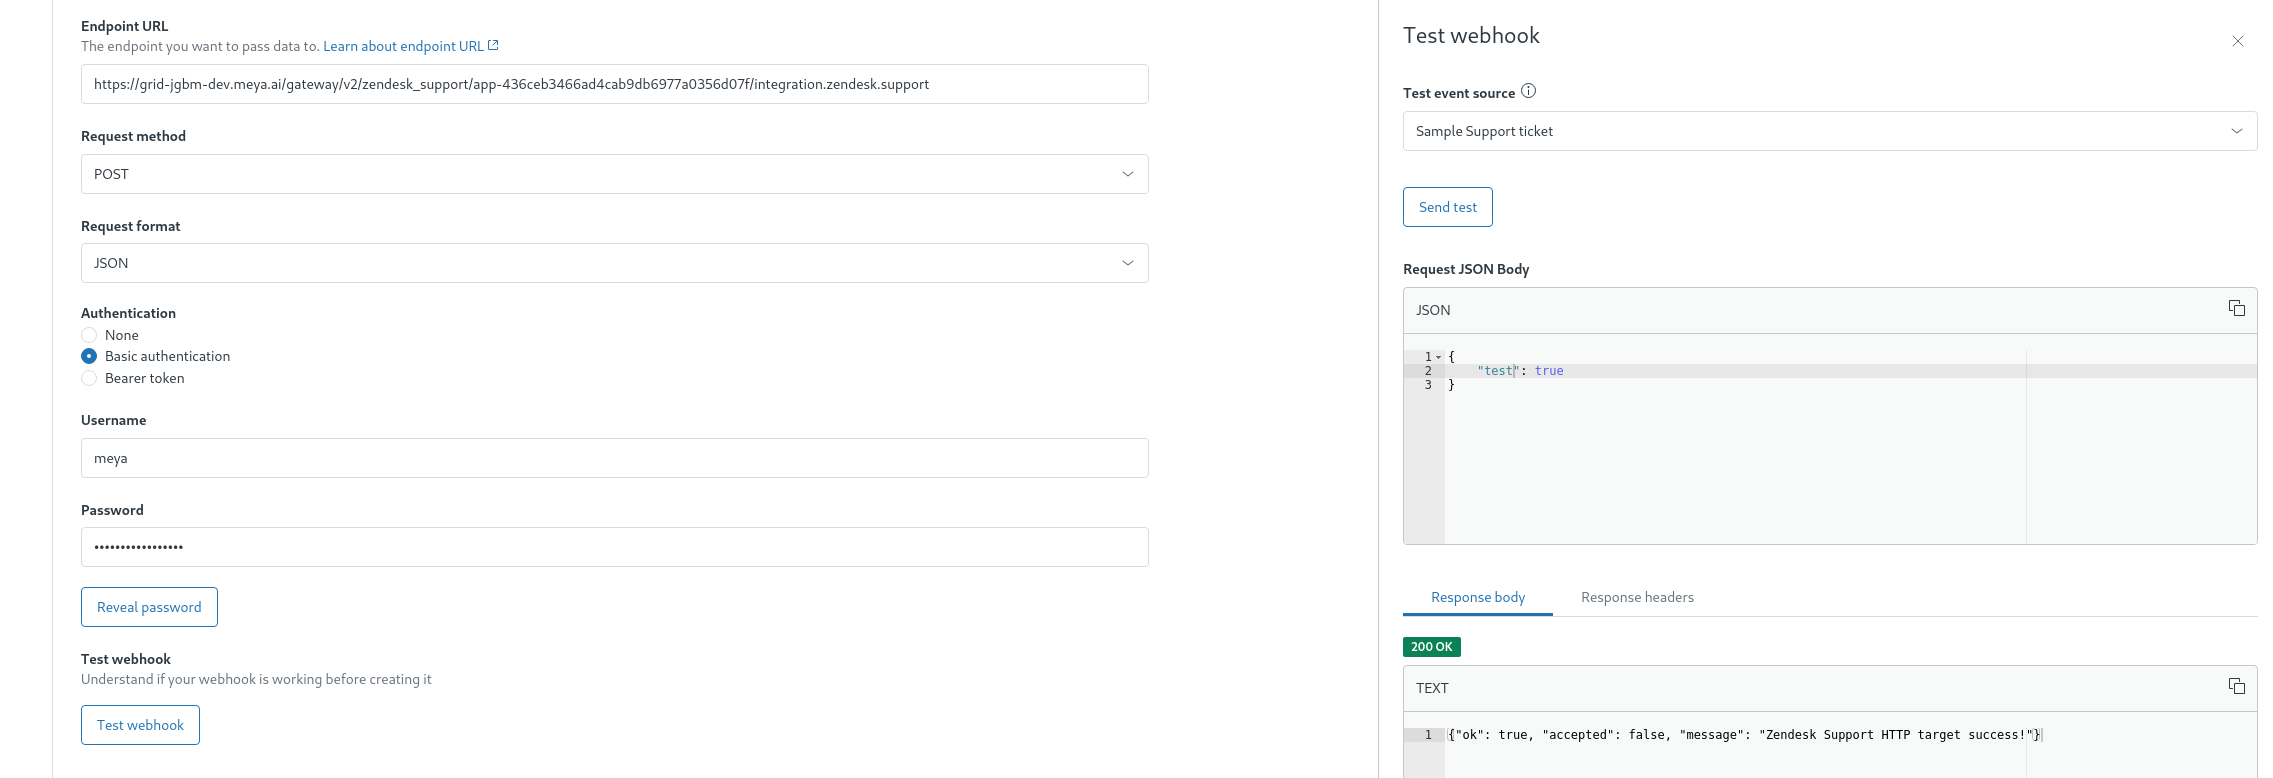
- Make sure to test the webhook.
- Click the *Test webhook button.
- In the Request JSON Body box, replace the JSON with the following:
{
  "test": "abc"
}- Click Send test.
- You should get a
200response code.
Create the Zendesk trigger
Next, you’ll create a Zendesk trigger that notifies our webhook whenever a ticket is created or updated.
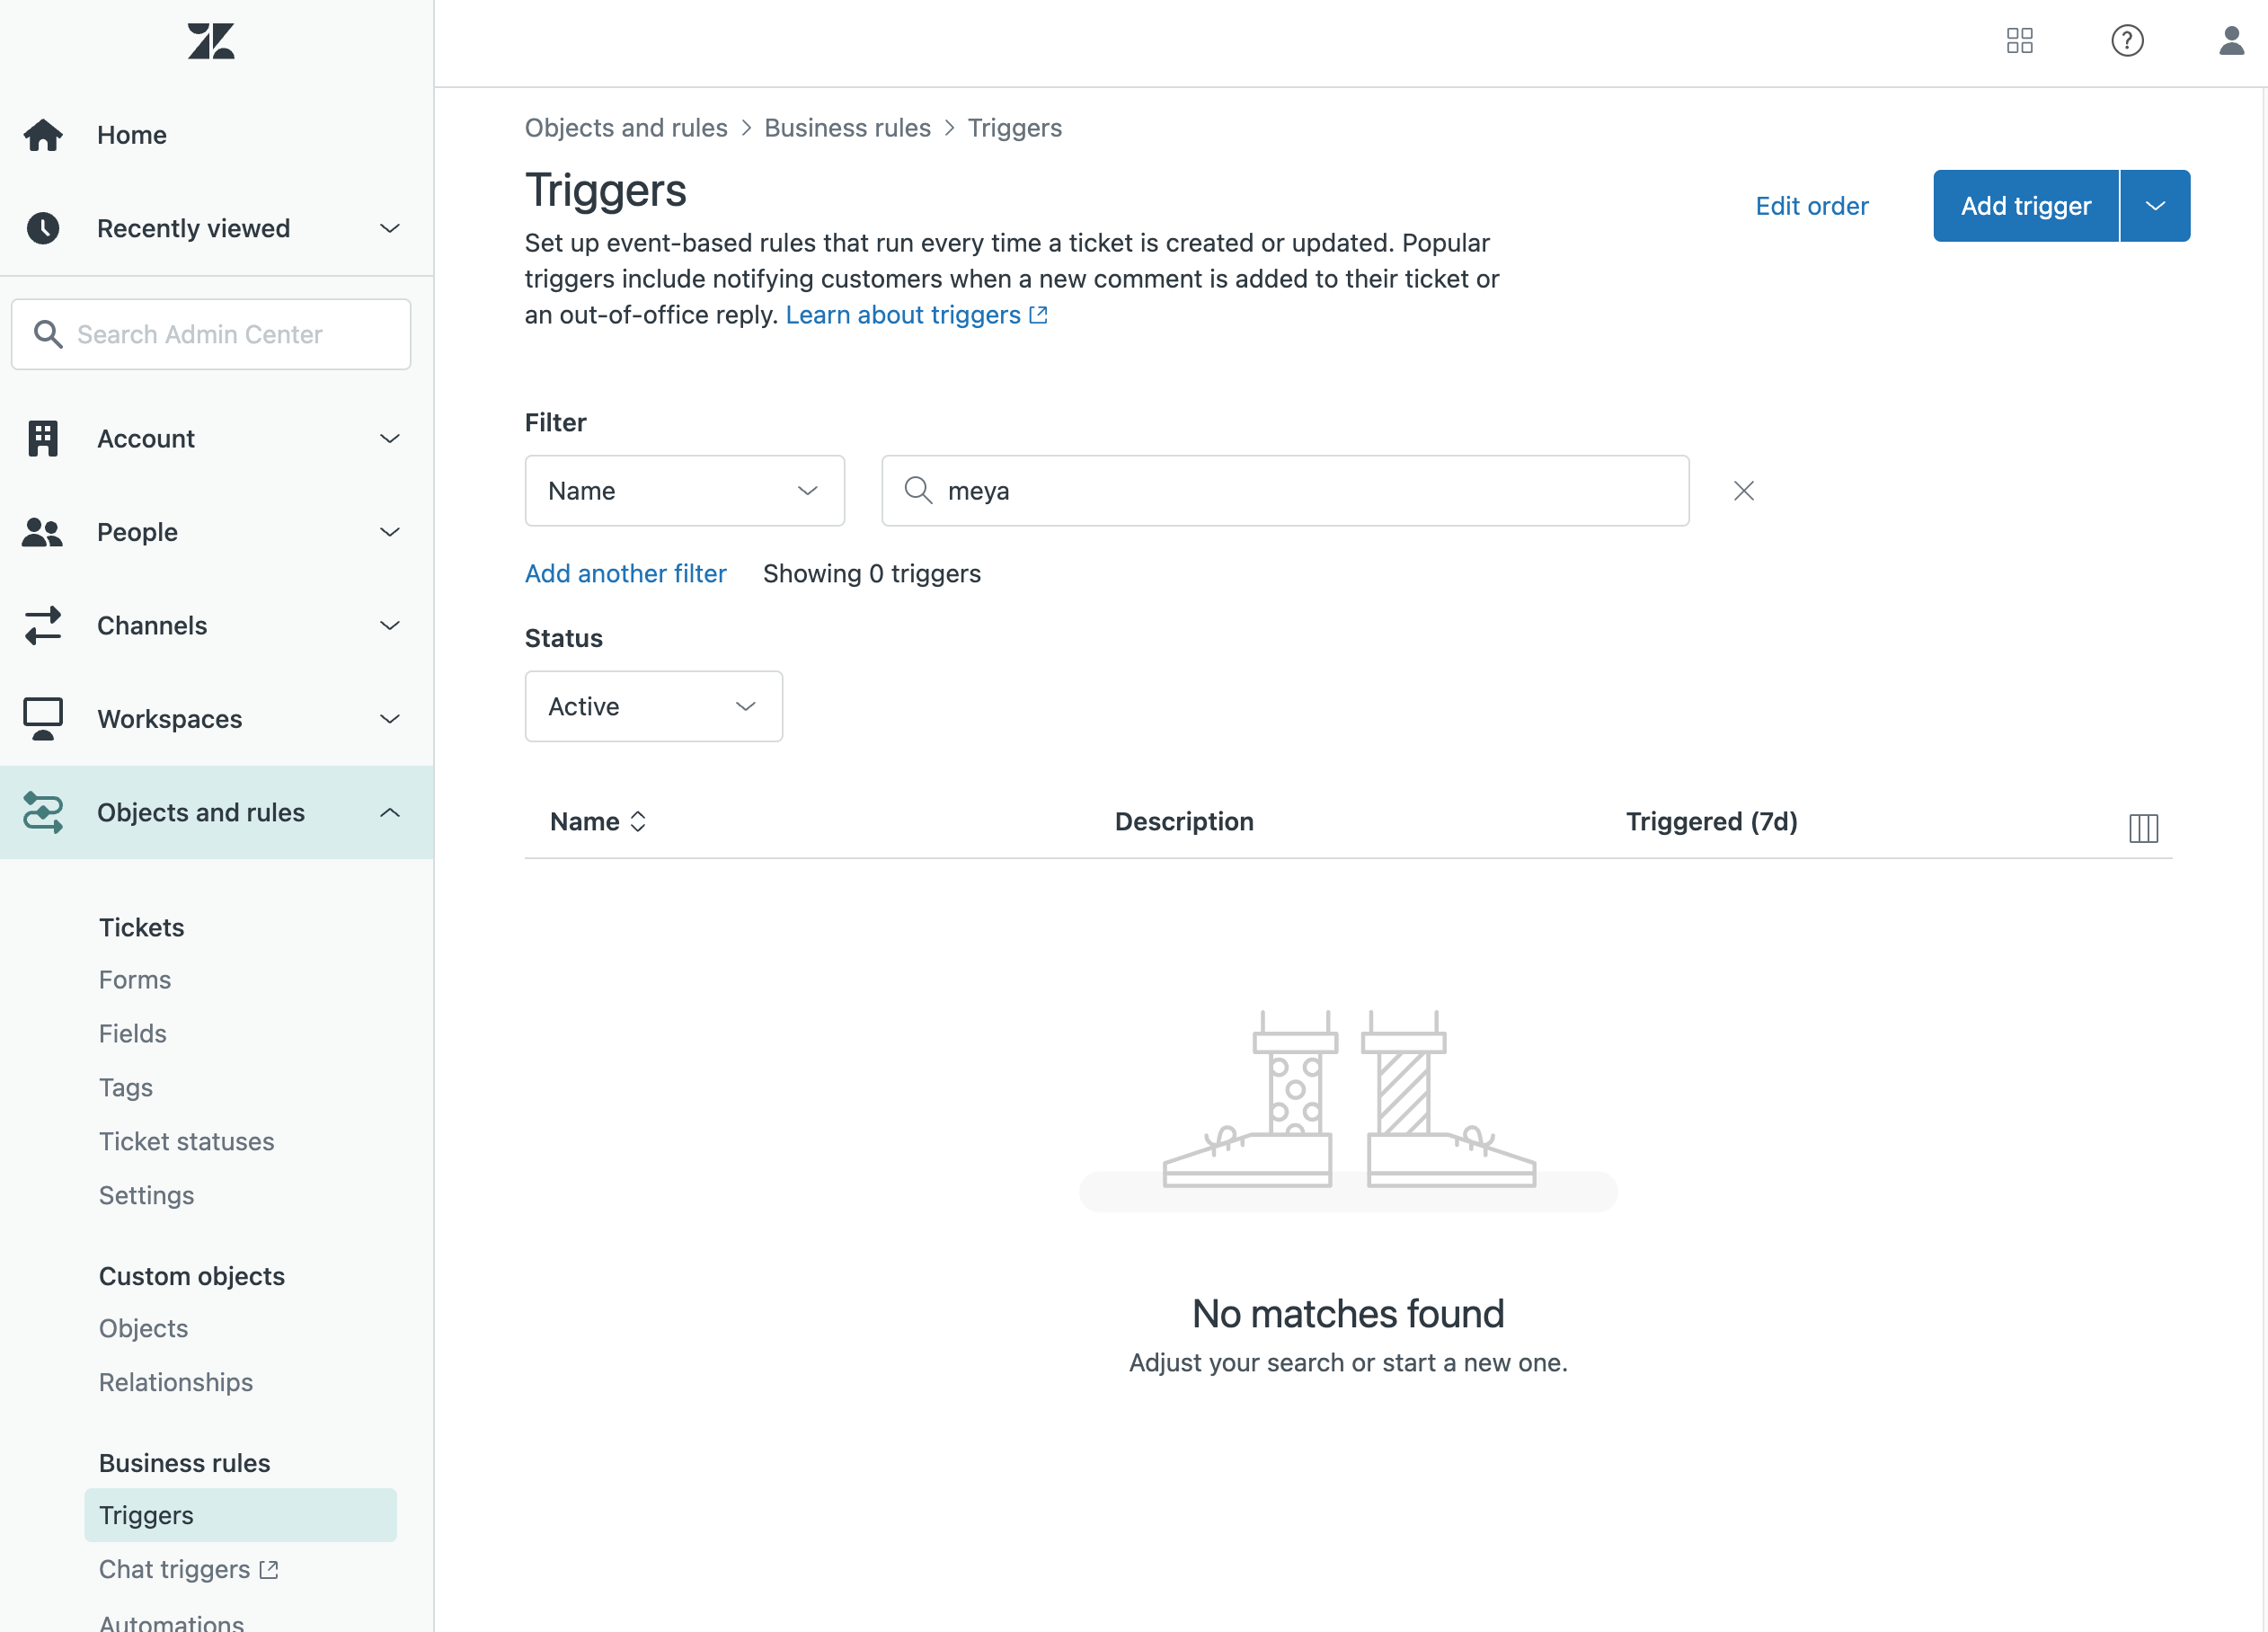
- Go to Zendesk Admin Center.
- Under Objects and rules select Triggers.
- Click the Add trigger button.
- Give the trigger a descriptive name, like
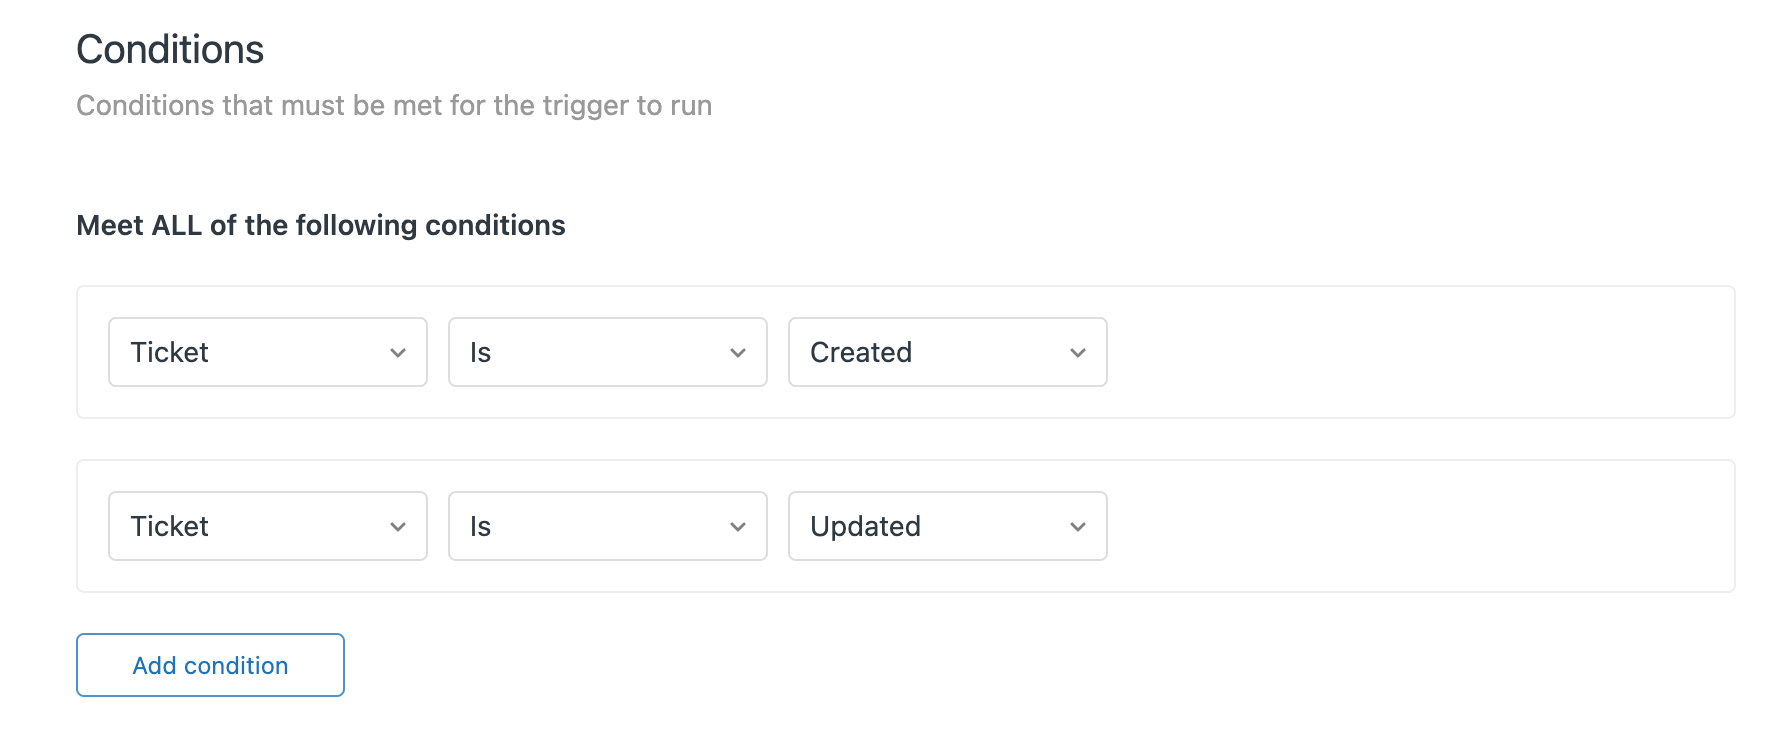
Notify Meya. - In the Conditions section, under Meet ANY of the following conditions, click the Add condition button.
- Select Ticket from the first dropdown, and Created from the last dropdown.
- Click the Add condition button to add a second condition.
- Select Ticket from the first dropdown and Updated from the last dropdown.
- Under the Actions section, click Add action.
- From the dropdown, choose Notify active webhook.
- In the second dropdown, choose the webhook you created earlier.
- In the JSON body field, enter this code:
{
    "ticket_id": "{{ticket.id}}",
    "updated_at": "{{ticket.updated_at_with_timestamp}}",
    "current_user_id": "{{current_user.id}}"
}- The form should look like this when you’re done:

- Click Create to save the trigger.
Create a flow
Let’s create a flow that will create a ticket in Zendesk Support.
- In your app’s
flowfolder, create a subfolder calledzendesk. Inside the subfolder, create a file calledescalate.yaml. Copy this code into the file:
triggers:
  - keyword: escalate

steps:
  - (check_name)
  - if: (@ user.name )
    then:
      jump: check_email
    else: next
  - ask: What is your name?
  - user_set:
      name: (@ flow.result )

  - (check_email)
  - if: (@ user.name )
    then:
      jump: create
    else: next
  - ask: What is your email?
  - user_set:
      email: (@ flow.result)

  - (create)
  - type: meya.zendesk.support.component.user.create_or_update
    integration: integration.zendesk.support
    name: (@ user.first_name )
    email: (@ user.email )
  - type: meya.zendesk.support.component.ticket.create
    integration: integration.zendesk.support
    requester_id: (@ flow.result.id )
    subject: This is a test subject
  - say: 'Ticket #(@ flow.result.id ) created. An agent will be here shortly...'
This flow will be triggered with the keyword escalate. In production you’ll want to find a more user-friendly way of launching this flow, such as a button or natural language.
Next, we collect some info from the user. While not required, we collect this info so we can pass it on to Zendesk.
For a complete list of user data you can send to Zendesk, take a look at our documentation for the zendesk.support.user.create_or_update component.
The create_or_update component returns an object representing the Zendesk user. In the next step, we create the Zendesk ticket and use the user’s Zendesk ID in the requester_id field.
The ticket.create component returns an object representing the Zendesk ticket. In the final step, we use this object to print the ticket ID.
Save the file and upload it:
meya format
meya push
Test the integration
- In the chat simulator, type
escalateto trigger the new flow. If you don’t have values already stored atuser.nameanduser.email, you’ll be asked to provide those. The bot should then provide you with a ticket ID.

- Log in to Zendesk Support as a human agent (do not use the bot agent’s account). Open Zendesk Support and confirm the ticket has been created.

- Enter a public reply, submit the ticket, and return to the chat simulator. Confirm that the agent’s message appears in the chat.

The Zendesk Support integration is now setup! Check out the Advanced Usage section below for next steps.
Troubleshooting
Zendesk user
Did you create a separate Zendesk user for the Meya app? The Meya app cannot share an account with a human agent as this can cause unexpected behaviour.
API token
When generating the Zendesk API token were you logged into the bot agent account? The API token is associated with the user that created it, so if you didn’t create the token as the bot agent, do that now, and update your vault secrets.
Upload vault secrets
Saving new data in vault.secret.yaml doesn’t update your remote vault. Remember to run this command whenever you update the vault:
meya vault upload --file vault.secret.yamlCheck the logs
From the app’s Logs page, do a search for url:*zendesk*. This will return all incoming and outgoing calls to Zendesk. Check the payloads for error messages.
Target failures
Zendesk has deprecated the old target based webhooks and now allow you to register webhooks that are connected to trigger rules. Zendesk targets used to deactivate if there were consecutive webhook request failures that would break the integration message flow. The Meya Zendesk Support integration had logic to automatically reactive the target under certain conditions, however, if you're still using Zendesk Support targets, then we highly recommend switching to Zendesk webhooks because webhooks do not deactivate on request failures.
Advanced usage
Agent commands
Did you know your agents can send commands to your Meya app and have it launch flows? Here’s how.
- Create a new flow called
say_hi.yamlthat uses the agent_command trigger:
triggers:
  - agent_command: say_hi

steps:
  - say: The agent says hi :)
Save the file and upload it:
meya format
meya push-
In the chat simulator, run the
escalate.yamlflow to create a ticket in Zendesk. -
In Zendesk, open the ticket, make sure you have Internal note selected, and enter this text:
/say_hiSubmit the ticket. Back in the chat simulator you should see the text from the say_hi flow.

Consider using agent commands for tasks like collecting additional information from users.
Detect ticket updates
You can use the meya.zendesk.support.trigger.ticket.update trigger to detect ticket updates. One way to use this feature is to offer “signposts”, like “Ticket was assigned”.
- Create a new flow called
ticket_update.yaml. Copy this code into the file:
triggers:
  - type: meya.zendesk.support.trigger.ticket.update
    bot: bot.notification

steps:
  - (check_status)
  - if: (@ flow.ticket.status != flow.old_ticket.status )
    then: next
    else:
      jump: check_assignee
  - status: Ticket (@ flow.ticket.id) is now (@ flow.ticket.status )

  - (check_assignee)
  - if: (@ flow.ticket.assignee_id != flow.old_ticket.assignee_id )
    then: next
    else:
      jump: solved
  - if: (@ not flow.ticket.assignee_id )
    then:
      jump: no_assignee
    else: next
  - type: meya.zendesk.support.component.user.show
    integration: integration.zendesk.support
    user_id: (@ flow.ticket.assignee_id )
  - status: >
      Ticket (@ flow.ticket.id) is now assigned to
      (@ flow.result.alias or flow.result.name )
  - jump: solved

  - (no_assignee)
  - status: Ticket (@ flow.ticket.id) status is now unassigned
  - jump: solved

  - (solved)
  - if: (@ flow.ticket.status != flow.old_ticket.status and flow.ticket.status ==
      "solved" )
    then:
      lifecycle: flow.zendesk.support.webhook.ticket_solved
    else: end
Reading through the code, you’ll see that it alerts the user to a change in ticket status, and ticket assignee.
When the ticket is solved, the flow emits the flow.zendesk.support.webhook.ticket_solved lifecycle event. See Ticket resolution survey below for an example of how you can use this webhook event.
Save the file and upload it:
meya format
meya push
To test it out, create a ticket using the escalate.yaml flow, then change the ticket status in Zendesk Support. The ticket_update.yaml flow should run.
Ticket resolution survey
It’s a good idea to have the user confirm that their issue has been resolved. You can take advantage of Zendesk Support webhook events to do this.
- Create a new flow called
ticket_solved.yaml. Copy this code into the file:
triggers:
  - lifecycle_id: flow.zendesk.support.webhook.ticket_solved

steps:
  - thread_set:
      mode: bot
  - ask: Did we solve your problem?
    quick_replies:
      - Yes
      - No
  - if: (@ flow.result == "Yes" )
    then: next
    else:
      jump: reopen
  - type: meya.zendesk.support.component.ticket.update
    integration: integration.zendesk.support
    status: closed
  - say: Glad to help!
  - end

  - (reopen)
  - thread_set:
      mode: agent
  - type: meya.zendesk.support.component.ticket.update
    integration: integration.zendesk.support
    status: open
  - say: Sorry, to hear that 😢
The lifecycle trigger lets you listen for the ticket_solved webhook event.
Save the file and upload it:
meya format
meya push
To test it out, create a ticket using the escalate.yaml flow, then resolve the ticket in Zendesk Support. The ticket_solved.yaml flow should run.
Custom fields
If you have custom ticket fields in Zendesk Support, you can have your Meya app populate them.
- In Zendesk Support, click the gear icon to open the settings menu. Under Manage, select Ticket Fields. Make a note of the Field ID for the fields you want to populate from the Meya app.

- Update the
escalate.yamlflow so it looks like this:
triggers:
  - keyword: escalate

steps:
  - (check_name)
  - if: (@ user.name )
    then:
      jump: check_email
    else: next
  - ask: What is your name?
  - user_set:
      name: (@ flow.result )

  - (check_email)
  - if: (@ user.name )
    then:
      jump: create
    else: next
  - ask: What is your email?
  - user_set:
      email: (@ flow.result)

  - (create)
  - type: meya.zendesk.support.component.user.create_or_update
    integration: integration.zendesk.support
    name: (@ user.first_name )
    email: (@ user.email )
  - type: meya.zendesk.support.component.ticket.create
    integration: integration.zendesk.support
    requester_id: (@ flow.result.id )
    subject: This is a test subject
    custom_fields:
      - id: FIELD_ID_1
        value: 123
      - id: FIELD_ID_2
        value: foo
      - id: FIELD_ID_3
        value: (@ user.some_value )
  - say: 'Ticket #(@ flow.result.id ) created. An agent will be here shortly...'
Replace FIELD_ID_X with the IDs of the fields you want to populate. Note that the custom_fields property is a YAML list.
Make sure the value field is properly indented or it won’t work.
Save the file, then upload it:
meya format
meya push
IP Restrictions
If you have enabled IP restrictions in the Zendesk Admin center, then you will need to add the Meya platform's Meya Source IP to your list of Allowed IP ranges.
Updated 2 months ago