Shopify
How to set up a Shopify integration
Shopify enables you to bring your business online with an ecommerce website backed by powerful tools that help you find customer, drive sales, and manage your day-to-day business activities.
With Meya's Shopify integration, you can build an app that:
- shows the user products in your store
- shows the user the status of their order
- let's the user update or cancel their order
- gather the user's order, billing, and shipping information so you can provide it to a customer service rep

Shopify components
The Shopify integration comes with over a dozen components so you can work with your Shopify data with ease.
Component | Documentation |
|---|---|
| |
| |
| |
| |
| |
| |
| |
| |
| |
| |
| |
| |
| |
|
Create a Shopify app
First, we'll create a new private Shopify app. This app will allow Meya to access your Shopify store via API.
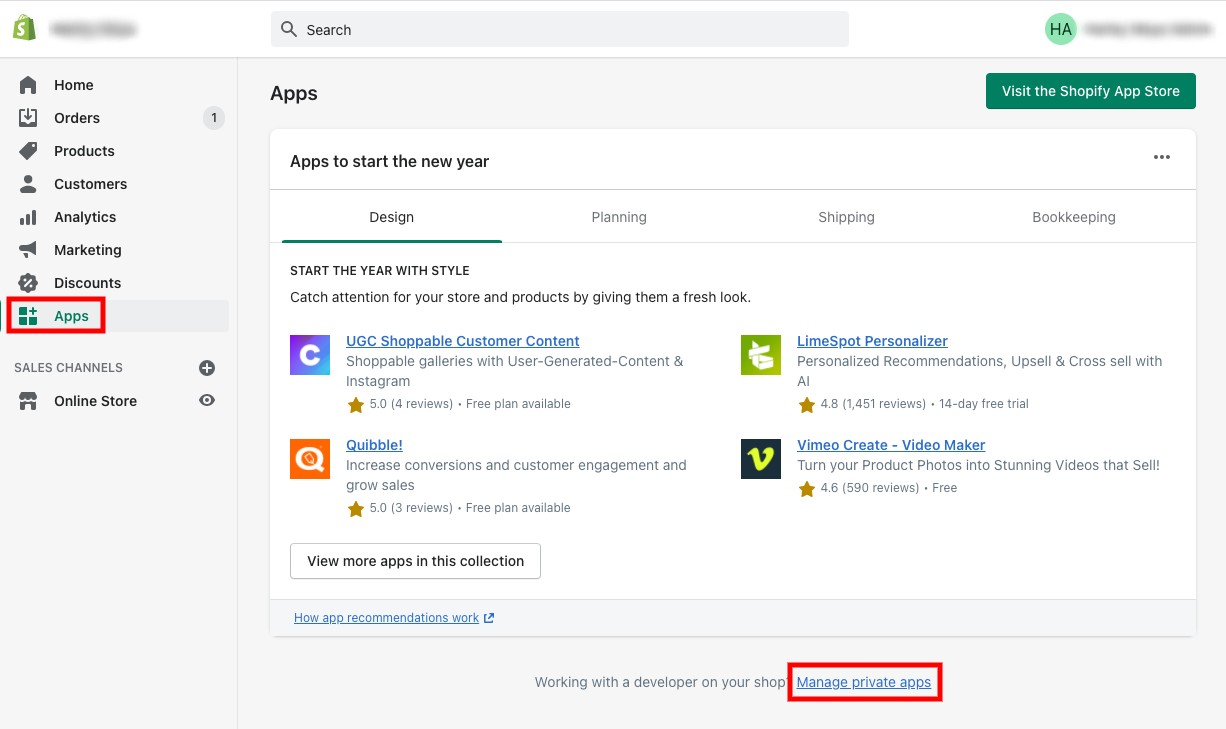
- Navigate to your Shopify store's admin panel. Click Apps from the left-hand menu, then click the Manage private apps link near the bottom of the screen.
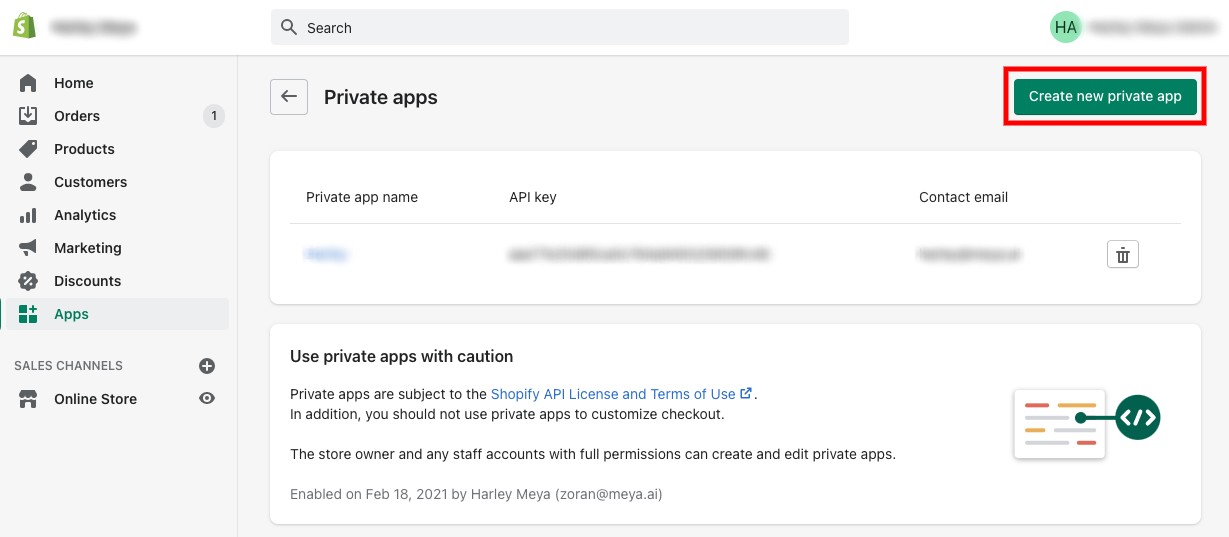
- Click the Create new private app button in the top right corner.
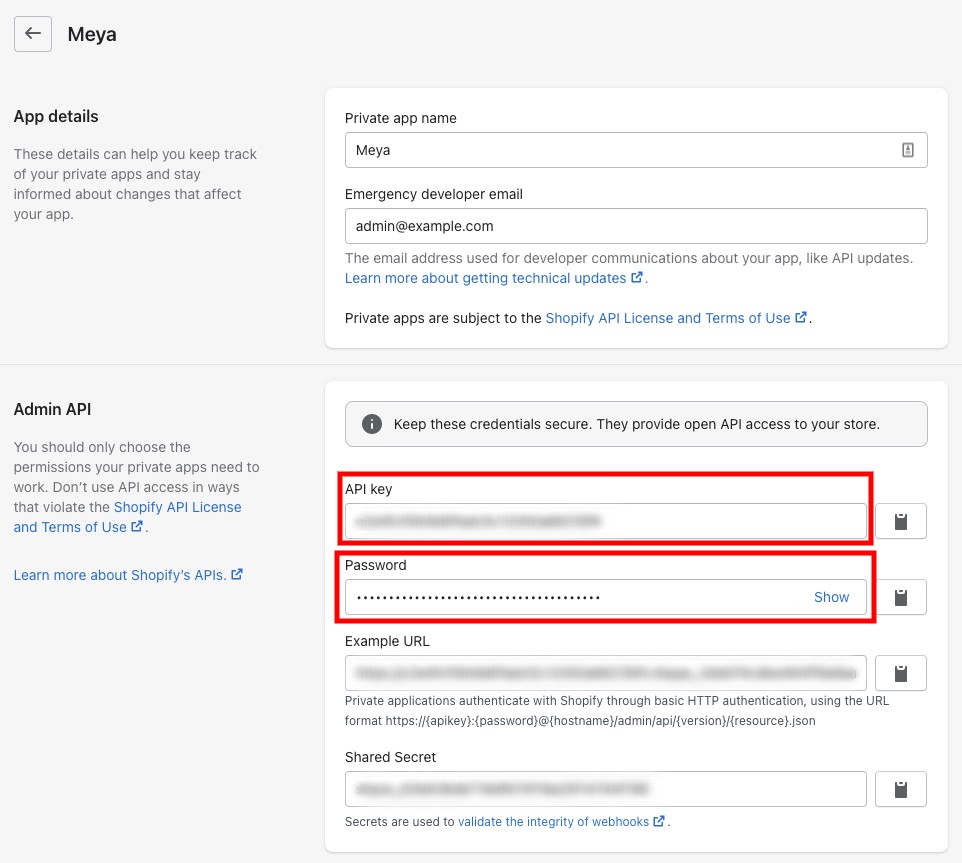
- Give the app a name, like Meya, and provide an emergency developer email address.
In order for all of the Shopify integration components to work, you'll need to update the Shopify app's permissions:
Permission | Type of access |
|---|---|
Shipping | Read/Write |
Orders | Read/Write |
Customers | Read/Write |
Products | Read/Write |
Any permission not mentioned in this table can be left at its default value of No access.
In the Webhook API version dropdown, select the option with (Latest) in its title.

At the bottom of the form, leave the Storefront API checkbox unchecked.

Click Save. In the pop-up window, click Create app.
The page will refresh and display your API key, as well as a password. You'll need both of these values for the next step.
Update the vault
In your app's root folder, open vault.yaml and add this code to the bottom of the file:
shopify.api_key: xxx
shopify.password: xxx
shopify.store_url: xxx
Remember thatvault.yamlis committed to version control and should not contain your actual secrets. Leave the values toxxx.
Open vault.secret.yaml and add this code to the bottom:
shopify.api_key: xxx
shopify.password: xxx
shopify.store_url: xxx
Replace the xxx values with the actual values.
The Shopify store URL should not include thehttps://. It should look something likestore-name.myshopify.com.The password is not your Shopify admin password. It is the one generated by your Shopify private app in the previous step. It begins with
shppa_.
Save the files and push them to the Grid by running this command in your terminal:
meya vault upload --file vault.secret.yamlCreate the integration
Now that we've stored our secrets, let's create the integration file and reference those secrets.
In your app's integration folder, create a new file called shopify.yaml and copy this code into it:
type: meya.shopify.integration
store_url: (@ vault.shopify.store_url)
api_key: (@ vault.shopify.api_key)
password: (@ vault.shopify.password)
Save the file and push it to the Grid by running these commands in your terminal:
meya format
meya push
Create the flows
To experience all of the features the Shopify integration has to offer, check out the demo-app repo, which contains 14 Shopify flows for things like calculating shipping, authenticating users, viewing products, and viewing and updating a customer's orders.
For this demo, we'll just list products in your Shopify store. In the Advanced section below, we'll show how to authenticate a user and display their orders.
List the products
In your app's root folder, create a new file at this file path: flow/shopify/product/list.yaml. Copy this code into it:
triggers:
  - keyword: shopify_product_list

steps:
  - type: meya.shopify.component.product.list
    integration: integration.shopify
  - flow_set: products
  - type: component.shopify.product.display
    products: (@ flow.products )
Line 5 to 7: First we retrieve a JSON array of products from our Shopify store, then save it to flow.products.
Line 8 and 9: We pass the product list to a component that will display the products for us. This component doesn't exist yet. We'll create it in the next step.
Create the product display component
Let's create a component that will display our products as a carousel of tiles.
Create a new Python file at component/shopify/product/display.yaml and copy this code into it:
from dataclasses import dataclass
from meya.button.spec import ButtonElementSpec
from meya.component.element import Component
from meya.element.field import element_field
from meya.entry import Entry
from meya.tile.event.ask import TileAskEvent
from meya.tile.spec import TileButtonStyle
from meya.tile.spec import TileCell
from meya.tile.spec import TileEventSpec
from meya.tile.spec import TileImage
from meya.tile.spec import TileLayout
from typing import List


@dataclass
class ProductDisplayComponent(Component):
    products: List[dict] = element_field()

    async def start(self) -> List[Entry]:
        tiles = []
        triggers = []
        for product in self.products:
            button = ButtonElementSpec(text="Select", result=product['id'])
            buttons = self.get_buttons_and_triggers([button])
            triggers += buttons.triggers

            tile = TileEventSpec(
                title=product['title'],
                image=TileImage(url=product['image']['src']),
                rows=[
                    [
                        TileCell(
                            cell="Price", value=f"${product['variants'][0]['price']}"
                        )
                    ]
                ],
                buttons=buttons.buttons,
            )
            tiles.append(tile)

        event = TileAskEvent(
            button_style=TileButtonStyle.TEXT,
            text=None,
            tiles=tiles,
            layout=TileLayout.ROW,
        )
        return self.respond(event, *triggers)
This component dynamically builds a meya.tile.component.ask component for us and returns a meya.tile.event.ask entry.
Save the file and push it to the Grid by running these commands in your terminal:
meya format
meya push
Test it out
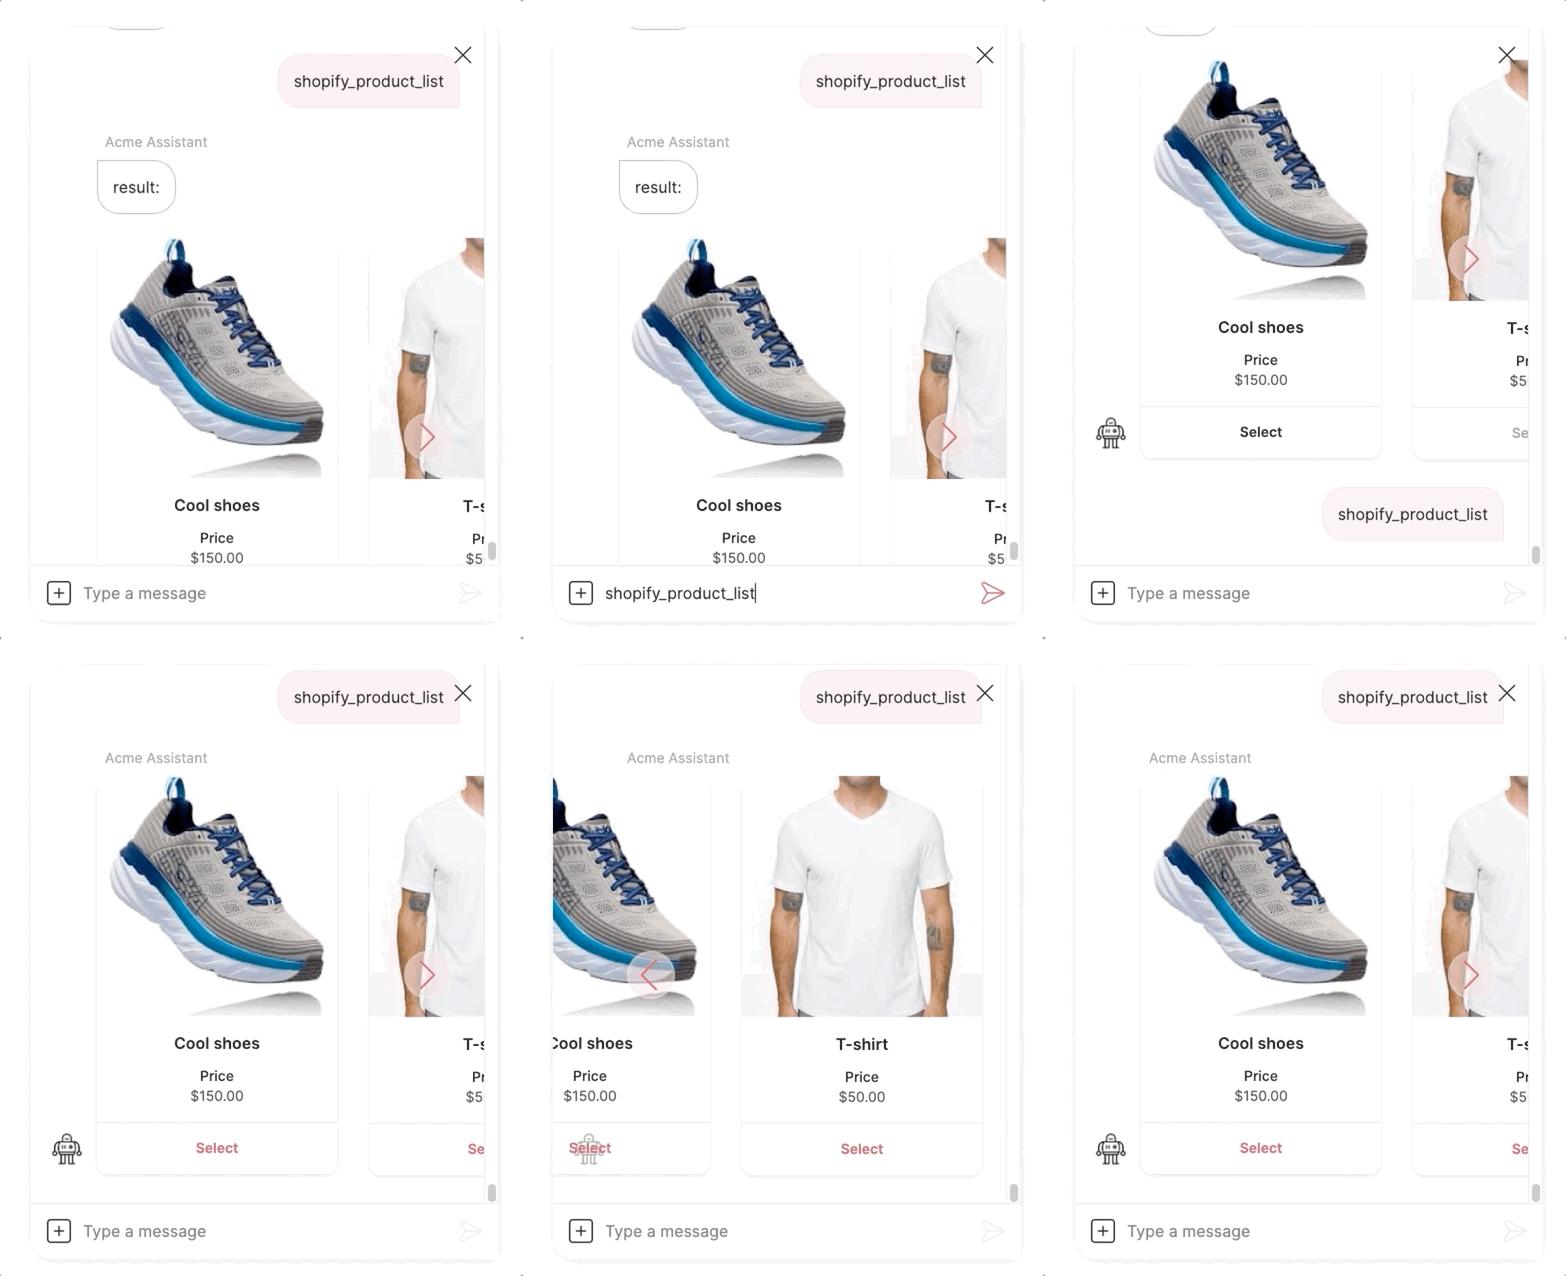
In your app's Simulator, trigger the new flow with the phrase shopify_product_list. You should see your store's products displayed, like this:
You've successfully set up the Shopify integration! Keep reading to learn how to authenticate users.
Advanced
Let's build on our previous example so we can authenticate our users and show them their orders from our Shopify store.
Enable logged in users
In order to authenticate, users will need to have an account on your store. By default, customer accounts are disabled, meaning users don't need to log in to your store to check out. Let's enable accounts now.
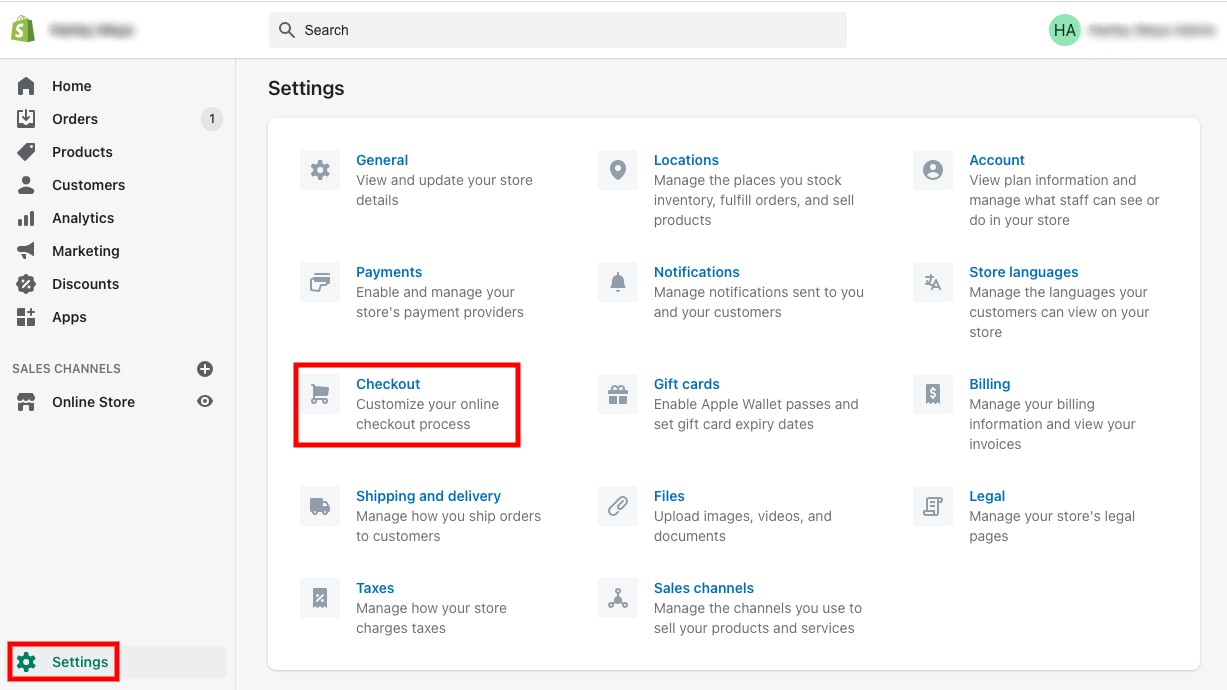
In your Shopify store admin dashboard, click the Settings button in the bottom left corner, then click Checkout.
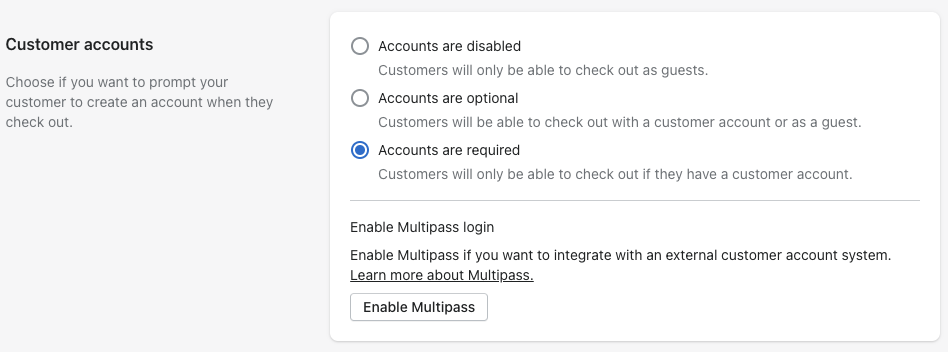
In the Customer accounts section, select the Accounts are required option, then click the Save button at the top of the screen.
Add the Orb integration
We need to pass our user's Shopify customer ID into our Meya app. One way of doing that using the Orb integration's pageContext property.
If you haven't already set it up, head over to our How to set up an Orb integration guide and complete that
Add the Shopify customer ID to pageContext
There are two methods for passing the customer ID to the Meya app:
- Hardcoding the value is okay for testing purposes. It's fast and doesn't require updating your Shopify store's theme code.
- Dynamically populating the ID using a Liquid template is the best option in a production environment.
Both methods are described below.
Hardcoding the customer ID for testing
In your Orb's JS snippet, add the pageContext property (lines 8 to 10 below). Your snippet should look something like this:
<script type="text/javascript">
window.orbConfig = {
     connectionOptions: {
        gridUrl: "https://grid.meya.ai",
        appId: "APP_ID",
        integrationId: "integration.orb",
        connect: false,
        pageContext: {
            "shopify_customer_id": "CUSTOMER_ID"
        }
    },
    theme: {"brandColor":"#e45567"},
    windowApi: true,
};
(function(){
    var script = document.createElement("script");
    script.type = "text/javascript";
    script.async = true;
    script.src = "https://cdn.meya.ai/v2/orb.js";
    document.body.appendChild(script);
    var fontStyleSheet = document.createElement("link");
    fontStyleSheet.rel = "stylesheet";
    fontStyleSheet.href = "https://cdn.meya.ai/font/inter.css";
    document.body.appendChild(fontStyleSheet);
})();
</script>
Remember to update theAPP_IDvalue in the snippet, as well.
Liquid template for dynamically populating the customer ID
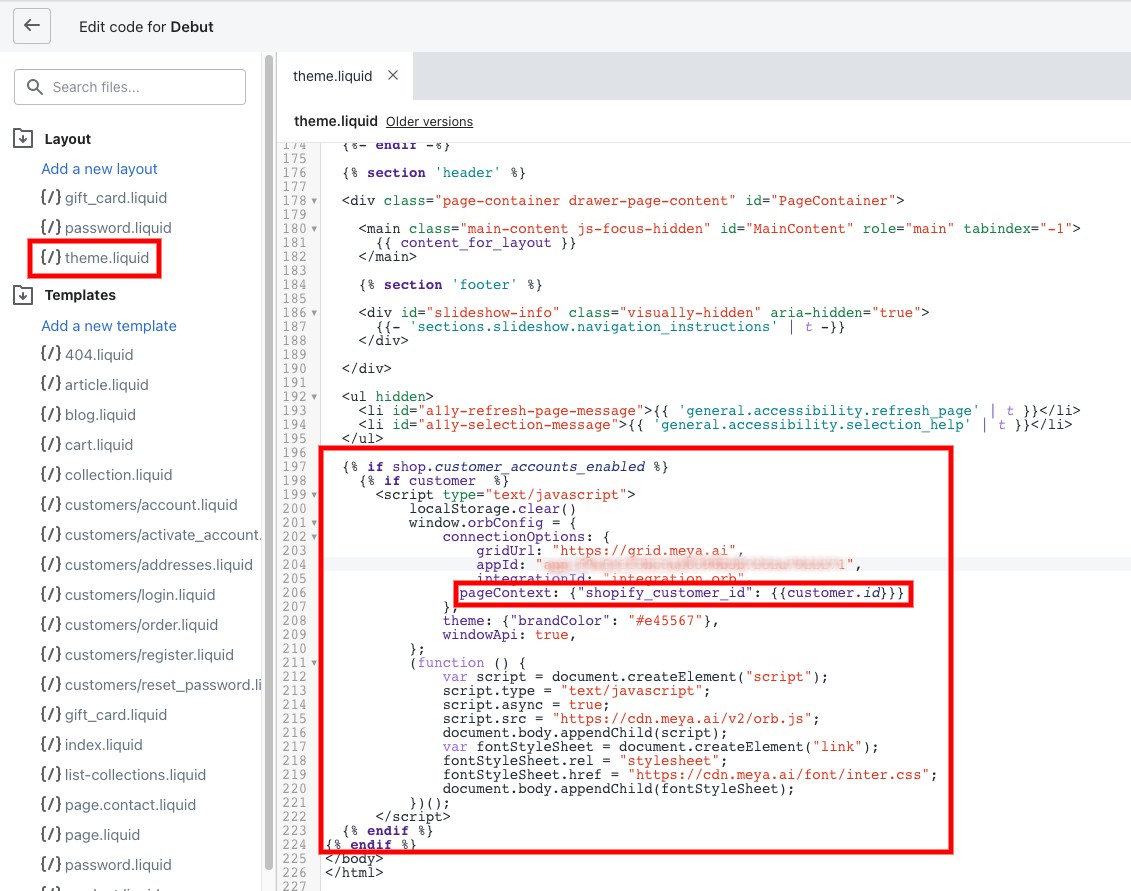
Shopify has its own templating language called Liquid. Here's a modified Orb JS snippet that will only load if your store has customer accounts enabled and the current user is logged into their customer account.
{% if shop.customer_accounts_enabled %}
  	{% if customer  %}
      <script type="text/javascript">
          localStorage.clear()
          window.orbConfig = {
              connectionOptions: {
                  gridUrl: "https://grid.meya.ai",
                  appId: "APP_ID",
                  integrationId: "integration.orb",
                pageContext: {"shopify_customer_id": {{customer.id}}}
              },
              theme: {"brandColor": "#e45567"},
              windowApi: true,
          };
          (function () {
              var script = document.createElement("script");
              script.type = "text/javascript";
              script.async = true;
              script.src = "https://cdn.meya.ai/v2/orb.js";
              document.body.appendChild(script);
              var fontStyleSheet = document.createElement("link");
              fontStyleSheet.rel = "stylesheet";
              fontStyleSheet.href = "https://cdn.meya.ai/font/inter.css";
              document.body.appendChild(fontStyleSheet);
          })();
      </script>
  {% endif %}
{% endif %}
Remember to update theAPP_IDvalue in the snippet, as well.
Copy the snippet.
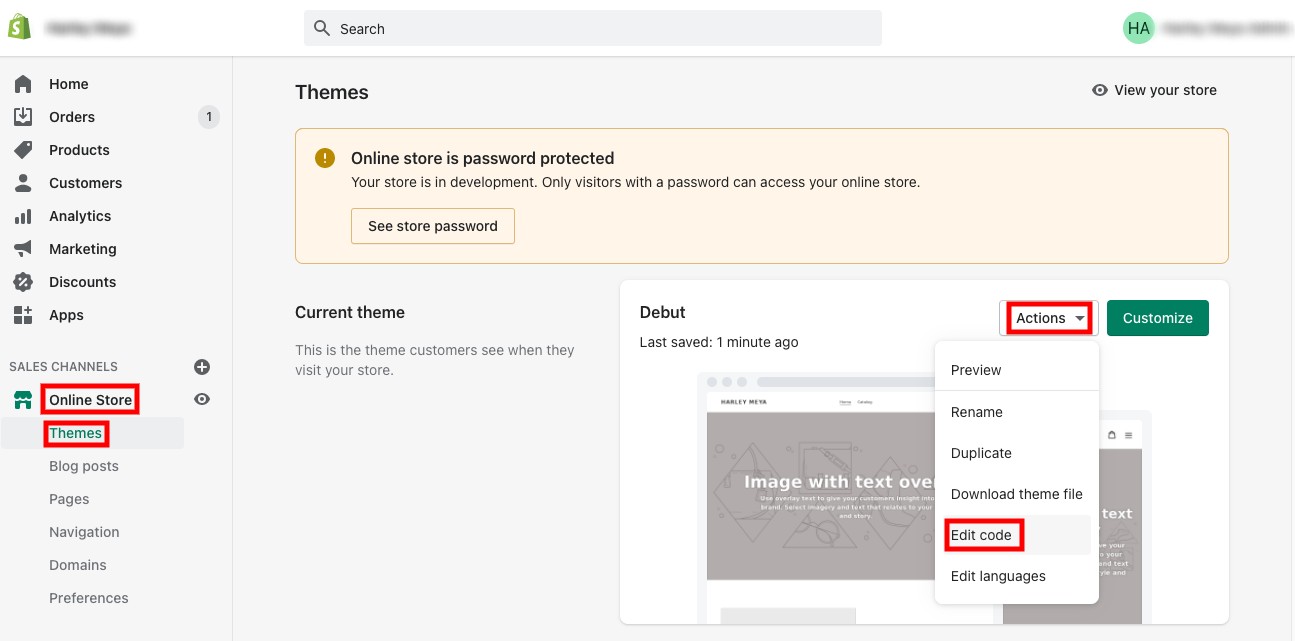
In your Shopify store's admin dashboard, select Online Store, then Themes. In the Current theme section, choose Edit code from the dropdown menu.
Open theme.liquid, scroll to the bottom, and add the snippet just above the closing </body> tag.
Save the file.
Create the authentication flows
We'll need to create a number of flows to check if the user exists in Shopify.
open.yaml
Create a flow at flow/shopify/auth/open.yaml and copy this code into it:
triggers:
  - page_open

steps:
  - if: (@ flow.context.get("shopify_customer_id"))
    then: next
    else:
      flow: flow.shopify.start
      transfer: true

  - flow_set:
      user_id: (@ flow.context.shopify_customer_id)

  - flow: flow.shopify.auth.check
    data:
      user_id: (@ flow.user_id )

  - flow: flow.shopify.start
This flow saves the Shopify customer ID we injected in the Orb's pageContext property to the user scope (line 11), loads the customer data from Shopify (line 14), and then starts a conversation with the user (line 18).
check.yaml
Next, we'll create flow/shopify/auth/check.yaml to load the customer data.
steps:
  - flow_set:
      user_id: (@ flow.get("user_id") or user.user_id )

  - if: (@ flow.user_id)
    then: next
    else:
      jump: fail

  - type: meya.shopify.component.customer.get
    customer_id: (@ flow.user_id | int )
    integration: integration.shopify

  - if: (@ flow.get("result") )
    then: next
    else:
      jump: fail

  - flow: flow.shopify.auth.login
    data:
      user: (@ flow.result )
  - end:
      result: true

  - (fail)
  - flow: flow.shopify.auth.forbidden
    transfer: true
Line 19: If Shopify found the customer and returned data, we save the data to user scope using the login flow.
Line 26: If Shopify couldn't find the customer, we'll display a "Forbidden access" message to the user.
Let's create those two flows now...
login.yaml
steps:
  - user_set:
      user_id: (@ flow.user.id )
      first_name: (@ flow.user.first_name )
      last_name: (@ flow.user.last_name )
      email: (@ flow.user.email )
forbidden.yaml
steps:
  - user_set:
      id:
      first_name:
      last_name:
      email:
  - say: Forbidden access
start.yaml
Finally, we need to create a flow that will start the interaction with the user:
triggers:
  - keyword: start

steps:
  - (auth)
  - flow: flow.shopify.auth.check
  - if: (@ flow.result )
    then: next
    else:
      jump: login

  - (welcome)
  - say: |
      Hi (@ user.first_name ), I'm (@ config.store.name )'s digital assistant.
      How can I help you today?
    quick_replies:
      - text: See my orders
        action:
          flow: flow.shopify.order.list
          transfer: true
  - end

  - (login)
  - say: You have to login first.
Display the customer's orders
Let's add the last piece: displaying the customer's orders.
Create a file called flow/shopify/order/list.yaml and copy this code into it:
steps:
  - type: meya.shopify.component.customer.order.list
    customer_id: (@ user.user_id | int)
    status: any
    integration: integration.shopify

  - type: meya.shopify.component.order.display
    orders: (@ flow.result)
    integration: integration.shopify

  - ask: Here are your orders...
    tiles: (@ flow.result)
Save all of your files, then upload them with these commands:
meya format
meya push
Test it out
In Codepen, or wherever you're testing the Orb JS snippet, refresh the page and open the Orb. If the user exists, you should see the welcome message from the start flow.
Try clicking the See my orders button. You should see something like this:

For more Shopify flows, check out our demo-app repo!
Updated 8 months ago
