Zendesk Chat
How to set up a Zendesk Chat integration
Zendesk Chat lets you add live agent support to your website or mobile app so you can have rich conversational experiences with customers.
With the Zendesk Chat integration, you can connect Zendesk Chat to your Meya app and seamlessly pass control of the conversation between the app and the agent. This guide will show you how.
Retrieve the account key
First, we need to find your Zendesk Chat account key. This will give your Meya app permission to make API calls to Zendesk.
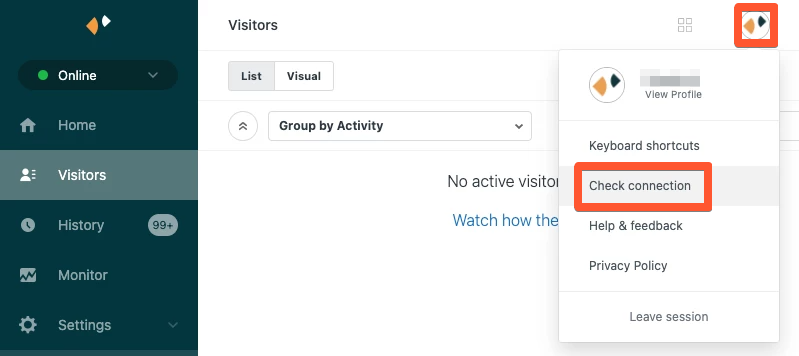
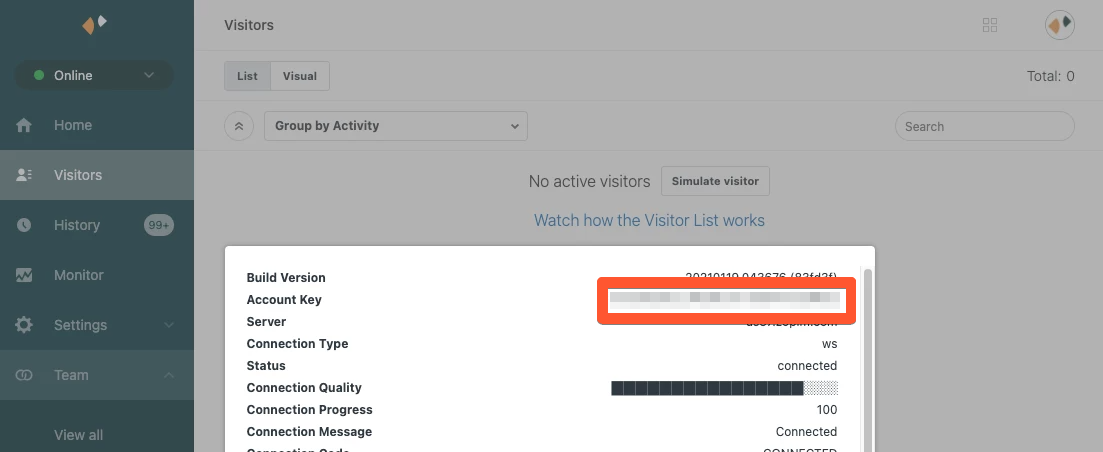
Log in to your Zendesk Chat account. In the top right corner, click the Chat logo and choose Check connection from the drop-down menu.

Copy your Account Key to the clipboard. We’ll add it to your app’s vault in the next step.

Update vault secrets
Let’s store the account key as a secret in the vault.
In your app’s root folder, open vault.yaml and add a new line with this code:
zendesk.chat.account_key: xxx
Do not put your actual account key invault.yaml. Recall that this file is committed to version control and shouldn’t contain actual secrets. It’s intended to be used as a reference for developers.
Now open vault.secret.yaml and add a new line containing this code:
zendesk.chat.account_key: ACCOUNT_KEY
Make sure to replaceACCOUNT_KEYwith your actual account key.
Save the files and run this command to upload the new secret:
meya vault upload --file vault.secret.yamlAdd the integration
We now have everything we need to add the integration.
In your app’s integration folder, create a subfolder called zendesk. Inside the subfolder, create a file called chat.yaml and copy this code into it:
type: meya.zendesk.chat.integration
account_key: (@ vault.zendesk.chat.account_key )
Save the file and run these commands in your terminal to push the changes to the Grid:
meya format
meya push
Add flows
Next, we’ll create a few flows that let the user start and end a chat with an agent. We’ll add a couple flows which are triggered by Zendesk Chat webhook events so we can let the user know their position in the queue, as well as when an agent joins or leaves the chat.
Navigate to your app’s flow folder. You’ll need to add a few folders and four flows. Here is what the finished folder structure will look like:
- flow
-
- zendesk
-
-
- chat
-
-
-
-
- session
-
-
-
-
-
-
- end.yaml
-
-
-
-
-
-
-
- start.yaml
-
-
-
-
-
-
- webhook
-
-
-
-
-
-
- member.yaml
-
-
-
-
-
-
-
- queue_position.yaml
-
-
-
Go ahead and create the necessary folders. Each of the flows is explained in detail below.
start.yaml
The start flow will allow the user to initiate a chat with an agent.
Copy this code into start.yaml:
triggers:
  - keyword: zendesk_chat_session_start

steps:
  - (name)
  - ask_form: Name?
    icon: (@ config.icon.person )
  - flow_set: name
  - (email)
  - ask_form: Email?
    expect: email_address
  - flow_set: email
  - (phone)
  - ask_form: Phone?
    icon: (@ config.icon.phone )
  - flow_set: phone

  - (transfer)
  - open_chat
  - say: Thanks! An agent will be with you shortly.
  - type: meya.zendesk.chat.component.session.start
    integration: integration.zendesk.chat
    visitor_name: (@ flow.name )
    visitor_email: (@ flow.email )
    visitor_phone: (@ flow.phone )
This flow begins by asking the user for their name and contact info.
Consider making this process a bit more sophisticated by addingifstatements to check if this information is already known.
Notice we’re using the open_chat component on line 19. If you’re using the Orb integration, this causes the Orb to switch from embed mode to the more traditional live chat mode, which is better suited for chatting with agents.
You can see from the BFML that themeya.zendesk.chat.component.session.startcomponent supports quite a few properties. To view the full list, check out our documentation.
end.yaml
The end flow will allow the user to end a chat with an agent. Copy this code into end.yaml:
triggers:
  - keyword: zendesk_chat_session_end
    when: true

steps:
  - say: Ending session...
  - type: meya.zendesk.chat.component.session.end
    integration: integration.zendesk.chat
For testing purposes, we’ve set the keyword to something a user is unlikely to guess. If you want to give the user the option of ending the chat, be sure to update the trigger to something more user-friendly.
member.yaml
This flow, and the queue_position.yaml flow, use the meya.zendesk.chat.trigger.webhook trigger to listen and respond to webhook events from Zendesk Chat.
For more information on this trigger, check the documentation.
Specifically, we’ll listen for the chat.memberjoin and chat.memberleave webhook events (which indicate when an agent as joined or left the chat) and route the app to the appropriate flow step.
triggers:
  - zendesk_chat_event_type: chat.memberjoin
    action:
      jump: join
  - zendesk_chat_event_type: chat.memberleave
    action:
      jump: leave

steps:
  - (join)
  - status: (@ flow.result.display_name ) has joined the chat
  - end

  - (leave)
  - status: (@ flow.result.display_name ) has left the chat
  - if: (@ flow.result.last_agent)
    then:
      say: What do you want to do now?
    else: next
  - end
On line 11 and 15 we use the meya.text.component.status component to print a message to the user.
Thestatuscomponent is perfect for messages that should appear to come from the system, instead of the app itself, or an agent, or user. The image below shows how it will render in the Orb.
queue_position.yaml
This flow also uses the meya.zendesk.chat.trigger.webhook trigger to listen for the chat.queue_position webhook event. This will allow us to give the user updates on their position in the queue.
It’s a great idea to display this information to the user as it gives them an idea of how long they’ll be waiting.
Copy this code into queue_position.yaml:
triggers:
  - zendesk_chat_event_type: chat.queue_position

steps:
  - if: (@ flow.result.queue_position > 0 )
    then: next
    else: end
  - status: You are now in queue position (@ flow.result.queue_position )
    ephemeral: true
Notice theephemeralproperty is set totrue. This means the status message will disappear when a newer one appears.
Save the four new flow files and push them to the Grid using these commands in your terminal:
meya format
meya push
Test it out
Alright, we’re finally ready to test it out!
Open your app’s console in the browser and navigate to the Simulator page. Open another browser window and go to the Visitors page in Zendesk Chat. Position both windows side-by-side so you can see them at the same time.
In the Simulator, enter zendesk_chat_session_start. The start flow should run. Enter some contact info. A new chat session should appear in the Visitors page in Zendesk Chat.
In Zendesk Chat, accept the chat. You should see some status messages appear in the Simulator as the queue position updates and when you join the chat.
Send a few messages back and forth between the user and the agent. Then, as the agent, end the chat session.
As the end user, confirm that the app is responding to input again.
Try starting another chat, but this time have the user end the chat by typing the special keywordzendesk_chat_session_end.
Congratulations! You’ve installed the Zendesk Chat integration.
Updated 8 months ago
