Salesforce Cases
Create and update Salesforce Cases from your Meya app
In Salesforce, a Case represents a customer’s question, feedback, or issue. Support agents can review Cases to see how they can deliver better service. Sales reps can use Cases to see how they affect the sales process. Tracking and responding to Cases keeps your customers happy and enhances your brand.
With Meya's Salesforce Cases integration you can:
- Search for cases using SOQL queries
- Populate standard case fields
- Add comments to a case to provide context for your agents
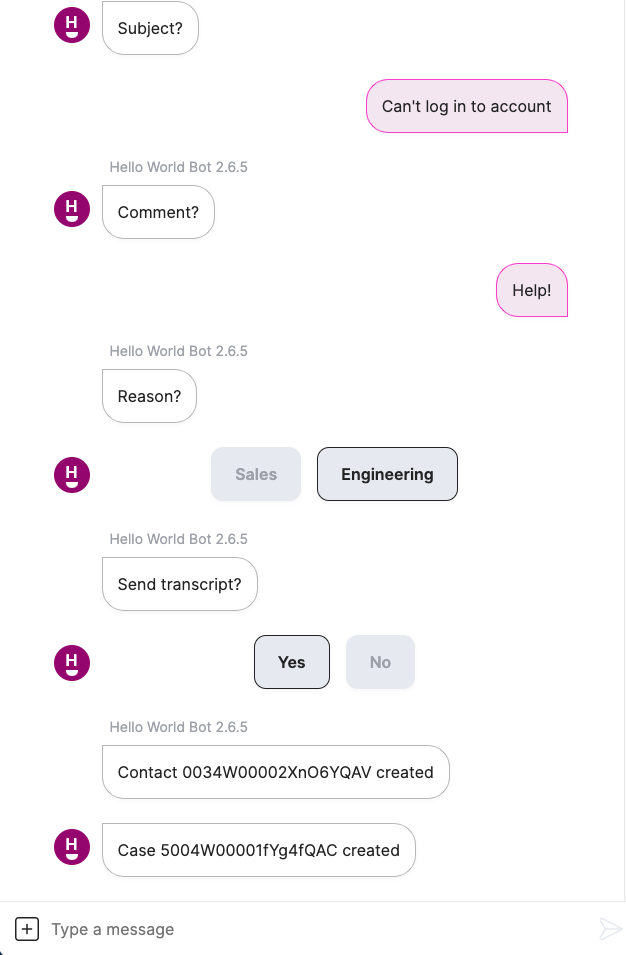
The user has been added as a Contact in Salesforce, and a Case has been created.
Here's what the agent sees in Salesforce:
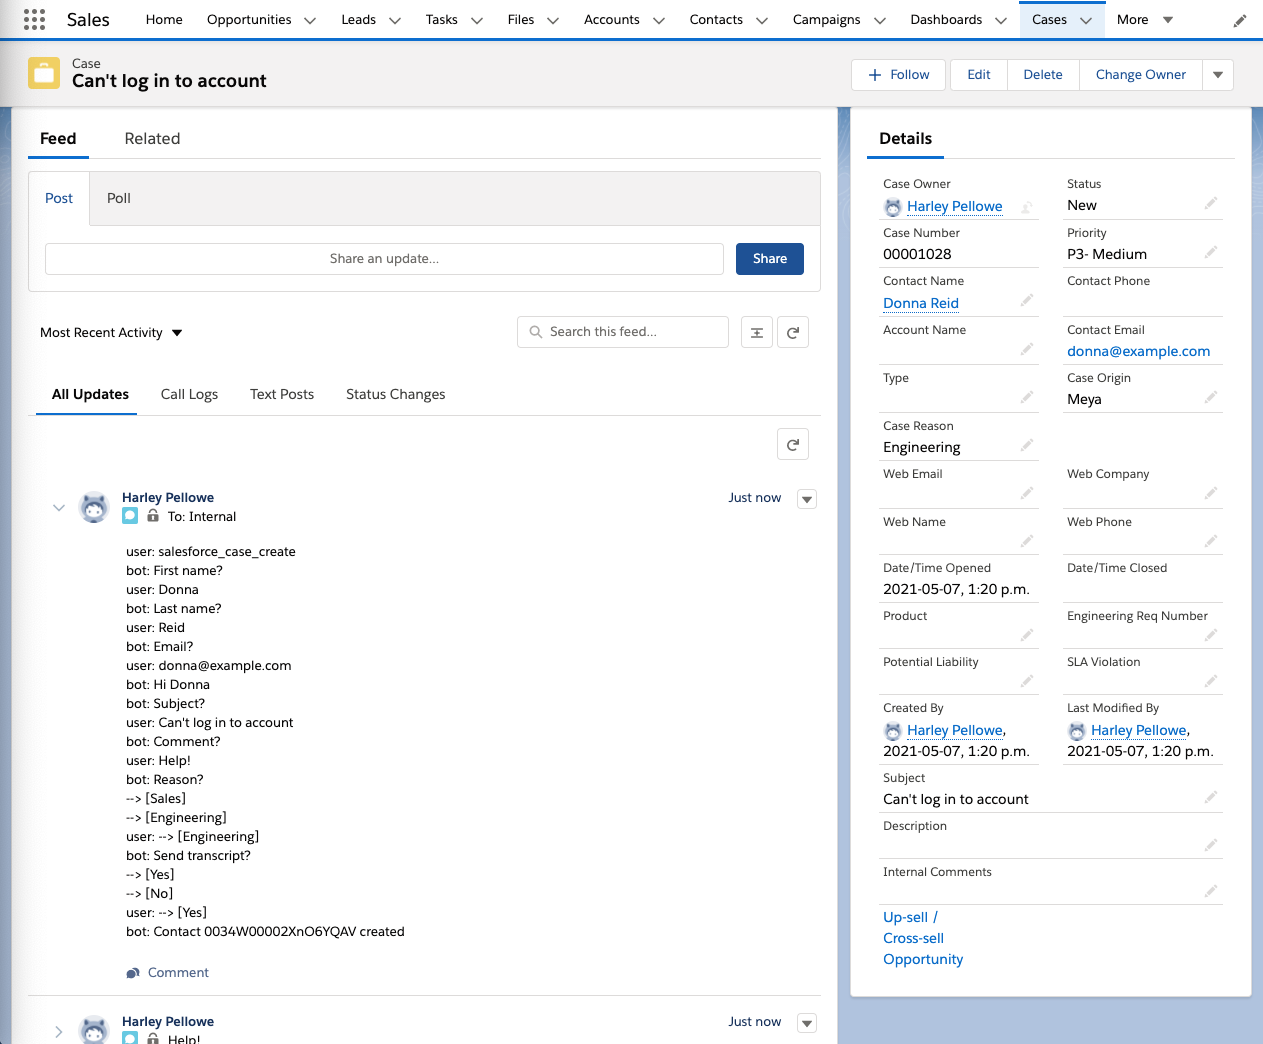
The Case has fields filled out and the transcript added as a comment.
Keep reading to learn how to set up the integration.
If you've already set up the Salesforce CRM integration you can skip ahead to the Add the integration section, since the same credentials are used by both integrations.
Find your Salesforce instance base URL
Your instance base URL will look like this: https://INSTANCE.salesforce.com.
The instance base URL is not necessarily the URL you see in the address bar. The domain in the address bar can be affected by things like a custom My Domain. Keep reading to learn how to find your instance base URL.
To find your instance base URL, open Setup. In the search bar, type company information. Select Company Information from the search results.

Select Company Information.
In the Organization Detail section, find Instance and make a note of the value. It will start with two letters and end with a few numbers.
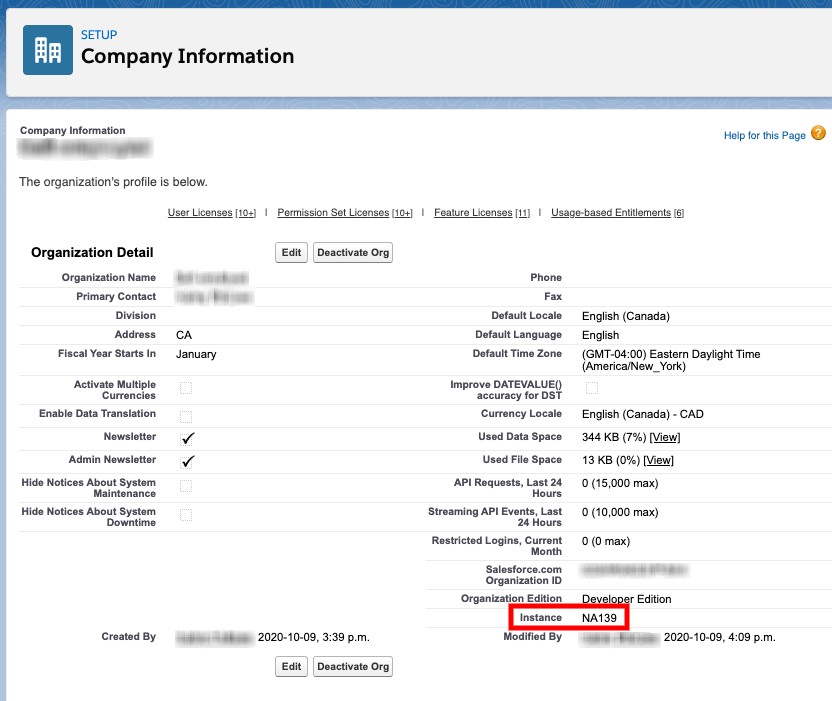
The Salesforce instance.
Once you have your instance, insert it into the URL like this: http://INSTANCE.salesforce.com. Keep this URL handy since you'll be adding it to the vault at a later step.
Create a connected app
A connected app allows external systems to authenticate against, and interact with, your Salesforce instance in a secure way. In this section, you'll create a connected app that your Meya app can use.
In Salesforce, click the gear icon in the top corner, then click Setup. In the search bar, type app manager. Select App Manager from the search results.

Select App Manager.
Click the New Connected App button in the top right corner.

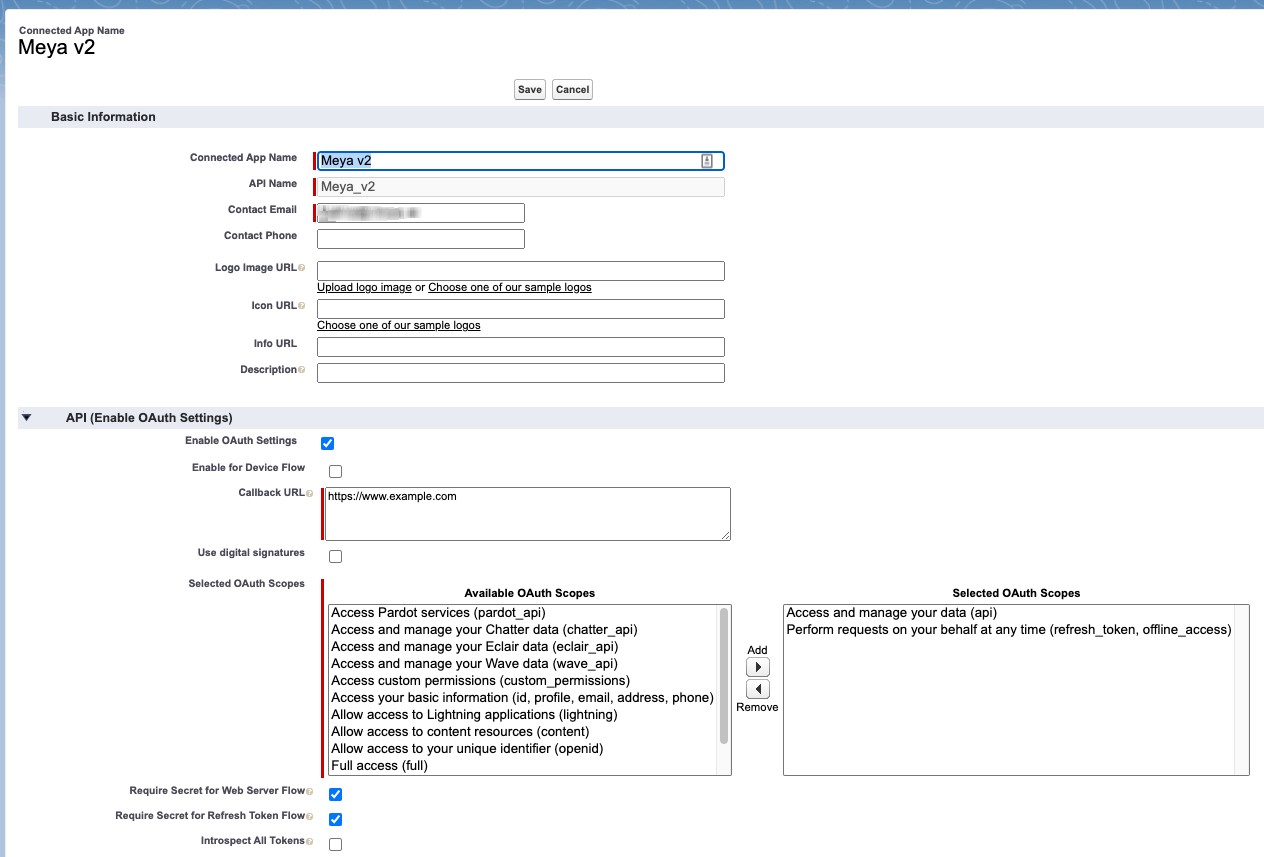
Enter a meaningful name for your app, such as Meya. The API name will fill in automatically once you move to another input.
Add an email to the Contact Email field. You can use your own, a support address, or your Salesforce admin's address.
In the API (Enable OAuth Settings) check the Enable OAuth Settings checkbox. In the list of available OAuth scopes, choose:
- Access and manage your data (api)
- Perform requests on your behalf at any time (refresh_token, offline_access)
Leave the other settings as-is. Your page will look something like this:
Click Save to create the app. You'll be redirected to the connected app's detail page.
If you have login IP ranges enabled for your app, you will also need to change the IP Relaxation setting of the connected app to "Relax IP restrictions":
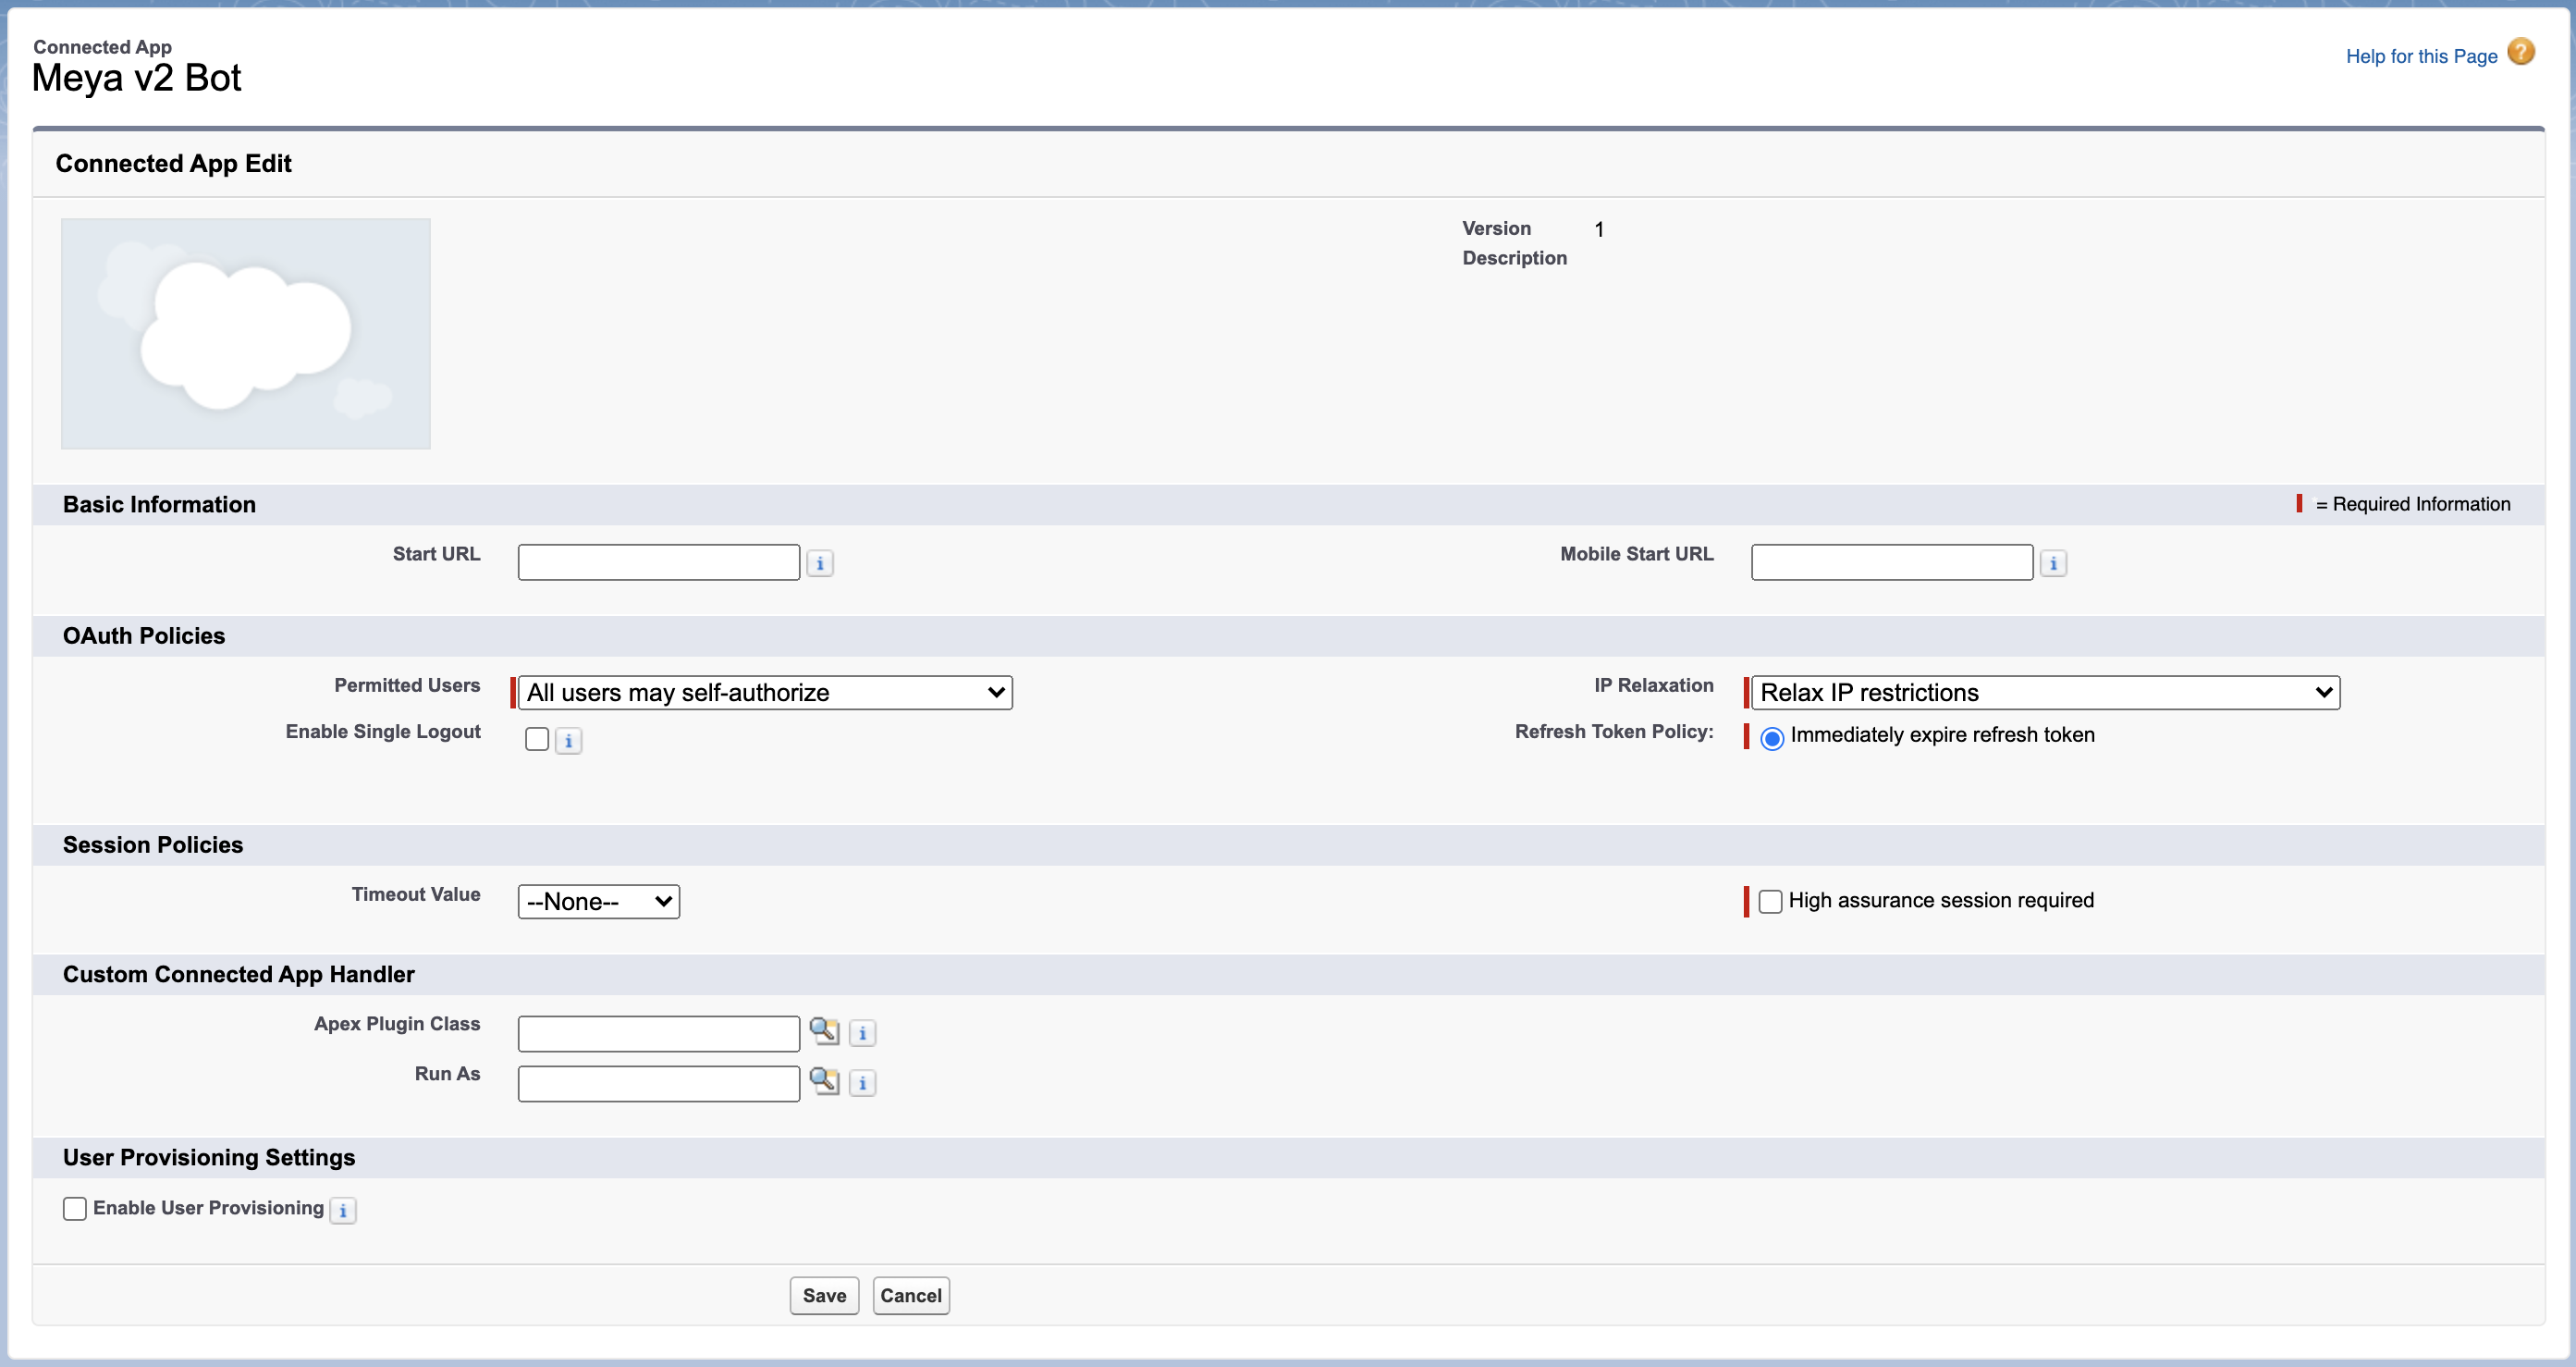
(This settings screen is available via Manage Connected Apps)
Retrieve the client key and secret
In Salesforce, connected apps with OAuth enabled will have a consumer key and consumer secret. These are also sometimes referred to as a client key and client secret.
In the API (Enable OAuth Settings) section of your connected app, copy the Consumer Key and Consumer Secret since you'll need those in a later step.

Update the vault
Now that we have all of our secrets, it's time to add them to your app's vault.
In your app's root folder, open vault.yaml and add this code to the bottom:
salesforce.instance_base_url: https://your_salesforce_instance.salesforce.com
salesforce.client_id: xxx
salesforce.client_secret: xxx
salesforce.username: xxx
salesforce.password: xxx
Remember not put actual secrets invault.yaml, since it's committed to version control. The actual values should go invault.secret.yaml, as described below, since it is not committed to version control.
Now open vault.secret.yaml and add this code to the bottom:
salesforce.instance_base_url: https://your_salesforce_instance.salesforce.com
salesforce.client_id: CLIENT_ID
salesforce.client_secret: CLIENT_SECRET
salesforce.username: USERNAME
salesforce.password: PASSWORD
Replace the values to the actual values.
You may want to create a dedicated Salesforce user whose credentials will be used here. Alternatively, you can use the credentials of an existing user as long as they're okay with your developers potentially seeing them (depending on their Meya Team permissions).
Save the files and upload the secrets to your remote vault using this command in your terminal:
meya vault upload --file vault.secret.yamlAdd the integration
Now that your secrets are in the vault, you can reference them in the integration file.
In your app's integration folder, create a subfolder called salesforce. Inside that folder, create a file called cases.yaml and copy this code into it:
type: meya.salesforce.cases.integration
instance_base_url: (@ vault.salesforce.instance_base_url)
client_id: (@ vault.salesforce.client_id)
client_secret: (@ vault.salesforce.client_secret)
username: (@ vault.salesforce.username)
password: (@ vault.salesforce.password)
Save the file.
Add flows
The Salesforce Cases integration comes with components that allow your app to create a case, update a case, and add a comment to a case. There are also a few non-case-specific components like contact.create and query you can use as well. Let's add some flows to your app to demonstrate how they work.
In your app's flow folder, create a folder called salesforce. Inside, create a folder called cases. Inside the cases folder, create three YAML files. The names and contents of these files are shown in the code box below. Copy the code from the code box into the flow files.
triggers:
  - keyword: salesforce_case_create

steps:
  - if: (@ user.salesforce_contact )
    then:
      jump: questions
    else: next

  - ask: First name?
  - user_set: first_name

  - ask: Last name?
  - user_set: last_name

  - ask: Email?
  - user_set: email

  - type: meya.salesforce.component.contact.create
    first_name: (@ user.first_name)
    last_name: (@ user.last_name)
    email: (@ user.email)
    integration: integration.salesforce.cases
  - user_set: salesforce_contact

  - (questions)
  - say: Hi (@ user.first_name)

  - ask: Subject?
  - flow_set: subject

  - ask: Comment?
  - flow_set: comment

  - ask: Reason?
    buttons:
      - text: Sales
        result: Sale
      - text: Engineering
        result: Engineering
  - flow_set: reason

  - ask: Send transcript?
    buttons:
      - text: Yes
        result: true
      - text: No
        result: false
  - flow_set: send_transcript

  - say: Contact (@ user.salesforce_contact.id) created

  - type: meya.salesforce.cases.component.create
    status: New
    contact_id: (@ user.salesforce_contact.id)
    origin: Meya
    reason: (@ flow.reason)
    subject: (@ flow.subject)
    priority: P3- Medium
    comments: (@ flow.comment)
    send_transcript: (@ flow.send_transcript)
    integration: integration.salesforce.cases

  - say: Case (@ flow.result.id) created
triggers:
- regex: ^salesforce_case_update_by.*$
action:
jump: (@ flow.result )
steps:
- (salesforce_case_update_by_case_number)
- ask: Case number?
regex: ^[0-9]{8}$
- flow_set: case_number
- type: meya.salesforce.component.query
soql_query: SELECT id from Case WHERE CaseNumber = '(@ flow.case_number)'
integration: integration.salesforce.cases
- flow_set: search_result
- if: (@ flow.search_result.records)
then: next
else:
jump: not found
- flow_set:
case_id: (@ flow.search_result.records[0].Id )
- jump: question
- (salesforce_case_update_by_case_id)
- ask: Case id?
regex: ^[a-zA-Z0-9]{18}$
- flow_set: case_id
- (question)
- ask: Subject?
- flow_set: subject
- type: meya.salesforce.cases.component.update
subject: (@ flow.subject)
case_id: (@ flow.case_id)
integration: integration.salesforce.cases
- say: Case (@ flow.result.id) updated
- end
- (not found)
- say: Case not found for case number '(@ flow.case_number)'triggers:
- regex: ^salesforce_add_comment_by.*$
action:
jump: (@ flow.result )
steps:
- (salesforce_add_comment_by_case_number)
- ask: Case number?
regex: ^[0-9]{8}$
- flow_set: case_number
- type: meya.salesforce.component.query
soql_query: SELECT id from Case WHERE CaseNumber = '(@ flow.case_number)'
integration: integration.salesforce.cases
- flow_set: search_result
- if: (@ flow.search_result.records)
then: next
else:
jump: not_found
- flow_set:
case_id: (@ flow.search_result.records[0].Id )
- jump: question
- (salesforce_add_comment_by_case_id)
- ask: Case id?
regex: ^[a-zA-Z0-9]{18}$
- flow_set: case_id
- (question)
- ask: Comment?
- flow_set: comment
- type: meya.salesforce.cases.component.comment.add
comment: (@ flow.comment)
case_id: (@ flow.case_id)
integration: integration.salesforce.cases
- say: Comment added case (@ flow.result.id)
- end
- (not_found)
- say: Case not found for case number '(@ flow.case_number)'create.yaml: In this flow the app asks the user for some basic info and creates a Contact in Salesforce. It uses the Contact ID to create a Case that's associated with the Contact.
update.yaml: This flow demonstrates how to search for a Case using its case number.
SOQLNotice how the
querycomponent supports SOQL queries? This is an easy, yet powerful, way to retrieve data from Salesforce.
comment.yaml: This flow is very similar to update.yaml, except instead of updating a Case attribute, it adds a comment to the Case.
Save the files and upload them to the Grid by running these commands in your terminal:
meya format
meya push
Test it out
We're ready to test the flows!
Open your app's simulator and type salesforce_case_create. Enter some information for your test user. In Salesforce confirm that the Case was created.
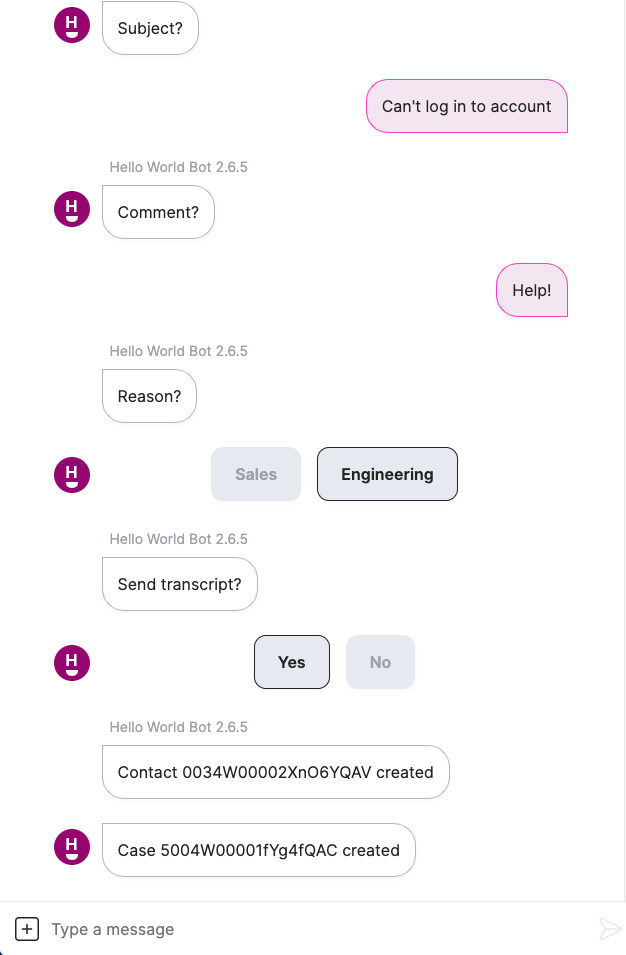
Here's what the Case looks like in Salesforce:
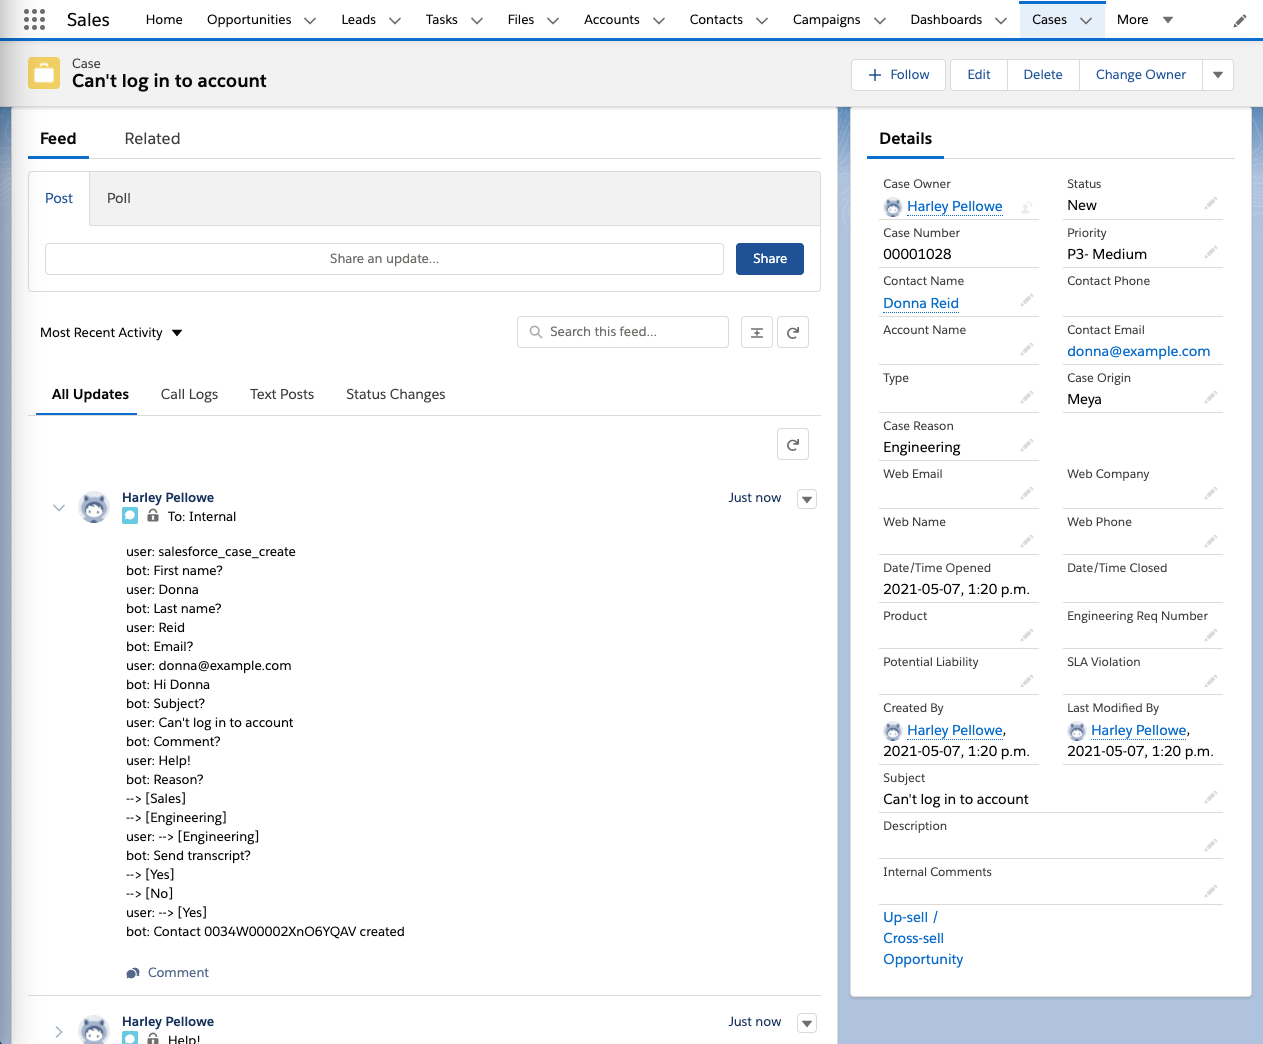
Great! You've successfully added the Salesforce Cases integration to your app.
Suggested reading
Updated 8 months ago
