Tutorial 2: Using Bot CMS to train an NLU agent
Build a bot that understands the user's intent and triggers the right flow.
Forcing user's to interact with your bot using keywords is not very user-friendly. People want to talk to bot's using natural-sounding language and have your bot understand what they mean (i.e. their intent). You can accomplish this using Natural Language Understanding (NLU). In this tutorial, you'll learn how to use Bot CMS, an NLU agent, and the cms_nlu trigger to launch a flow.
The Bot CMS advantageOne way of integrating NLU into your Meya bot is to create a Wit.ai or DialogFlow agent and train the agent on the Wit.ai or DialogFlow platforms. (Training an agent means giving it examples of what a user might say to the bot, and specifying how to respond to that input.) The downside of this is that all of the intents and responses reside on those platforms, adding another step to your bot development process. With Bot CMS you can manage your NLU training material on the Meya platform, which means that after creating a Wit.ai or DialogFlow agent, you don’t have to go back to those platforms at all. Awesome!
Before you begin...
You’ll be using the same bot you built in the previous Bot CMS tutorial. If you didn’t build that bot, clone it in your Meya account: cms-basic
If you want to access the finished bot right away, clone cms-nlu-trigger.
NLU agents are not copied!If you're cloning the finished bot, you'll still need to create your own NLU agent and connect it to Bot CMS, otherwise your bot won't respond.
So far you’ve been using the open_chat intent to trigger the welcome flow, but this trigger is only available in the Meya Web chat client. If you want to make your bot available in other platforms (e.g. Facebook Messenger, Twitter, etc.) you’ll need to replace this trigger. Let’s get your bot to respond when the user issues some form of greeting.
1. Create an NLU agent
While you can create an NLU agent using Wit.ai, for this tutorial you’ll be using DialogFlow. Follow the steps on this page to setup your Dialogflow integration.
There’s no need to create any intents or entities within Dialogflow. Bot CMS will handle all of that for you. At the top of the menu on the left side of the DialogFlow dashboard you should see a gear icon.
2. Add training material to Bot CMS
Right now your agent doesn't know much, because you haven't trained it. Let's create a few entities in Bot CMS you can use to train your agent.
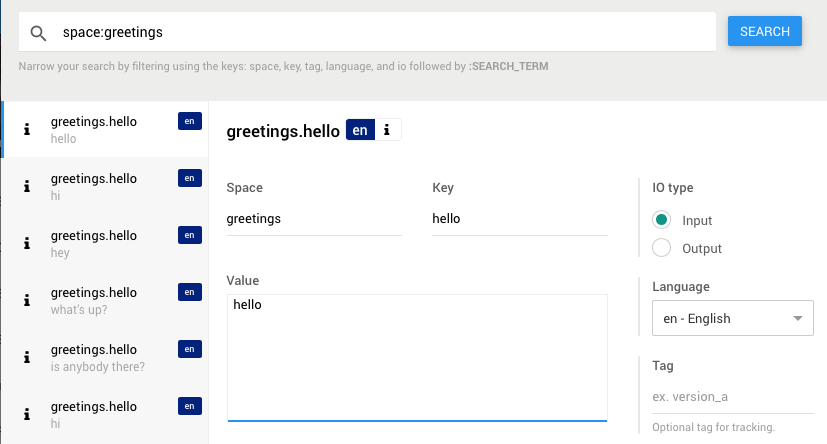
Back in the bot's dashboard, navigate to Bot CMS. Click the Edit Content button to open the Entity Editor. On the left side of the window, click Create new. Set Space to greetings, Key to hello, IO Type to Input, Language to en - english, and Value to hello. Click Save.

Add entities to Bot CMS.
There’s more than one way to greet someone, though! Let’s add more greetings to the CMS. Try adding hi, hey, what’s up?, and anybody there? using the same method. Click New to create a new entity. Remember to save each one individually.
After you've added your greetings, click Close to leave the Entity Editor.
3. Connect Bot CMS to your NLU agent
Now you have an NLU agent and some content to train it with. All you have to do is connect them!
Under the Natural Language Understanding section in the Bot CMS tab, click Connect Provider. Meya will warn you that connecting to a provider will overwrite the NLU agent’s content.
Your NLU agent will be overwritten!It is very important to remember that Bot CMS does not add to your agent’s content, it totally replaces it. If you have any content within the agent you wish to preserve, ensure you back it up before proceeding with this tutorial. NLU agent backups are done from within your wit.ai or DialogFlow accounts, not within the Meya platform.
Click Yes, Continue.
Under Select a provider, choose dialogflow. Copy-paste your project ID from your agent’s settings page into the text field. Select en - English as the agent’s language, and Save.
You may need more than one NLU agentAs you expand your bot's content in Bot CMS, you'll have more spaces. Each space containing one or more inputs (i.e. pieces of content from the user that your bot must understand) must have its own NLU agent. For example, if you have a greetings space, an faq space, and a subscription space, you will need to create three NLU agents in Wit.ai or DialogFlow.
If a space only contains output entities, it does not need an NLU agent. NLU agents are only necessary to help your bot understand user input.
Name your NLU agents something meaningful so you remember the bot and space for which they're trained. For example
<bot_name>-<cms_space>.
4. Use the cms_nlu trigger to trigger a flow
We're almost done! All that's left to do is replace the welcome flow's open_chat intent with one that uses your NLU agent.
From the bot’s dashboard, enter Bot Studio. Open the welcome flow from the file explorer on the left. In the Trigger section, click the pen icon to edit the intent. From the Trigger Type drop-down, select cms_nlu. Call the space greetings, and the key hello. Leave the other fields at their default values and click OK. Save the flow.
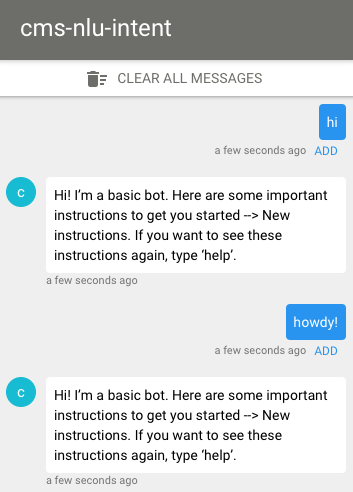
Type hi in the test chat window. You’re bot should respond with the text from the welcome flow. Try typing some of the other greetings from the CMS.
Type howdy!. Notice how, even though we didn’t include howdy in our CMS, the DialogFlow agent understands that it is a form of greeting and, therefore, belongs to the greetings intent which triggers the welcome flow.

Test the NLU intent.
5. Add new content from the test chat window
Try typing It’s a pleasure to meet you. The bot doesn’t respond! If you scroll to the bottom of the debug panel, you should see the words No matching intent.

The NLU agent couldn't find a matching intent.
The NLU agent didn’t recognize this as a greeting, so it didn’t match it to the greetings intent, which is why your welcome flow wasn’t triggered. The agent should learn this greeting. Let’s teach it by adding this greeting to your CMS. You don’t even have to re-type it in the Entity Editor; just click the little ADD button under the text you typed.

Add content on the fly by clicking the ADD button.
In the Entity Editor, enter greetings as the space, and hello as the key. Everything else should be filled out already. Click Save and Close.
Retraining your NLU agentIt can take several seconds for your NLU agent to re-train using the updated content from Bot CMS, so if you re-enter the new text in the test chat window and don’t get a response, don’t worry! Just wait a few seconds and try again.
Tip: If your bot doesn't work, clone the cms-nlu-trigger bot and compare it with your own.
It’s a good idea to think of as many possible ways of expressing an intent as you can. This makes your bot robust and able to handle a wide range of user input. The more your bot is able to understand, the happier your users will be.
Test yourself: see if you can replace the help flow's keyword trigger with another cms_nlu trigger. Create a new space called help. Remember, you'll need a second NLU agent for this new space. The finished bot includes Bot CMS content to trigger the help flow. If you get stuck, check it out.
Congratulations!You now know how to use Bot CMS and an NLU agent to trigger a flow. This makes your bot more robust (able to handle a variety of input). By adding more content to Bot CMS and connecting it to NLU agents, your user's will be able to speak naturally to your bot, instead of using keywords. Awesome!
Updated 8 months ago
So far, you’re bot has been talking to its users in English. I’m sure your French users would love to be able to interact with your bot in French. In the next tutorial, you’ll learn how to use Bot CMS for internationalization.
