Bot Dashboard
Learn how to navigate your bot's dashboard.
Once you've created a new bot, you'll be able to access the bot's dashboard. The Bot Dashboard is where you access your bot's code, create re-usable content, build integrations, sync your code to GitHub, and more.
Creating a new bot
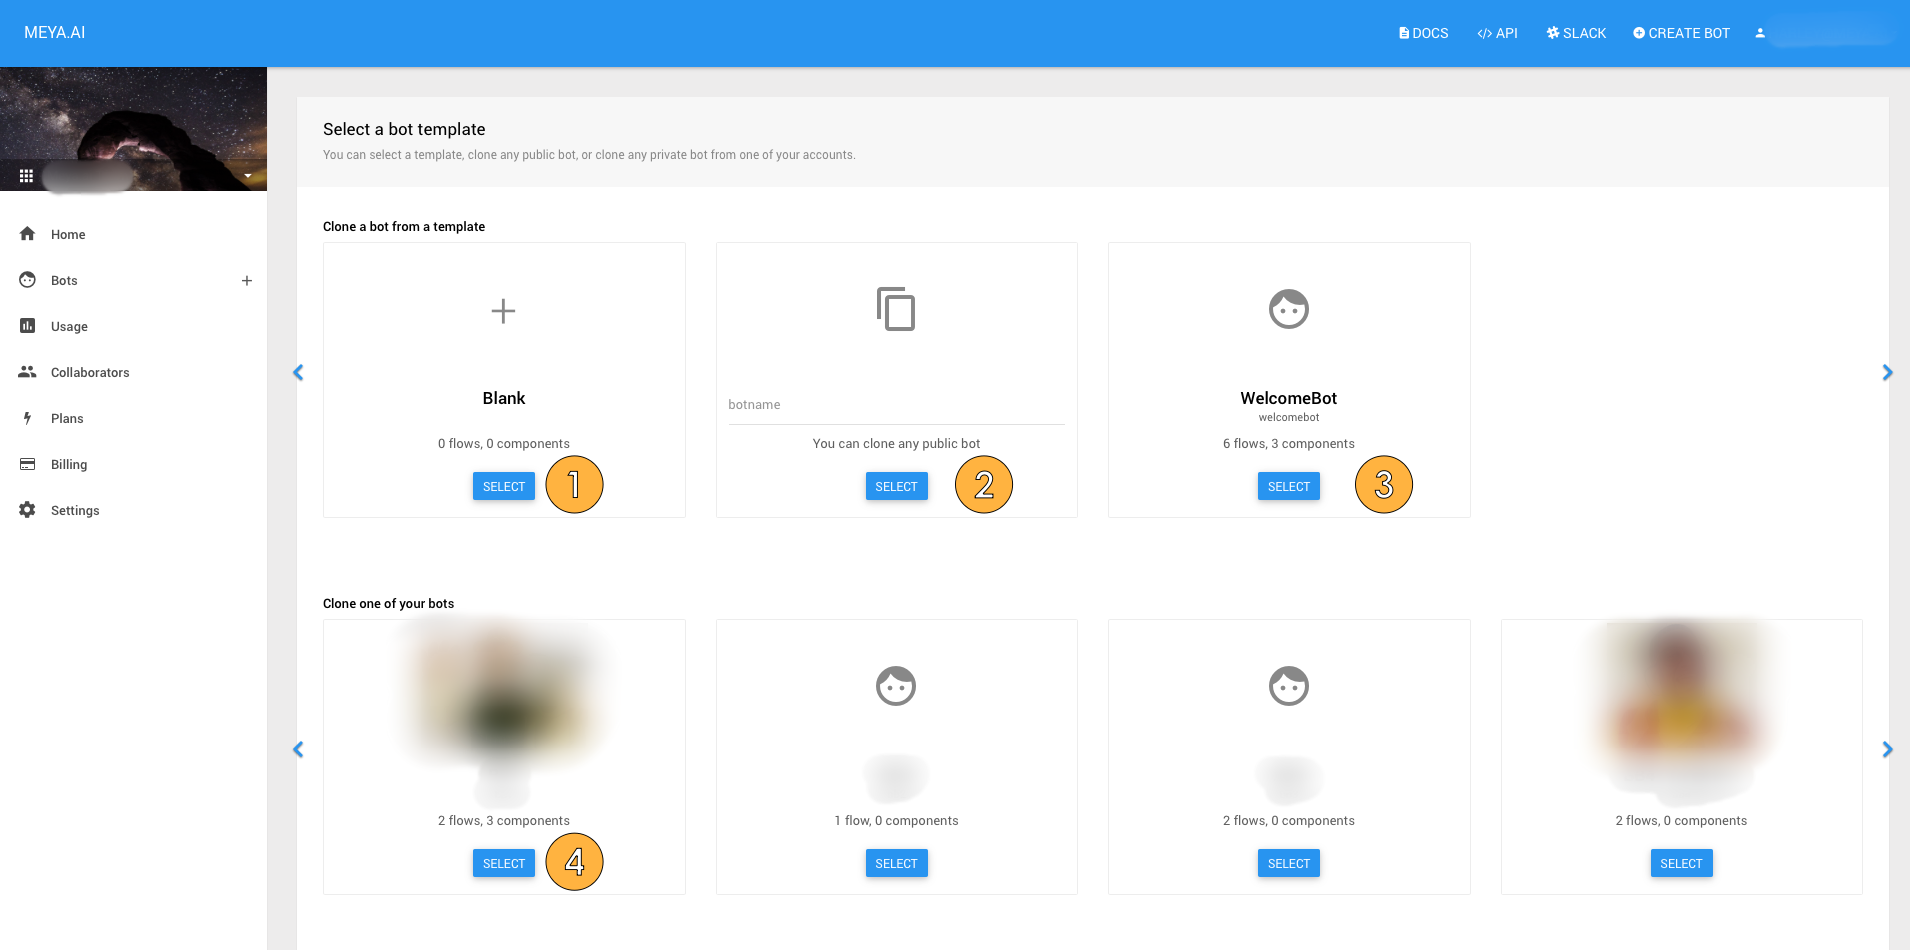
Before you can access a bot's dashboard, you need to create a bot. After clicking the Create A New Bot button on your Account Dashboard, you'll be presented with some options.
The Dashboard tab in the Bot Dashboard.
- Select this option if you want to start building a bot from scratch.
- Cloning let's you copy a bot someone has made public. If you come up with a cool idea for a bot that you'd like to share with the community, set your bot to public on the Settings tab.
Public botsMaking a bot public does not let people edit your bot's code or settings. Instead, they create a clone, or copy, of your bot that they can edit without impacting your original bot.
Note that when cloning a bot that uses an NLU agent, you'll need to create your own agent, since agents are not clone-able.
- WelcomeBot is a sample bot you can clone. It demonstrates some of the basic functionality you might want to implement in your bot.
- You can clone your own bots even without making them public. This is a great way to test changes without affecting your main production bot.
Other ways of starting a botIf someone with a different Meya account wants to share their bot with you without making it public, they can download their bot as a ZIP file from the Repo tab. From the Repo tab of your own blank bot, you can import the ZIP file.
Alternatively, you can sync a bot to your bot's GitHub repo, again using the Repo tab. If you prefer to develop your bot on your local environment, you can push changes to your GitHub repo and set your bot's Repo settings to automatically grab new code.
The Dashboard tab
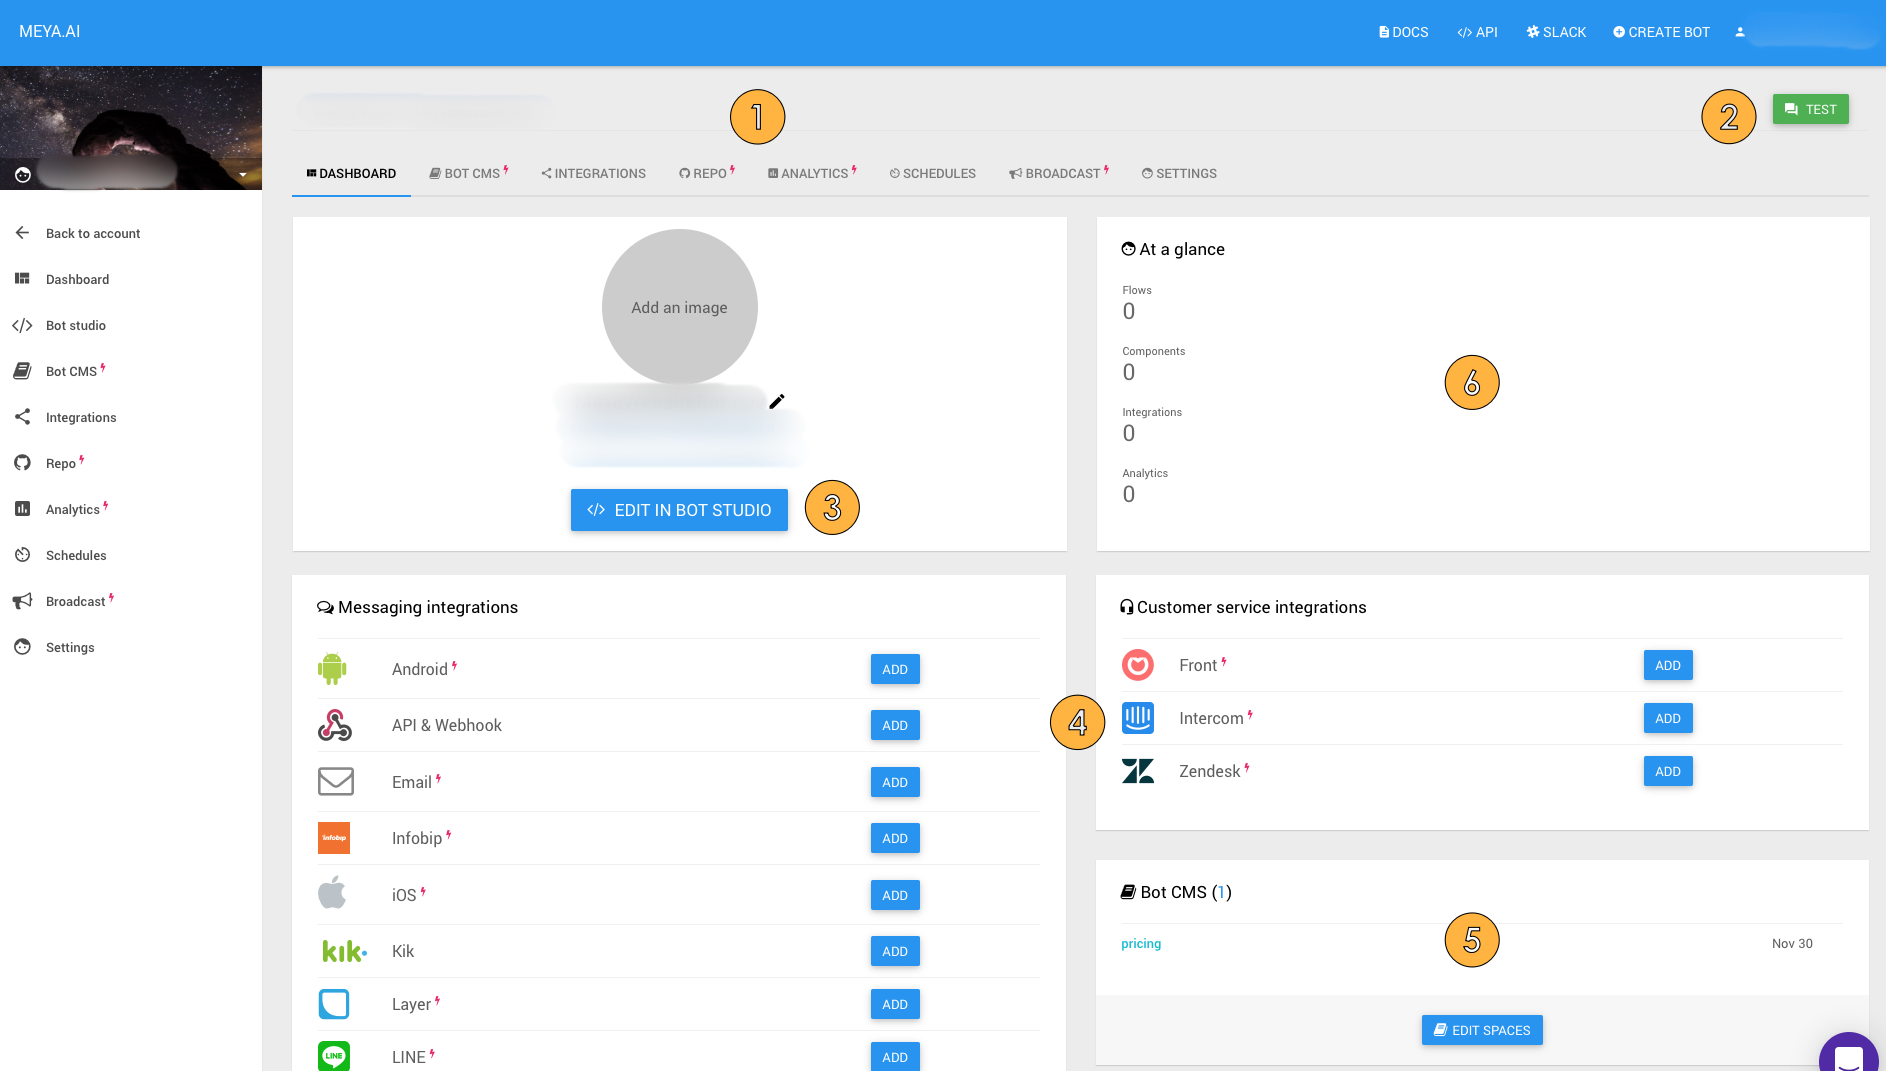
If you already have a bot, clicking the Edit button on your Account Dashboard will bring you to this screen.
The Dashboard tab in the Bot Dashboard.
- These tabs provide access to your bot's features. The red lightning symbol means that feature is only available to user's on a paid plan.
- You can test out your bot from the Bot Dashboard.
- Click this button to enter Bot Studio and edit your bot's flows, custom components, Python dependencies, and more.
- Meya supports a variety of popular messaging and customer service integrations. Click the Add button next to an integration to see instructions for how to setup that integration.
- This provides an overview of your Bot CMS content. Click the name of a space to go to the settings page for that space.
- Here you can see a few high-level statistics about your bot.
The Bot CMS tab
Bot CMS is where you can create and manage your bot's content. This makes it easy for non-developers to update your bot's content without altering code. This content can also be used to train an NLU agent.
- Your spaces are listed here. Spaces are like folders containing related content. Clicking on a space will take you to the settings for that space. From there, you can edit the space's content and add an NLU provider.
- Click this to create a new space.

The Bot CMS tab in the Bot Dashboard.
The Integrations tab
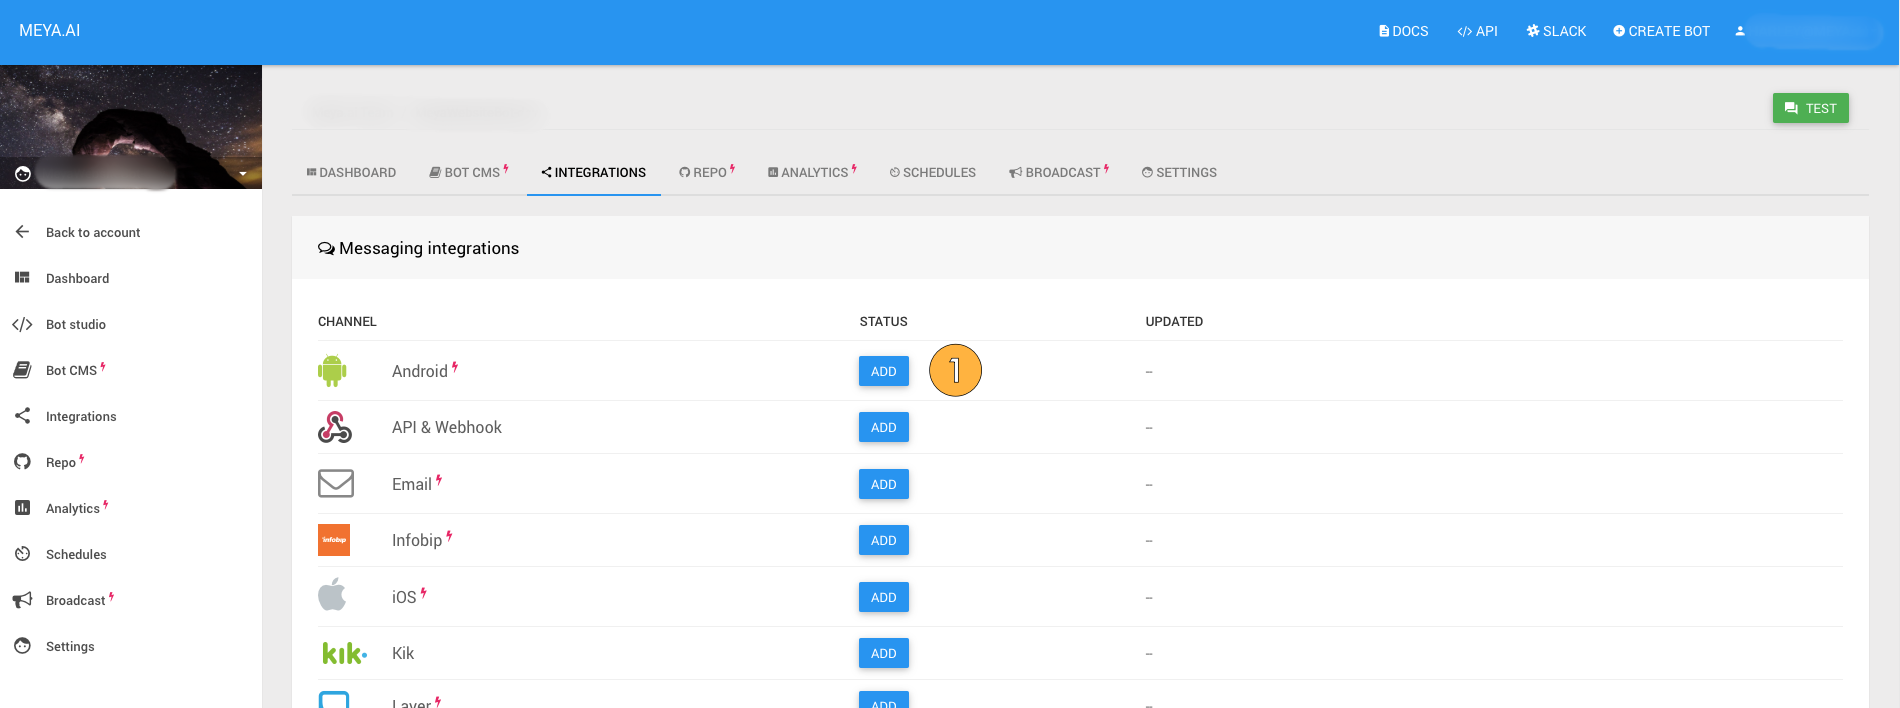
From the Integrations tab, you can connect your bot to a number of popular messaging platforms, such as Facebook Messenger, Smooch, and Layer, and customer service platforms such as Zendesk, Intercom, and Front.
- Clicking an Add button will take you to the settings for that integration. Once you've added an integration, the Add button becomes an Edit button, allowing you to quickly see which integrations you've added. Integrations can be deleted by clicking the Edit button and deleting the integration from its settings page.
The Integrations tab in the Bot Dashboard.
The Repo tab
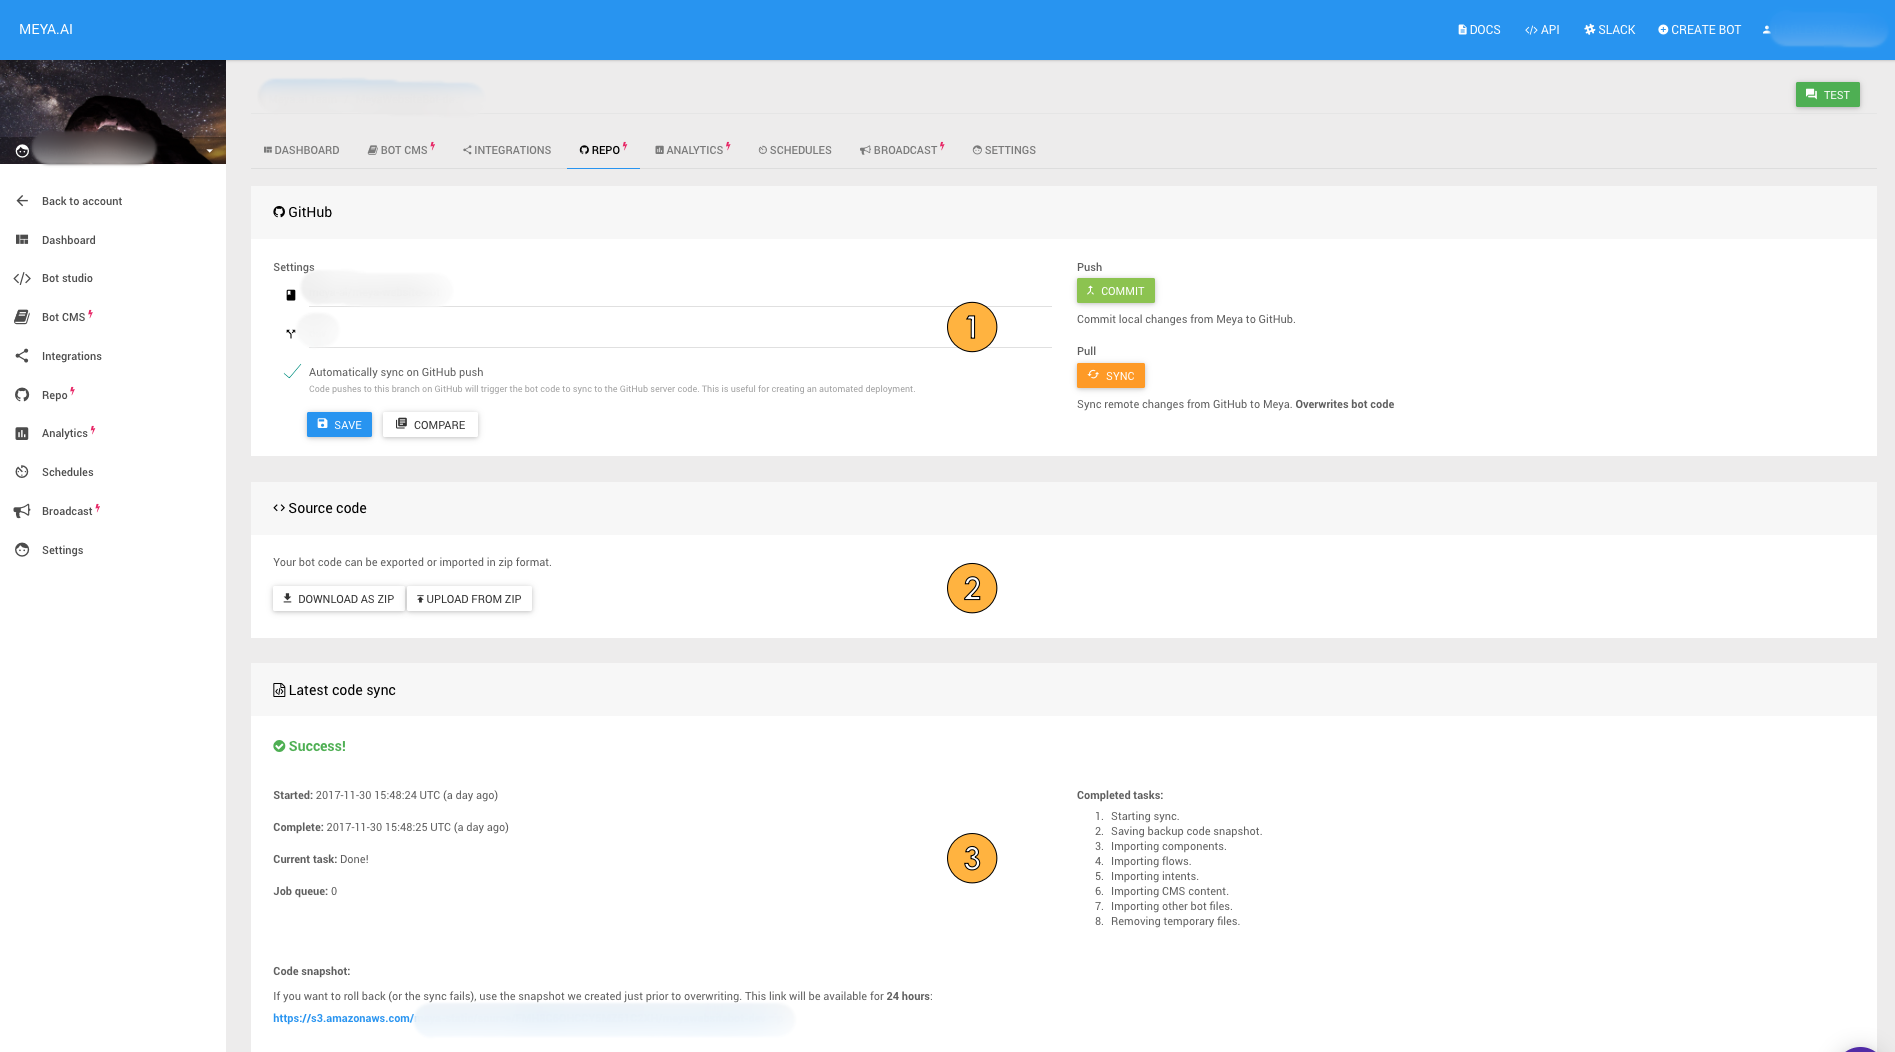
To connect your GitHub account to Meya, go to the Repo tab.
GitGit is a version control tool. If you make a mistake when editing your bot, you can always go back to an earlier working version. You can also create branches to test your new bot code before making it live in production. To learn more about how git can help your bot development process, take a look at the git website.
The Repo tab in the Bot Dashboard.
- Enter your repo and branch information here. Click Save.
You can push code to your repo by clicking the Commit button, update your bot's code from GitHub using the Sync button, and compare your bot's code with the GitHub version. You can even tell your bot to listen for commits made to the repo and automatically sync the changes. - You can download or upload your bot's files here. The directory structure is very important when uploading a ZIP file. Here's how it should look:
components          # Optional
  | component_1.py
  | component_N.py
cms                 # Optional
  | space_1.yaml
  | space_N.yaml
flows               # Required (must contain at least one flow)
  | flow_1.yaml
  | flow_N.yaml
triggers.yaml        # Required
requirements.txt # Optional- When you sync your code from GitHub, or upload a ZIP file, the status of the operation will be displayed here. Large bots can take several seconds to sync or upload. A backup snapshot is always created before loading the new version of the bot. This makes it easy to undo unwanted changes. The backup link is available for 24 hours
The Analytics tab
The Analytics tab is where you can integrate some of the most popular analytics platforms with your bot.
- Each analytics provider has their own settings. For help on how to use these platforms, visit their respective Help pages.
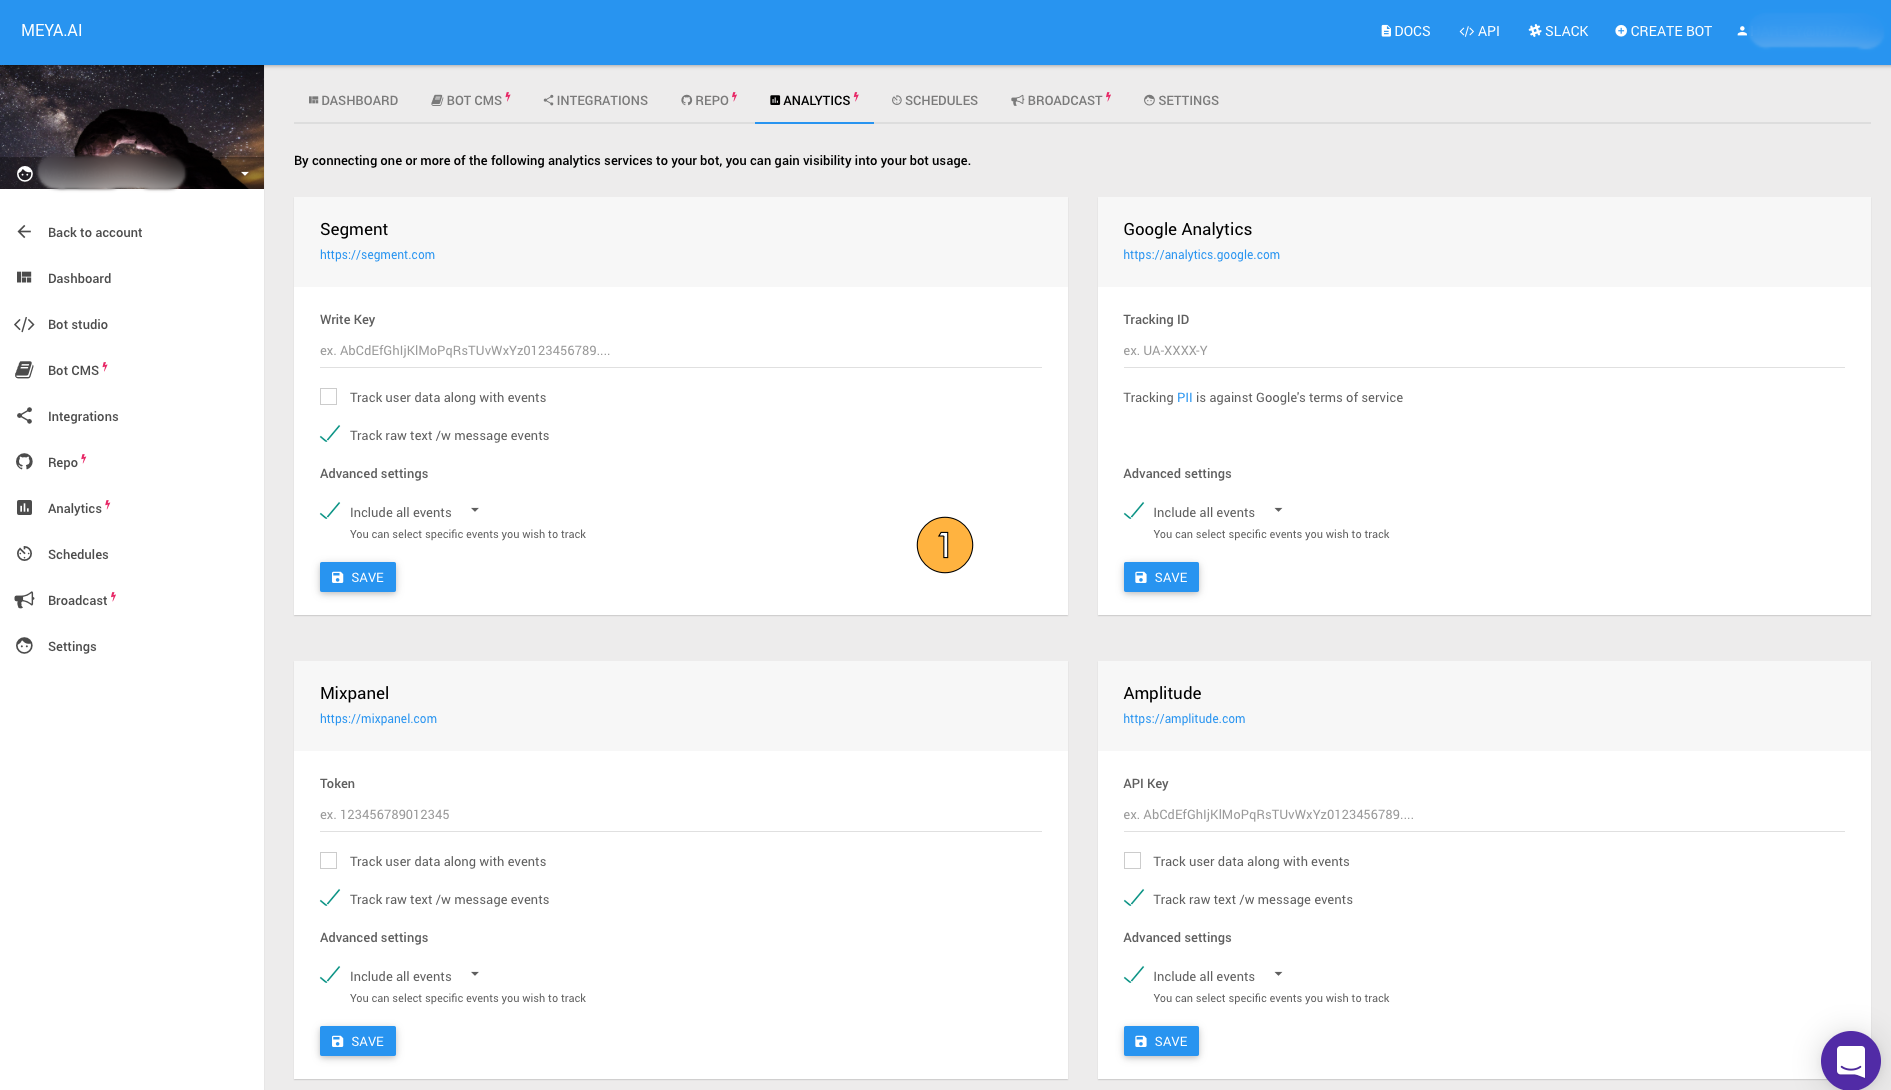
The Analytics tab in the Bot Dashboard.
The Schedules tab
Meya provides built-in components you can use to schedule actions for your users. This can be handy if you want to send content to the user on a daily basis, or send a message if they haven't responded within a certain amount of time, for example. You can see any scheduled actions on the Schedules tab.
- Scheduled actions are logged here. Note that you cannot create scheduled actions from this tab; you create them from within your bot using the meya.schedule component.
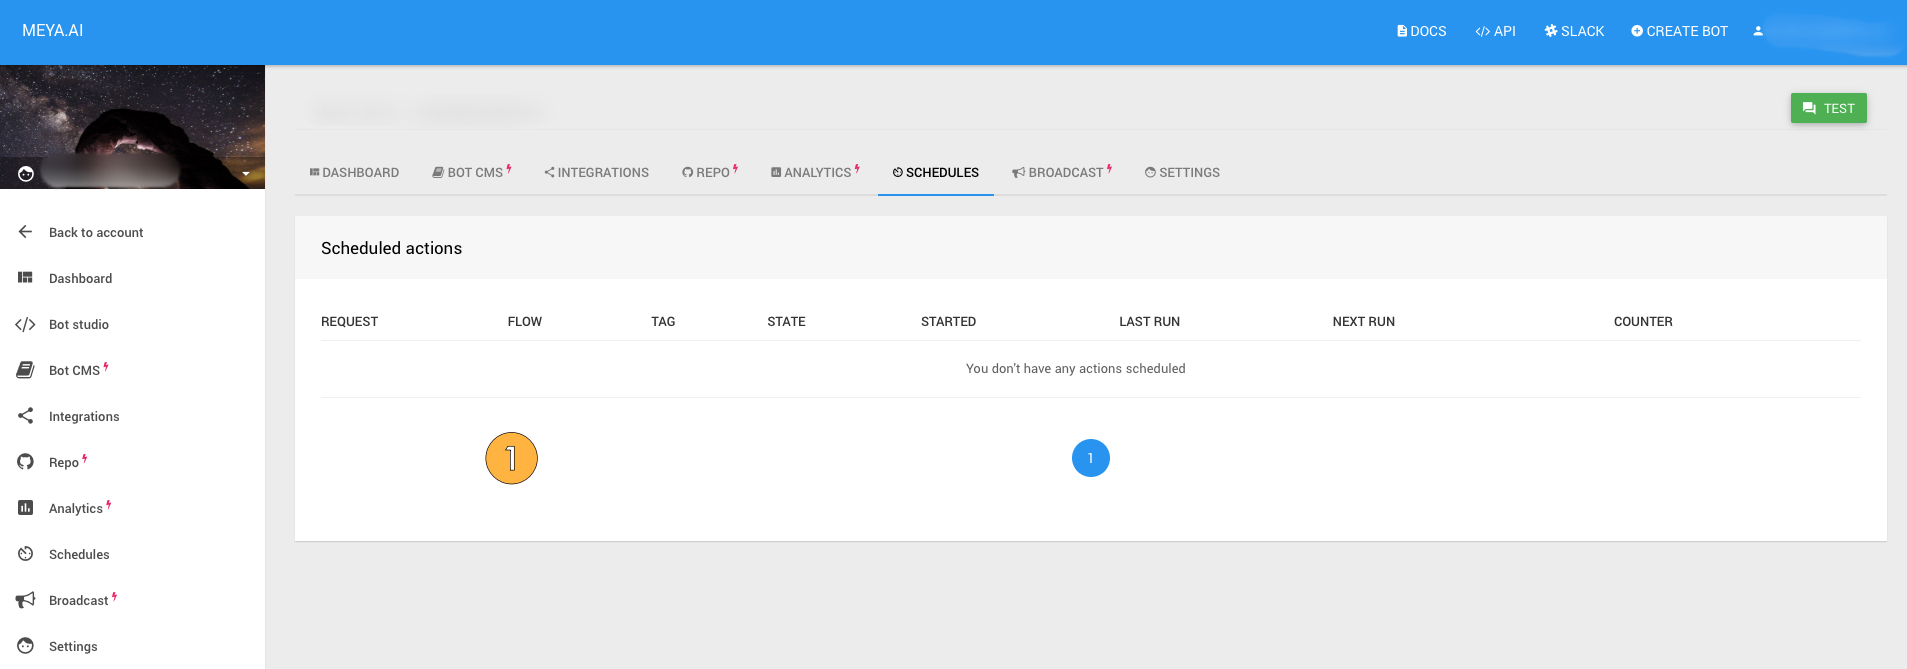
The Schedules tab in the Bot Dashboard.
The Broadcast tab
The Broadcast tab is where you can draft, schedule, and send a flow to a group of users. This is great if you have important information you need to send your users. You can even filter your users based on built-in or custom fields so that your message reaches the right users at the right time.
- Setup a new broadcast by clicking this button.
- Click these tabs to view drafted, scheduled, or sent broadcasts.
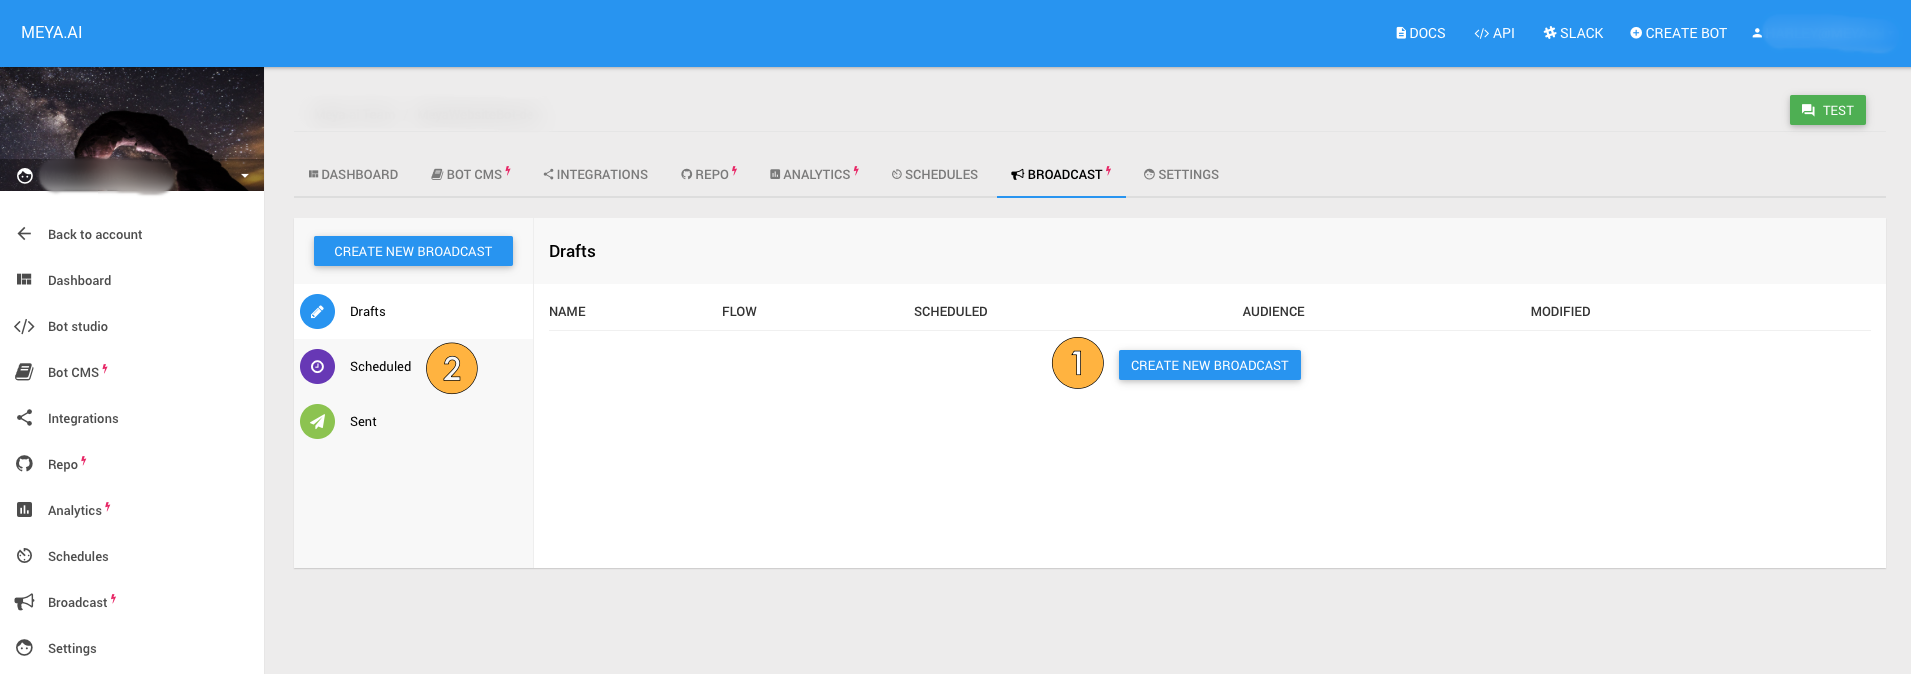
The Broadcast tab in the Bot Dashboard.
The Settings tab
The Settings tab is where you can set general bot information, such as time zone, active hours, and more.
- You can set your bot's name and username here. The username is what appears in the URL.
- You can give your bot a face, or logo, by adding a URL here. Note, the image must be hosted online; you can't upload an image from your computer directly to Meya.
- When checked, your bot is active, meaning it is accessible, and will respond to, users. Unchecking this disables your bot for all users.
Inactive vs PausedAn inactive bot is disabled for all users. This is different from pausing a bot when you're transferring a specific conversation to a human agent. Pausing disables the bot on a per-user basis.
- If you want to share you bot code with the world, check this box. Note that cloning a bot does not give anyone access to your original version of the bot, nor are changes to the original bot pushed to clones of the bot.
- You can set your bot's default language here. If you have multilingual content in Bot CMS, your bot will choose responses in it's native language unless otherwise specified. You can train your bot to understand and speak other languages by using an NLU agent.
- You can define custom variables here that will be available in the
botscope. - If you're specifying active hours for your bot, make sure the timezone is correct.
- You can set when your bot is active by checking this box and setting the daily active times.
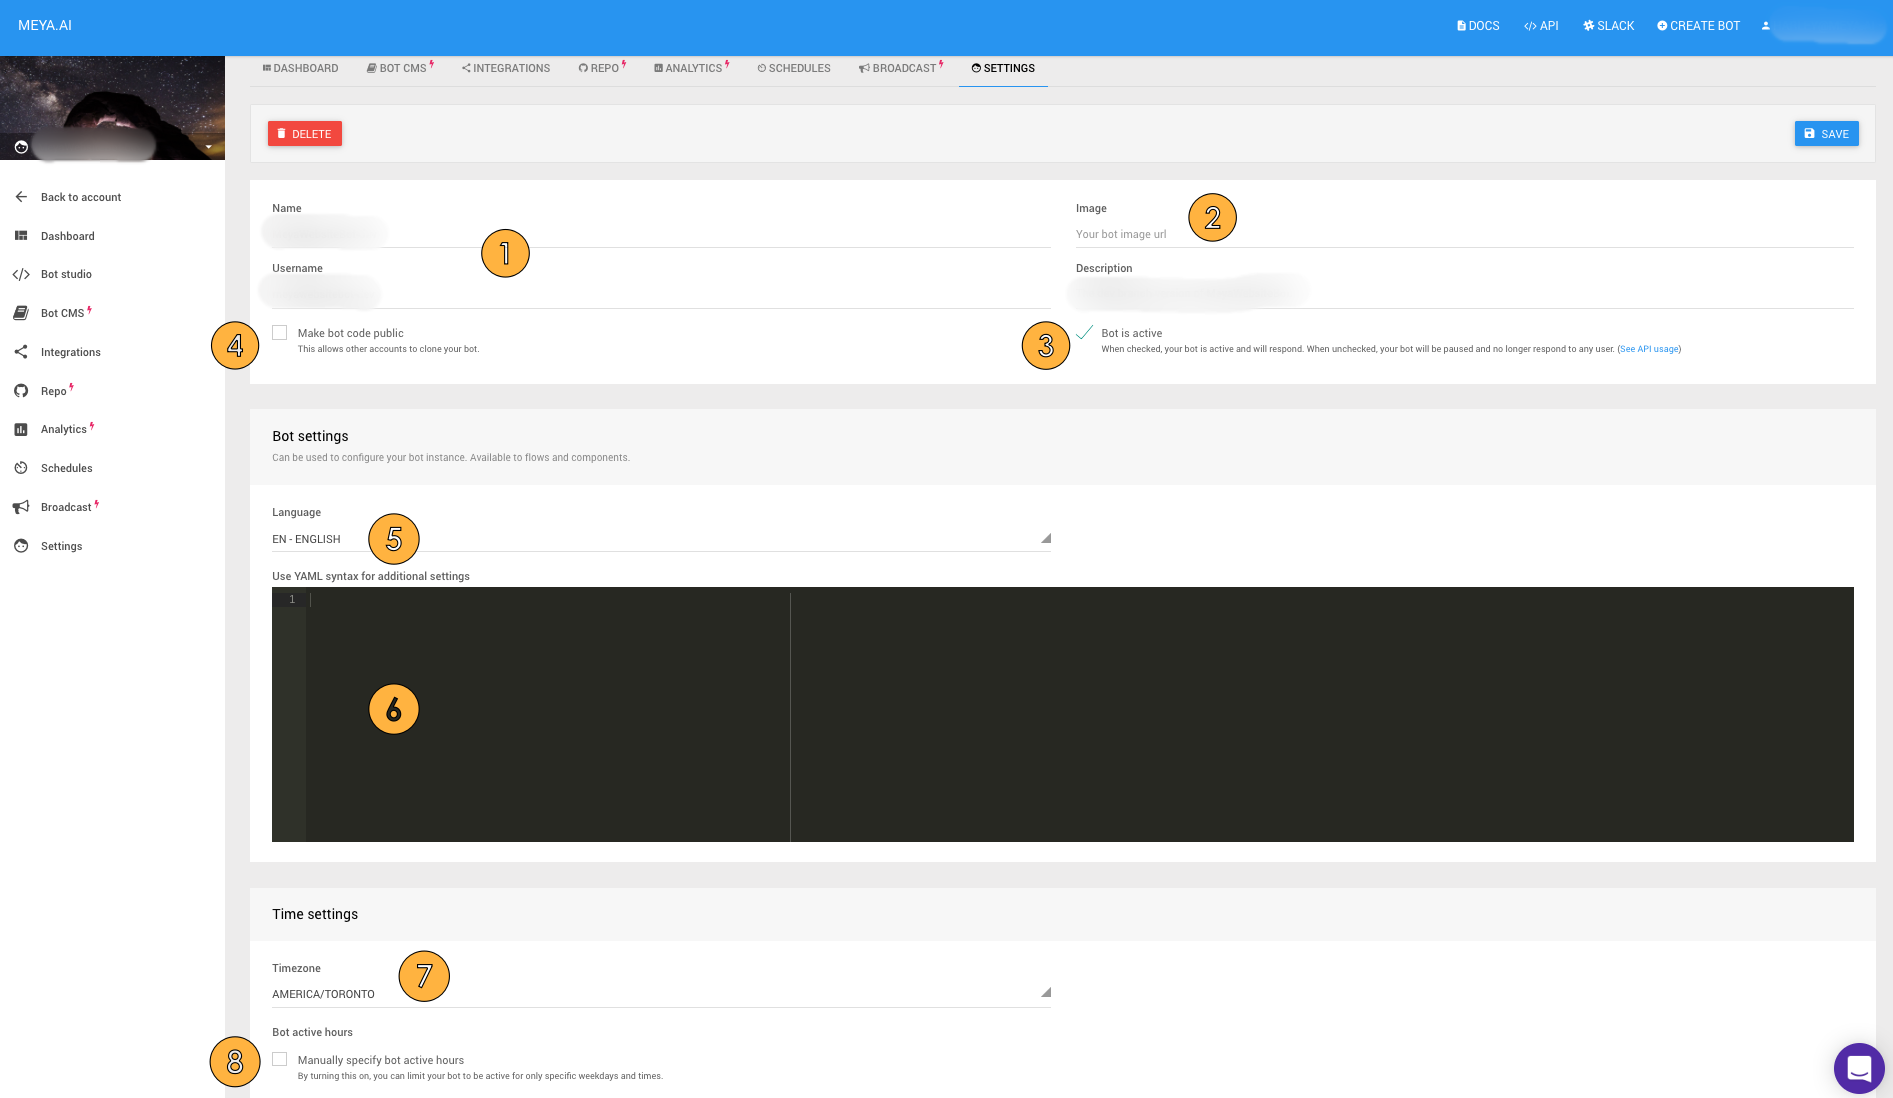
The Settings tab in the Bot Dashboard.
Updated 8 months ago
Now that you're familiar with your bot's dashboard, let's take a look at Bot Studio, Meya's online code editor.
