
Front
How to set up the Front integration
Front's communication hub combines emails, apps, and teammates into a single view so you can make every moment with customers more meaningful.
With the Front integration, you can connect Front to your Meya app and seamlessly pass control of the conversation between the bot and the agent. This guide will show you how.

Video Walkthrough
Create Front API token
First, let's generate an API token so your app can send messages to Front.
In your Front settings, click Plugins & API from the left-hand menu, then choose API. Click the New token button near the bottom of the screen.

Give the token a descriptive name, like Meya, and select all three scopes from the Scopes dropdown menu. Click Create.

Click on the new token to open the token's settings page.

Copy the token somewhere. We'll add it to the app vault in a future step.

Create a bot teammate
The app needs to have a Front user account associated with it.
This Front account needs to be dedicated to the app and should not be shared with other users, like agents or admins.
In your Front settings, select Teammates from the left-hand menu. Click Invite a teammate and go through the process of creating a new teammate.

Make a note of the new teammate's email address since we'll be adding it to the vault in a future step.
Create client token
The client token is a string made up of three values: the app ID, the integration ID, and a client secret.
- The app ID can be found in your app's
.meya/connect.yamlfile, or in the web console on the app's Settings page. - The integration ID is the dot path version of the integration file's location. For example, if the Front integration file is located at
integration/front.yaml, the integration ID isintegration.front. - The client secret should be alphanumeric with a length of 10-20 characters.
To create the client token, combine those three strings using colons :, like this:
client_tokenAPP_IDINTEGRATION_IDCLIENT_SECRET
# Example
client_tokenapp-xxxintegration.frontabcdef123456
Create an inbox channel
- From your Front settings page, select Inboxes from the left-hand menu.
- Click the inbox you want the app to interact with.
- Select Channels tab, then click Add channel.
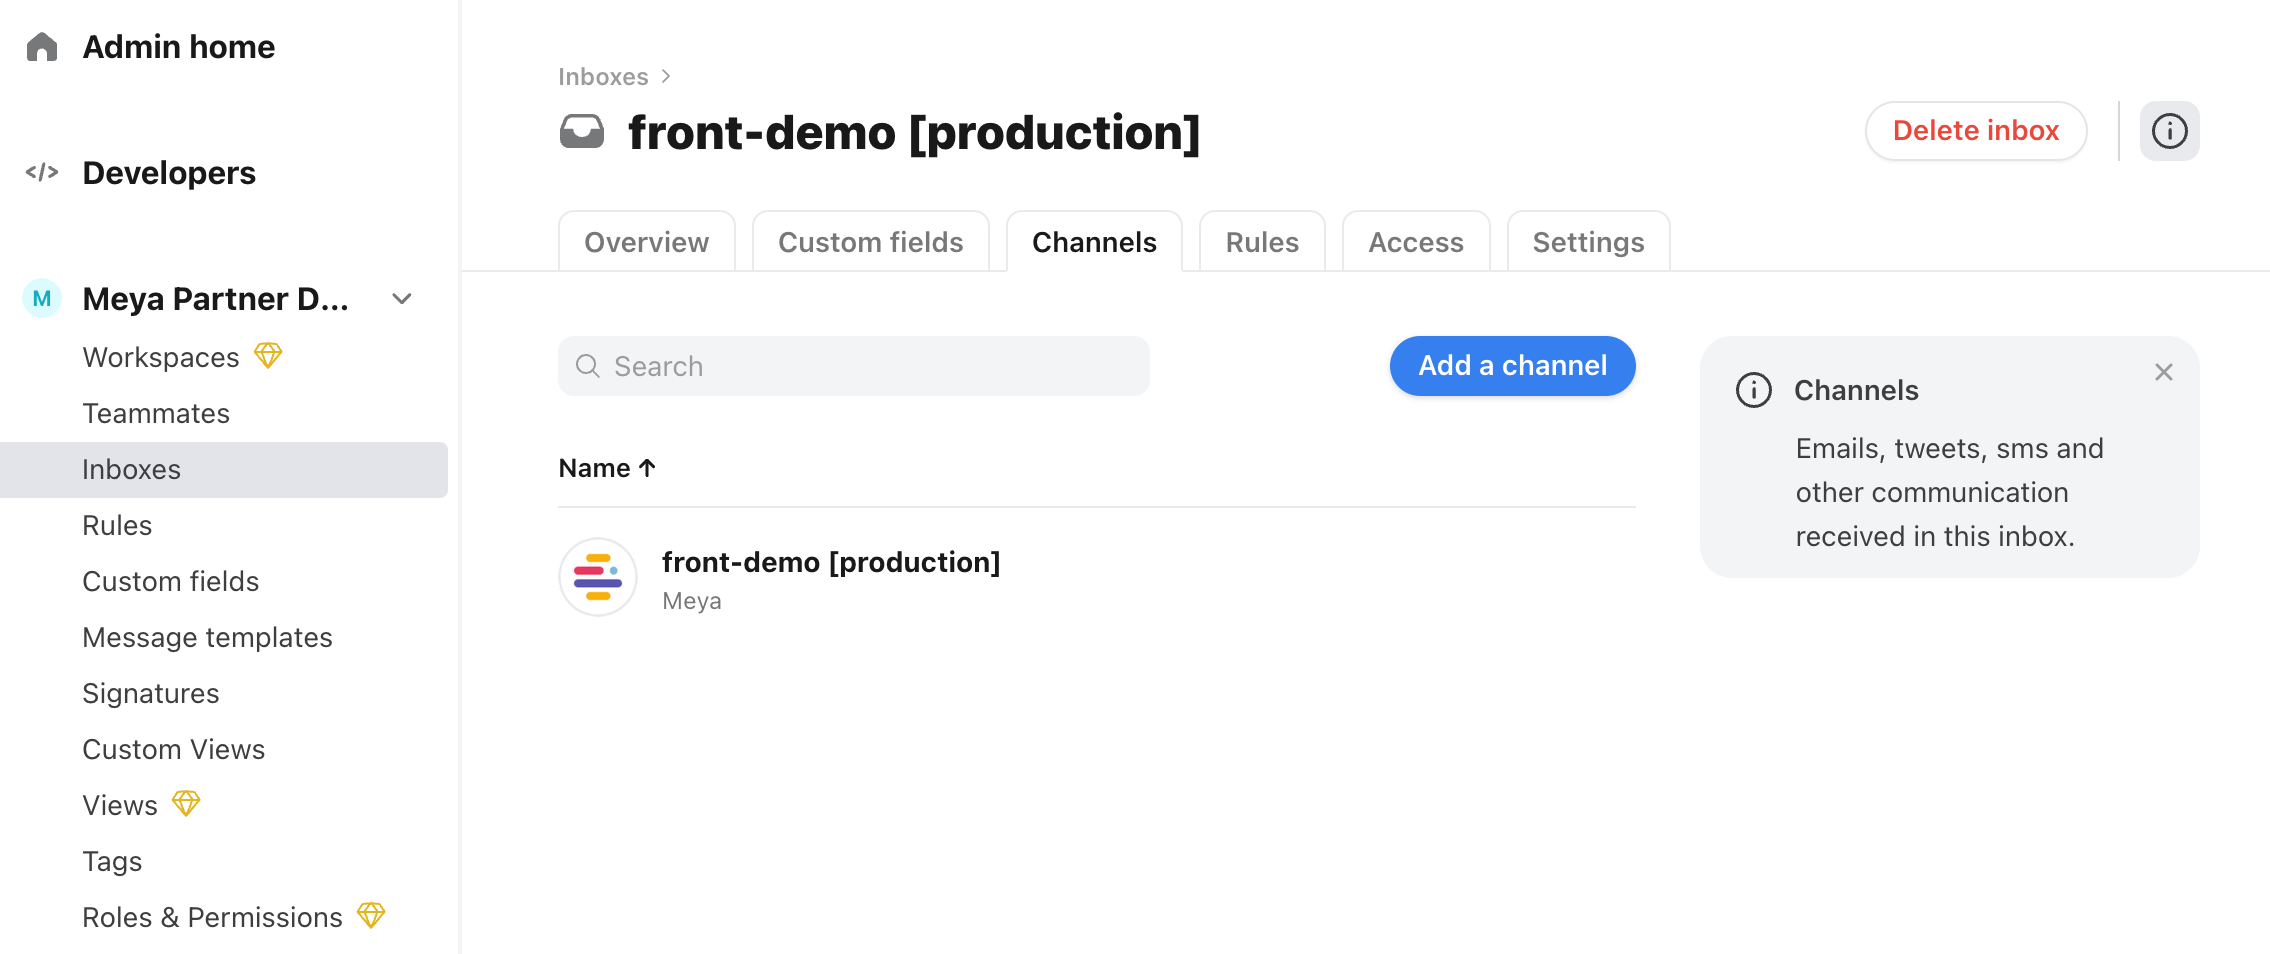
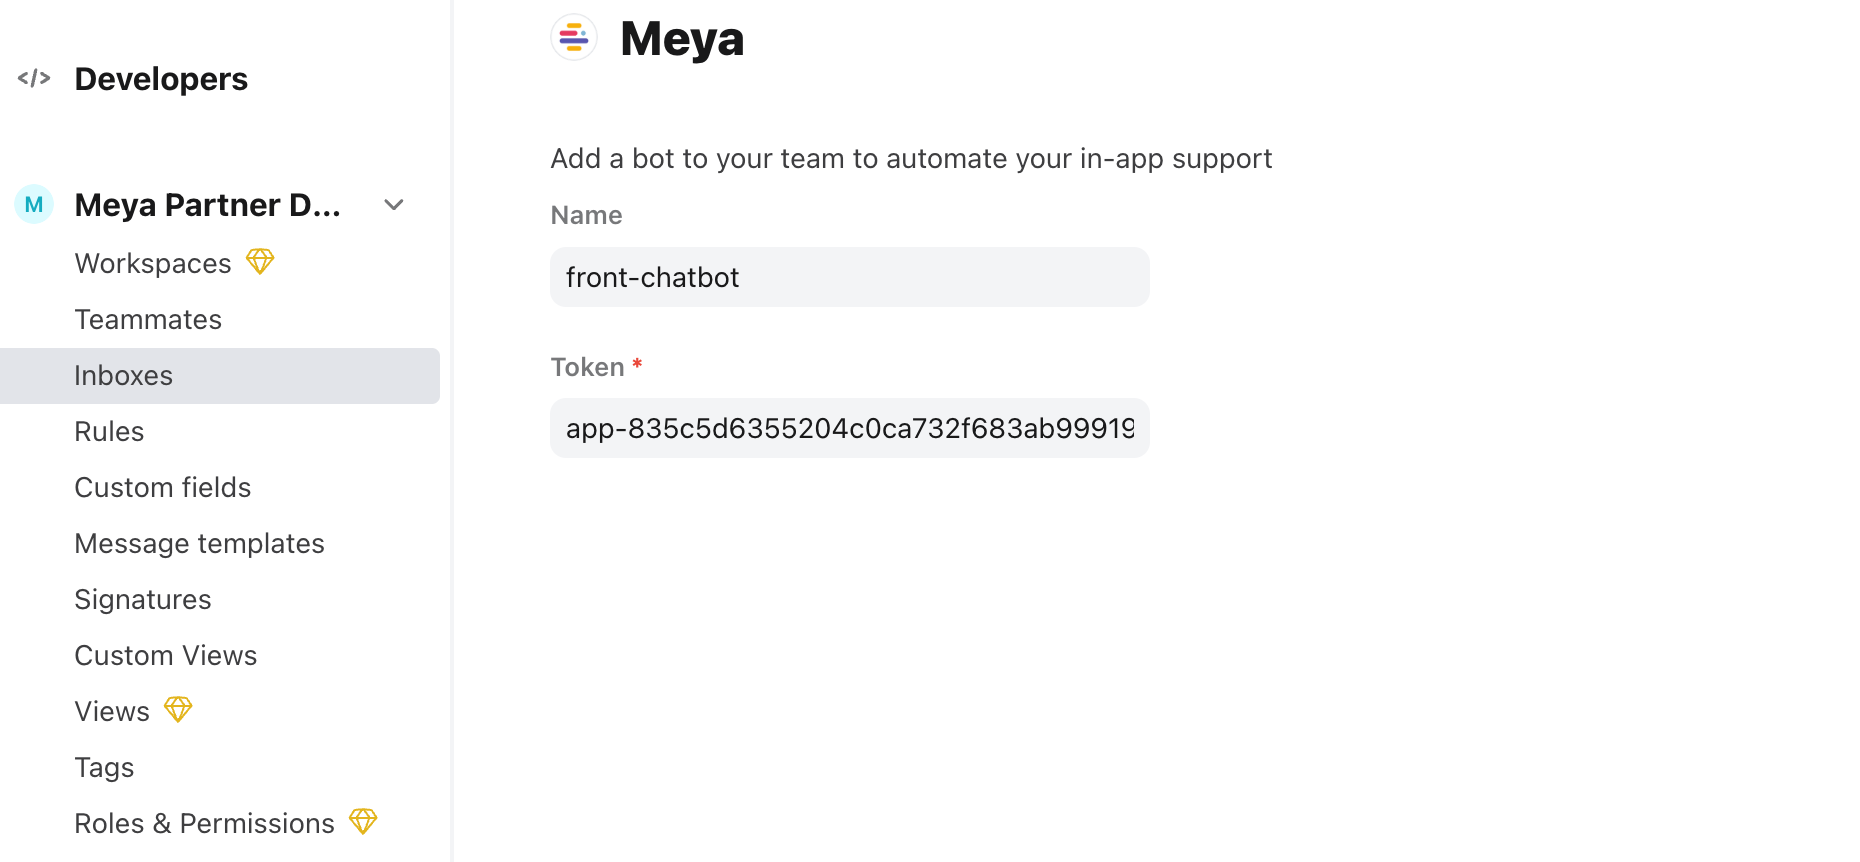
- Select Meya as the channel type.
- Give the channel a descriptive name in the Name field.
- In the Token field, paste the client token you created earlier.
- Click Create at the bottom right of the page.
Once the you have created the new channel, you need to get the channel ID.
- Once you created the channel the channel details page will be displayed.
- You can get the channel ID from the page URL in your browser:
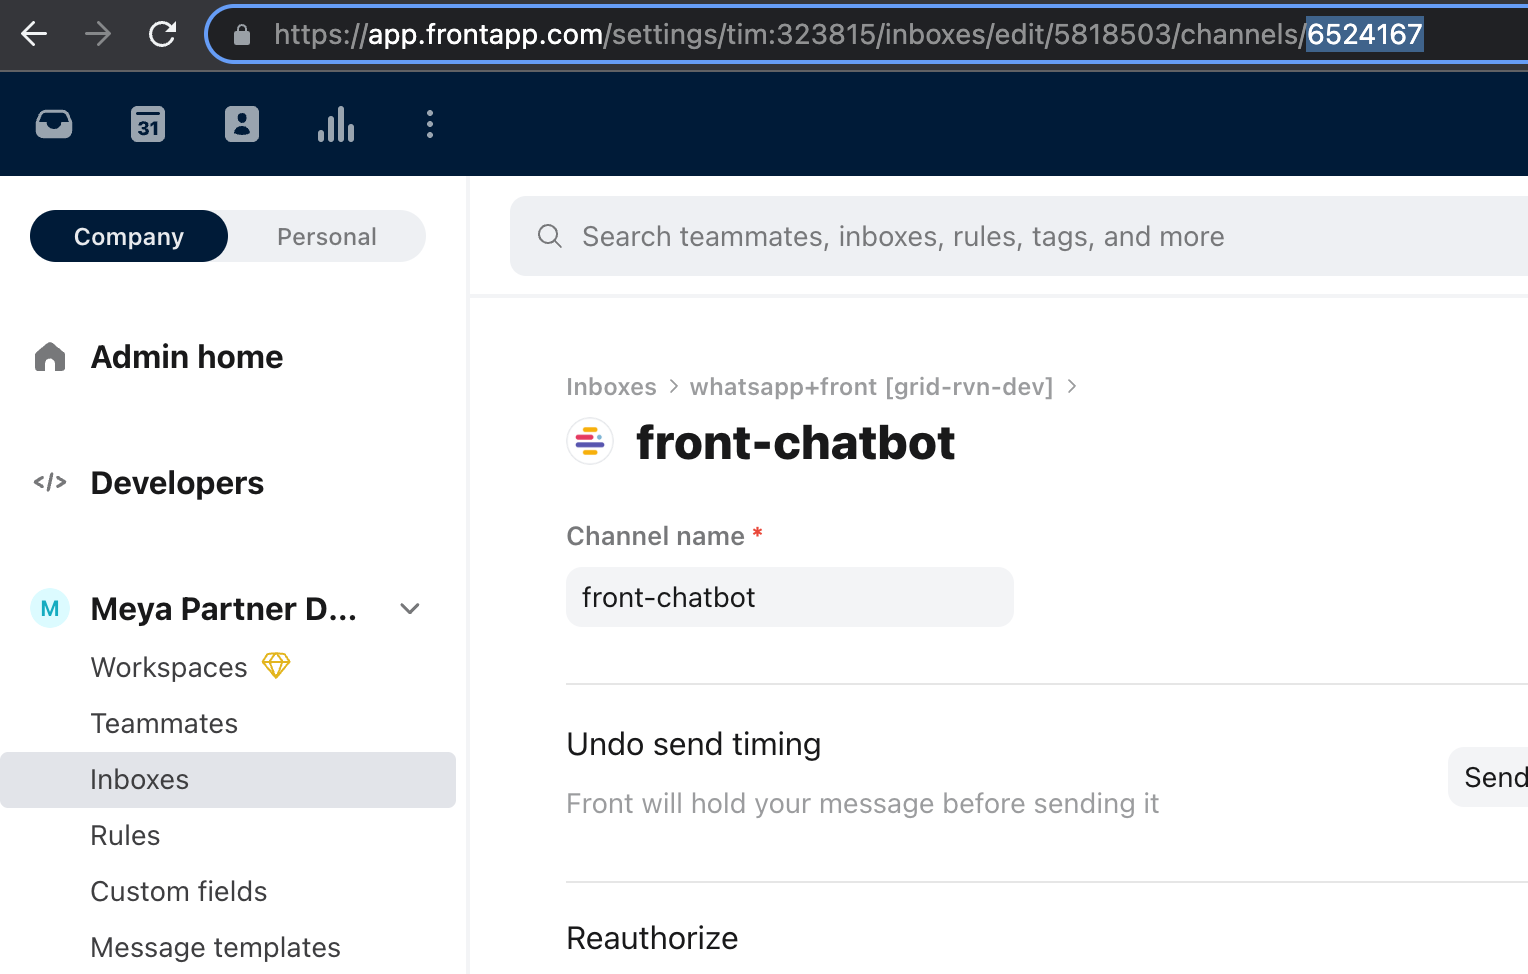
- Copy the channel ID somewhere. We'll add it to the vault in the next step.
Update vault secrets
Now that we have our API token, channel ID, and bot teammate's email address, we can add them to the app's vault.
Add these placeholder lines to your app's vault.yaml file:
front.enabledfalse
front.api_tokenxxx
front.channel_idxxx
front.bot_teammate_emailxxx
front.client_tokenxxx
Remember not to store the actual secrets in
vault.yaml. This file is committed to version control. The actual secrets should be stored invault.secret.yamlas shown below.
In your app's vault.secret.yaml file, copy this code:
front.enabledtrue
front.api_tokenAPI_TOKEN
front.channel_idcha_XXXX
front.bot_teammate_emailEMAIL_ADDRESS
front.client_tokenCLIENT_TOKEN
Make sure to replace the placeholder values with the actual values.
Save the files, then upload your changes to the remote vault by running this command in your terminal:
meya vault upload --file vault.secret.yaml
Create integration
Now that our secrets are in the vault, we're ready to create the integration.
In your app's integration folder, create a file called front.yaml and copy this code into it:
typemeya.front.integration
enabled(@ vault.front.enabled )
api_token(@ vault.front.api_token )
bot_teammate_email(@ vault.front.bot_teammate_email )
channel_id(@ vault.front.channel_id )
client_token(@ vault.front.client_token )
unassign_modeagent
Save your work and upload your code changes by running these commands in your terminal:
meya format
meya push
Retrieve the webhook URL
Now that the integration has been created, we can retrieve the integration webhook URL and add it to Front.
Run this command in your terminal:
meya webhooks
In the output, look for an entry for Front and copy the webhook URL.

Enable webhooks
From the Front settings menu, select Integrations, then choose Webhooks from the list of integrations.
On the Webhooks page, click Settings. Make sure Enabled and Send Full Event Data are both turned on. Click Save.

Add a rule
Now let's create a rule so Front knows when to send an event to the webhook.
Go to your Front settings page and select Rules from the left-hand menu. Click Add a team rule.

Give the rule a descriptive name.
In the When... section, add these triggers:
- Inbound message is received
- New comment is added from any teammate (no body condition)
- Assignee is changed to any teammate
- Assignee is removed
- Any tag is added
- Any tag is removed
- Conversation is archived
- Conversation is reopened
- Conversation is deleted
- Conversation is restored

In the Then... section, add the Send to a Webhook action and paste in your app's Front webhook URL:

At the bottom of the screen, click the Create rule button.
Test it out
Great! We're finally ready to test it out.
Go to your app's simulator in the browser console and try entering some text. You should see a new message appear in your Front inbox. Try replying as an agent and make sure the reply shows up in the simulator.

Awesome! You've finished setting up the Front integration.
Suggested reading: front.conversation.update component
Updated about 2 years ago